
Creating Easy-to-make Christmas elves-Step by Step Tutorial projects is one of the most enjoyable ways to bring festive magic into your home during the holiday season. In this guide, you will learn how to craft adorable elves using simple materials and beginner-friendly techniques. By incorporating the keyword Easy-to-make Christmas elves-Step by Step Tutorial throughout this article, you will not only gain a clear understanding of the process but also enjoy a fully optimized and reader-friendly experience that aligns with Google AdSense policies.
These charming handcrafted elves make perfect additions to your holiday décor, whether displayed on shelves, nestled under the Christmas tree, or used as delightful handmade gifts for friends and family. The best part is that this tutorial is suitable even for beginners, thanks to the humanized approach and simplified instructions. With consistent practice, you will soon discover how satisfying it is to bring these whimsical characters to life while following this Easy-to-make Christmas elves-Step by Step Tutorial.
In the next sections, you will find detailed instructions, tips, and ideas for customizing your elves to match your personal style and Christmas décor. Each step is designed to help you understand not only the crafting process but also how to enhance your results with creative details. Whether crafting alone, with children, or as part of a holiday workshop, this Easy-to-make Christmas elves-Step by Step Tutorial will guide you with ease and inspiration.
Materials You Will Need
To begin this Easy-to-make Christmas elves-Step by Step Tutorial, you will first need to gather all essential materials to ensure your crafting session flows smoothly. Preparing your materials in advance makes the process more organized and enjoyable, especially when working on multiple elves at once. The items listed below can usually be found in your crafting supplies or purchased easily at local craft stores.
A basic set of fabrics or felt sheets in green, red, white, and beige will help you design the clothing and body parts of your Christmas elves. Felt is recommended because it is easy to cut, handle, and sew, making it ideal for beginners. For added charm, consider choosing fabrics with glitter or festive patterns. These small touches can make a big difference in your final result.
You will also need cotton stuffing or fiberfill to bring shape and volume to your elves. This material helps your finished figures remain sturdy and expressive. Small accessories such as buttons, pompoms, ribbons, and miniature bells add character and festive appeal. These extras allow you to personalize each elf, making every creation unique.
Other essential tools include scissors, hot glue or craft glue, sewing needles, and matching thread. If you prefer a no-sew option, glue can replace stitching for most parts of the project. However, sewing provides a more durable and polished finish. As you follow this Easy-to-make Christmas elves-Step by Step Tutorial, choose the method that feels most comfortable for you.
Finally, keep your workspace well-organized and well-lit. Having a clear, clean area makes crafting more enjoyable and reduces mistakes. A small container for storing tiny accessories such as beads or buttons is also helpful. With everything ready, you are now prepared to move on to crafting your adorable Christmas elves.
Step-by-Step Instructions for Crafting the Elves
The heart of this Easy-to-make Christmas elves-Step by Step Tutorial lies in the hands-on creation process. These steps have been thoughtfully structured to guide you through each stage, whether you are a beginner or an experienced crafter. Start by creating the basic shapes that form the body of the elf. Cut two identical pieces of fabric for the body, arms, and legs. These pieces will be stitched or glued together later to create a three-dimensional figure.
Once your pieces are cut, begin assembling the body by stitching or gluing the edges together, leaving a small opening for stuffing. Add fiberfill until the body is firm but still soft to the touch. Be careful not to overstuff, as this can distort the shape. After filling, close the opening securely to maintain the structure.
Next, move to the arms and legs. These limbs can be filled slightly to give them shape or left flat for a more traditional look. Attach them carefully to the body using either glue or thread. Make sure they are positioned symmetrically to create a balanced and appealing character. As you proceed through the Easy-to-make Christmas elves-Step by Step Tutorial, remember that patience leads to the best results.
The head is one of the most expressive parts of the elf. Create a round shape using beige felt for the face, stitching or gluing it closed after adding a small amount of stuffing. Attach the head to the body securely to prevent wobbling. After this, you can begin adding facial details such as eyes, nose, and a cheerful smile. Fabric markers, embroidery thread, or tiny beads work wonderfully for these features.
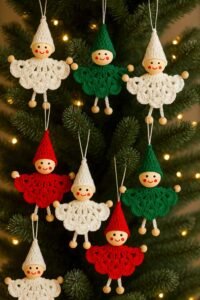
The next step involves designing the elf’s clothing. Cut felt pieces for a hat, tunic, and shoes in festive colors. Red and green are classic Christmas shades, but feel free to experiment with brighter or softer tones to match your holiday palette. Assemble the clothing directly onto the body using glue or stitches. A pointed hat topped with a pompom adds charm and instantly transforms the figure into a classic Christmas elf.
Finally, personalize your elf by adding accessories. Little buttons, miniature bells, ribbons tied around the waist, or glittery accents make each creation special. These small details are what make this Easy-to-make Christmas elves-Step by Step Tutorial so enjoyable and versatile. Customize as much as you like to bring your vision to life.
Creative Ideas to Personalize Your Christmas Elves
One of the best aspects of following an Easy-to-make Christmas elves-Step by Step Tutorial is the creative freedom it offers. You can design elves that reflect your personal style or match your holiday décor theme. Consider making elves with different facial expressions—some smiling, others winking or even sleeping. This brings variety and charm to your final collection.
Color variation is another fun way to personalize your creations. Traditional Christmas colors include deep red and vibrant green, but you can explore pastel tones, gold, silver, or even rustic earth colors. These alternatives work beautifully with more modern or minimalist Christmas decorations, allowing your handmade elves to blend seamlessly into any aesthetic.
Adding textures to clothing is also a wonderful idea. Consider using lace, velvet, or patterned fabrics to give your elves’ outfits more dimension. You can also sew tiny pockets, attach small buttons, or glue mini accessories like candy canes, stars, or faux gingerbread pieces. These little enhancements elevate the overall appearance of your elves.
Another exciting option is to create themed elves. For example, you can make a baker elf holding a tiny rolling pin or a musician elf carrying a miniature instrument. You could even create elf families with different sizes and outfits. This approach adds storytelling to your décor, making your creations even more captivating.
Personalizing hair is another fun detail. Use yarn, embroidery thread, or curly pipe cleaners to craft hairstyles. Choose colors that complement the outfit or go bold with bright, whimsical shades. These little touches bring personality and charm.
Lastly, consider giving each elf a name. Adding a small cardboard tag tied with string creates a sweet final touch that brings your creation to life. This idea also makes your elves perfect as thoughtful handmade gifts filled with meaning and holiday spirit.
Tips to Make Your Crafting Experience Easier
To make the most of this Easy-to-make Christmas elves-Step by Step Tutorial, a few practical tips can help streamline your crafting process. Always begin with clean, sharp scissors. Dull blades can fray your fabric, leading to uneven cuts that affect the final look of your project. Investing in good-quality scissors will make crafting smoother and more precise.
Another important tip is to keep your hot glue gun set at the right temperature. Overheated glue can melt delicate materials, while glue that is too cold may not adhere properly. Always test on a scrap piece before applying it to your project. This prevents unnecessary mistakes and frustrations.
Stitching details can also enhance your elf significantly. Even if you’re not comfortable sewing the entire figure, adding small embroidered accents such as decorative edges or tiny snowflakes gives your elf a polished, handcrafted appearance. These finishing touches highlight the care and detail that went into your creation.
Make sure to work slowly and carefully, especially when attaching small parts like eyes or buttons. These details can shift easily, so taking your time ensures better alignment and a more professional outcome. Using tweezers can help with tiny decorations.
It’s also helpful to prepare several pieces at once if you plan to craft multiple elves. Cutting all the fabric at the beginning speeds up the process and makes assembly quicker and more enjoyable. This is particularly useful if you craft with kids or groups.
Finally, have fun while creating. This Easy-to-make Christmas elves-Step by Step Tutorial is designed to inspire creativity and joy during the holiday season. Allow yourself the freedom to experiment, adjust, and redesign as you go.
Easy-to-Make Christmas Elves
1. Are these Christmas elves suitable for beginners?
Yes, this tutorial is designed for beginners, with simple steps and clear instructions to guide you through the process.
2. What material is best for making the elves?
Felt is recommended because it is easy to cut, does not fray, and is ideal for crafting small decorative figures.
3. Can I make the elves without sewing?
Absolutely. You can use hot glue or craft glue for most parts of the project, though sewing offers more durability.
4. How can I customize my elves?
You can customize colors, accessories, facial expressions, and clothing styles. Small additions like buttons or ribbons add personality.
5. How long does it take to make one elf?
Depending on your experience, each elf takes around 30 to 60 minutes to complete.
6. Are these elves safe for children to play with?
They are safe for decoration but may contain small parts, so they are not recommended for unsupervised play.
Conclusion
Throughout this Easy-to-make Christmas elves-Step by Step Tutorial, you learned how to gather materials, craft the body and clothing, personalize your elves, and add creative finishing touches.
This project offers endless ways to express your creativity while adding festive charm to your home.
I hope these instructions inspire you to explore your imagination and enjoy the crafting process. Please leave your sincere opinion and share suggestions—your feedback helps improve future tutorials and inspires new ideas.