
If you love cozy handmade accessories, then you’ll enjoy this Easy to Make Crochet Hat – Step by Step Tutorial. Crochet hats are a perfect project for beginners and experienced crafters alike, offering a wonderful way to create stylish, functional, and personalized pieces. In this guide, we’ll walk you through the entire process — from choosing the right materials to adding finishing touches. Whether you’re making it for yourself or as a heartfelt gift, this tutorial will help you make a crochet hat that’s both beautiful and comfortable.
Creating a crochet hat can be one of the most rewarding projects you’ll ever attempt. The repetitive rhythm of crocheting is relaxing, and the result is a handmade item that provides warmth and charm. With this Easy to Make Crochet Hat – Step by Step Tutorial, even those who have never held a crochet hook before can follow along and produce something truly special. This project doesn’t require expensive materials or advanced techniques — just patience, creativity, and a bit of yarn magic.
Another reason why this Easy to Make Crochet Hat – Step by Step Tutorial stands out is its adaptability. You can customize your hat’s size, colors, and style to match any personality or season. Whether you prefer a slouchy beanie, a snug cap, or something with a playful pom-pom, this pattern can be easily adjusted to suit your taste. By the end of this guide, you’ll not only have a beautiful crochet hat but also the confidence to tackle more advanced crochet patterns in the future.
Materials and Tools Needed
Before you begin making your Easy to Make Crochet Hat, gather all the necessary materials. Preparation ensures that the crocheting process flows smoothly, allowing you to focus on the creative part. You don’t need to spend much — just a few basic tools and some soft yarn will do the trick.
Start with yarn that feels soft to the touch but holds its shape well. Acrylic yarn is often recommended for beginners because it’s affordable, durable, and easy to handle. Cotton yarns are also great for lighter, breathable hats, while wool is ideal for cozy winter versions. The yarn weight should match your desired texture — thicker yarns work up faster and create warmer hats, while thinner yarns give a more delicate look.
Next, select a crochet hook that corresponds with your chosen yarn. Usually, the yarn label provides a recommended hook size. Using the right hook ensures your stitches are uniform and the hat has the right tension. For most Easy to Make Crochet Hat patterns, a 5mm or 6mm hook is perfect. Keep a pair of scissors and a yarn needle nearby for cutting and weaving in loose ends.
A measuring tape is also essential to ensure your hat fits properly. If you’re making the hat for someone else, measure their head circumference or use standard sizing charts. You might also need a few stitch markers to help you keep track of your rounds, especially if you’re new to crocheting in the round. These small tools make a big difference in maintaining accuracy.
Finally, choose your color scheme. You can stick to one color for a classic look or combine several for a striped or gradient design. The best part of making a crochet hat is how creative you can be — mix and match shades to reflect your personal style or the recipient’s preferences. Once you have everything ready, it’s time to start crocheting your first stitches.
With all your materials and tools in place, you’re set to dive into this Easy to Make Crochet Hat – Step by Step Tutorial. Having everything prepared before you begin helps you stay focused and makes the process more enjoyable from start to finish.
Step-by-Step Instructions to Crochet the Hat
Now that you’re ready, it’s time to follow the steps to make your Easy to Make Crochet Hat. Take your time with each step, especially if you’re new to crocheting. The goal is to enjoy the process while learning valuable skills.
Start by making a slip knot and chaining a foundation row. The number of chains depends on your pattern and the hat size. Typically, for adult hats, you’ll start with around 60 to 80 chains. Join the chain ends to form a loop, making sure the chain isn’t twisted. This will be the base for your hat’s first round.
Next, crochet in the round using basic stitches like single crochet (sc), half double crochet (hdc), or double crochet (dc). Beginners may find half double crochet a great option because it’s easy to master and creates a nice, even texture. Continue crocheting in rounds, increasing as needed to shape the crown of the hat. Once the desired width is reached, continue crocheting evenly until the hat reaches your preferred height.
To make your hat more interesting, consider adding texture or stripes. You can alternate colors every few rows or use different stitch patterns, such as front post and back post double crochets, to create ribbing or raised designs. These details elevate the overall look while keeping the project engaging.
If you want a snug fit around the head, add a ribbed brim. This is done by working rows of single or half double crochet through the back loops only. It creates stretch and helps the hat stay securely in place. Once finished, fold it upward for a polished appearance.
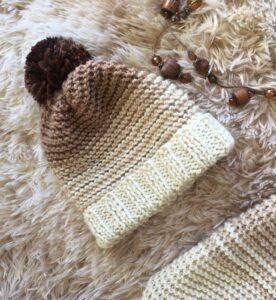
After completing the main body, you can finish the top by gathering the final round of stitches tightly or decreasing gradually in the last few rounds to close it off. Secure the end with a yarn needle and weave in all loose strands. If desired, attach a pom-pom, button, or crochet flower for a decorative touch.
By the end of these steps, your Easy to Make Crochet Hat – Step by Step Tutorial will have come to life. Each stitch you make brings you closer to a unique handmade creation that’s both fashionable and functional.
Customizing Your Crochet Hat
One of the joys of following this Easy to Make Crochet Hat – Step by Step Tutorial is the endless customization possibilities. You can make the pattern truly your own by playing with yarn colors, stitch types, and accessories.
If you love color, try creating striped patterns. Simply switch yarn colors every few rows to form beautiful stripes. Make sure to change colors neatly by completing the last stitch of one color with the next color’s yarn, ensuring smooth transitions without visible gaps.
For those who prefer a more textured design, experiment with different stitches. Using puff stitches, bobbles, or shell stitches can add dimension and character to your hat. These textures not only make your hat visually appealing but also add warmth and coziness.
You can also adjust the fit and style. If you like slouchy hats, just add a few extra rounds to increase the height. For a tighter beanie style, reduce the height slightly. The beauty of crochet is flexibility — there’s no strict rule, and you can adapt it to your liking.
Add some personal touches like a crochet flower, bow, or decorative edging to make your hat unique. Attaching a faux fur pom-pom or tassel can also add a fun and trendy look. Remember that even small embellishments can make your handmade hat stand out.
Don’t forget about functionality. If you live in a colder climate, choose thicker yarns and tighter stitches to keep you warm. For warmer weather, lighter yarns and open stitches will make your hat breathable. Customizing your hat ensures it’s perfect for the season and occasion.
By exploring these variations, your Easy to Make Crochet Hat – Step by Step Tutorial becomes more than just a pattern — it becomes a creative expression of your style.
Tips for Beginners
If you’re new to crochet, this Easy to Make Crochet Hat – Step by Step Tutorial is an ideal starting point. The following tips will help make your experience smoother and more enjoyable.
First, practice your tension. Consistent tension ensures your stitches look even and your hat fits properly. Too tight, and your hat may shrink; too loose, and it might lose shape. Take a few minutes to test your stitches before starting the actual project.
Second, learn to read crochet patterns. Understanding abbreviations like sc (single crochet) or hdc (half double crochet) makes it easier to follow instructions. It may seem confusing at first, but with time and practice, it becomes second nature.
Third, don’t be afraid to make mistakes. Every crocheter, no matter how experienced, has unraveled stitches at some point. Mistakes are part of the learning process, and each one helps you improve your technique.
Always remember to measure as you go. Try the hat on occasionally or use a measuring tape to ensure it’s the right size. It’s easier to adjust mid-project than to fix it after you’ve finished.
Keep your workspace organized. Tangled yarn can be frustrating, so wind your skeins neatly and use stitch markers to track rounds. Staying organized makes crocheting more enjoyable.
Lastly, enjoy the process. Crochet is as much about relaxation as it is about creativity. Put on some music, find a cozy spot, and let your hands work the magic. This project is your chance to unwind and create something you’ll be proud to wear.
FAQ – Easy to Make Crochet Hat
1. How long does it take to make a crochet hat?
It usually takes between two to four hours for beginners, depending on the pattern and yarn thickness. Experienced crocheters might finish even faster.
2. What is the best yarn for crochet hats?
Acrylic and wool yarns are popular choices because they’re warm, soft, and easy to work with. Cotton is great for lightweight, breathable hats.
3. Can I make a crochet hat without a pattern?
Yes, once you understand the basic stitches and shaping, you can freestyle a hat. However, following a tutorial like this one helps beginners stay on track.
4. How do I make my crochet hat fit perfectly?
Measure your head circumference before starting and adjust the stitch count accordingly. Stretchy stitches like ribbing also help ensure a comfortable fit.
5. How do I wash a crochet hat?
Always check your yarn label. Most acrylic hats can be machine washed gently, while wool may need hand washing to prevent shrinking.
6. Can I sell the crochet hats I make?
Absolutely! Handmade crochet hats are popular at craft fairs and online shops. Just make sure to give proper credit if you follow a specific pattern.
Conclusion
By following this Easy to Make Crochet Hat – Step by Step Tutorial, you’ve learned how to create a beautiful, cozy, and personalized crochet hat from start to finish. From gathering materials to customizing the final touches, this guide provides everything you need to make a hat that fits your style and skill level. Crocheting is not just a hobby — it’s a relaxing, creative process that lets you express yourself through handmade art.
Now that you’ve completed your project, take a moment to admire your work. Each stitch represents patience, effort, and creativity. Share your finished hat proudly and consider making more as gifts or to sell.
We’d love to hear your thoughts — please leave your honest opinion and suggestions about this tutorial in the comments below. Your feedback helps improve future guides and inspires others to start their own crochet journey.