
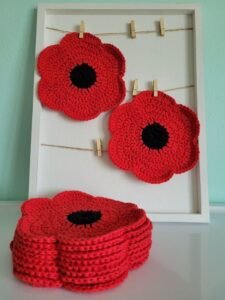
If you’ve been looking for a creative and relaxing project, this Easy to make crochet poppy – Step by Step Tutorial will be your perfect choice. Crochet poppies are not only beautiful but also carry deep symbolic meanings, representing remembrance and peace. Whether you are crafting them for decoration, gifts, or to honor a special date, this guide will help you create stunning poppy flowers with ease. Using only a few basic crochet stitches and vibrant yarn, you can make an everlasting flower that never fades.
Crocheting poppies can be a heartwarming experience, especially for those who love adding handmade charm to their crafts. In this Easy to make crochet poppy – Step by Step Tutorial, you will learn how to create each petal, assemble the flower, and give it that delicate and realistic touch. The best part is that you don’t need to be an expert in crochet. Even beginners can complete this project successfully by following these simple and detailed steps. All you need is a bit of patience and creativity to turn yarn into a beautiful symbol of love and memory.
The versatility of this project makes it a favorite among crocheters worldwide. You can use your finished crochet poppy as a brooch, a keychain, a hair accessory, or even as a part of a bouquet or wreath. With this Easy to make crochet poppy – Step by Step Tutorial, you’ll be able to explore your creativity and learn techniques that will help you with other floral projects as well. So, prepare your hooks, choose your favorite shades of red, black, and green yarn, and let’s start crocheting a poppy that will bloom forever.
Materials You Will Need
Before diving into the process, it’s important to gather all the materials required for this Easy to make crochet poppy – Step by Step Tutorial. Having everything ready will make your crafting time smoother and more enjoyable. For this project, you’ll need a small amount of red, black, and green yarn. Cotton yarn is ideal because it holds the shape well and gives a realistic look to the petals. A size 3.0 mm crochet hook works perfectly for medium-weight yarns, but you can adjust based on your preference.
You will also need scissors to cut the yarn neatly and a yarn needle for weaving in the ends. A small amount of stuffing is optional if you want your poppy center to have a 3D effect. Lastly, a stitch marker can be helpful to keep track of your rounds, especially if you’re a beginner. Before starting, make sure your yarn colors complement each other to make the crochet poppy visually striking.
It’s also useful to have a pattern or visual reference while working. Since this is an Easy to make crochet poppy – Step by Step Tutorial, we’ll explain everything clearly so you can follow along even without a written pattern. Each step builds upon the previous one, and by the end, you’ll have a beautiful flower that looks just like a real poppy.
A quick tip before starting: keep your tension consistent. Loose stitches might make your petals floppy, while tight stitches could make them too stiff. Finding the perfect balance will make your poppy soft yet structured. With your materials ready and your hook in hand, you are all set to start this fun and rewarding project.
Crocheting flowers can be a great way to practice basic stitches while making something truly pretty. In this Easy to make crochet poppy – Step by Step Tutorial, we’ll focus on simple techniques like chain stitches, single crochet, and double crochet. These basic stitches come together beautifully to form the delicate shape of the poppy petals. Once you master them, you’ll be able to create multiple flowers in no time.
Step 1: Creating the Poppy Petals
To begin the Easy to make crochet poppy – Step by Step Tutorial, start with the petals since they form the main body of the flower. Use your red yarn and create a magic ring. Inside the ring, make ten single crochet stitches and pull the ring tight to close the center. This will form the base circle for your poppy petals. Join the round with a slip stitch and chain one to start the next round.
For the second round, crochet two single crochets in each stitch around, ending with twenty stitches. This will expand the base of your flower. In the next rounds, you’ll shape the petals by working in clusters of stitches. For each petal, you can use a combination of single crochet, half double crochet, and double crochet stitches to give it a gentle curve.
A typical poppy has four to five large petals. To create this effect, divide your stitches evenly across the circle and work each petal separately. As you finish each petal, fasten off and weave in the ends neatly. Remember that the petals should overlap slightly, just like real flowers. This layering adds dimension and makes your crochet poppy look realistic.
If you prefer a ruffled effect, you can slightly increase the number of stitches in each petal. This technique gives the flower a fuller look. You can also play with different shades of red to give your poppy a more natural and artistic appearance. Once your petals are done, set them aside while you work on the center.
The beauty of this Easy to make crochet poppy – Step by Step Tutorial lies in the small details. Each petal contributes to the final charm of the flower, so take your time shaping and arranging them. When all petals are complete, you can assemble them around the black center for a stunning final result.
Step 2: Making the Poppy Center
Now it’s time to crochet the poppy’s signature black center. In this part of the Easy to make crochet poppy – Step by Step Tutorial, use your black yarn and create a magic ring. Inside the ring, make six single crochet stitches. Pull the ring tight and join with a slip stitch. In the next round, make two single crochet stitches in each stitch to have twelve stitches in total.
For a raised effect, you can add one or two more rounds, increasing evenly around the circle. To give your poppy center texture, use a few slip stitches on top, creating small ridges that resemble the natural pattern of a real poppy. Some crocheters like to add a few small French knots in green or dark brown yarn to enhance the detail.
Once the center is complete, leave a long tail for sewing. Place the black circle in the middle of your red petals and sew it securely using the yarn needle. Make sure the petals are evenly spaced around the center, adjusting as needed. This will give your crochet poppy a professional and balanced look.
If you want to make your poppy stand out, you can lightly stuff the center before sewing it in place. This gives it a soft, rounded appearance. Be careful not to overfill it, or it might look bulky. Just a small amount of stuffing will do the trick.
Take your time with this step. The center is the focal point of your Easy to make crochet poppy – Step by Step Tutorial, and adding these finishing touches can make a huge difference in the final result. Once you’re happy with how it looks, move on to the next step—adding the stem and leaves.
Step 3: Adding the Stem and Leaves
No flower is complete without a touch of greenery! In this section of the Easy to make crochet poppy – Step by Step Tutorial, you’ll learn how to crochet a simple stem and a couple of leaves to complete your flower. Use your green yarn and make a long chain, about 15 to 20 stitches, depending on how long you want the stem. Work a row of single crochet stitches back down the chain to make it thicker.
For the leaves, chain ten stitches and then work single crochets, half double crochets, and double crochets in sequence along the chain to create a leaf shape. Repeat the same pattern on the opposite side of the chain to make the leaf symmetrical. You can make one or two leaves for a natural touch.
Once your leaves and stem are done, attach them to the back of the poppy using a yarn needle. Make sure they are firmly sewn to ensure durability. If you’re planning to use the poppy as a brooch or keychain, you can shorten the stem slightly.
This step is where your flower truly comes to life. The green details add a lovely contrast to the vibrant red petals and dark center, making your crochet poppy look complete and realistic. You can even stiffen the leaves slightly using fabric glue or starch if you want them to hold their shape better.
The beauty of crochet is that you can always customize it. Feel free to experiment with different shades of green or add multiple leaves for a fuller look. Once everything is sewn together, your Easy to make crochet poppy – Step by Step Tutorial is almost complete!
Step 4: Assembling and Finishing Touches
Now that all your parts are ready, it’s time to assemble everything. Arrange your petals around the center until you’re happy with how they look. Sew each petal securely to the center, making sure they overlap naturally. Once attached, add your stem and leaves to the back of the flower.
If you want to turn your crochet poppy into an accessory, this is the perfect time to do so. You can sew a safety pin on the back to make a brooch or attach a small metal ring to create a keychain. The lightweight design makes it easy to use in different ways.
Adding a few final touches can make your project even more beautiful. You might consider adding a light touch of shimmer yarn for extra shine or a dab of fabric glue to secure small details. Each addition enhances the uniqueness of your handmade poppy.
Once finished, trim any excess yarn and check that everything is secure. Your poppy should look vibrant, soft, and full of charm. This Easy to make crochet poppy – Step by Step Tutorial is a wonderful way to create a timeless piece that carries meaning and beauty.
Display your new creation proudly or gift it to someone special. Handmade items like this always carry love and thoughtfulness, making them truly priceless.
FAQ
1. Can beginners follow this Easy to make crochet poppy – Step by Step Tutorial?
Yes! This tutorial is perfect for beginners. It uses basic stitches like single crochet, double crochet, and slip stitch, all explained in a simple way.
2. What type of yarn works best for crochet poppies?
Cotton yarn is ideal because it gives a clean, defined look. However, you can also use acrylic yarn for a softer texture.
3. How long does it take to make one crochet poppy?
Depending on your experience level, one poppy usually takes about one to two hours to complete.
4. Can I use these crochet poppies for decoration?
Absolutely! They look lovely as brooches, hair clips, keychains, or even as part of a larger wreath or bouquet.
5. How do I clean my crochet poppy?
It’s best to hand wash gently in cold water and let it air dry to maintain the flower’s shape and color.
Conclusion
In this Easy to make crochet poppy – Step by Step Tutorial, you learned how to create a beautiful poppy flower from start to finish.
From shaping the petals to adding the final touches, each step helps you craft a meaningful and stunning handmade piece. Crochet poppies are not only decorative but also rich in symbolism and perfect for heartfelt gifts.
If you enjoyed this tutorial, I’d love to hear your honest opinion! Leave your feedback and suggestions about this Easy to make crochet poppy – Step by Step Tutorial—your thoughts help improve and inspire new creative ideas.