
If you love adorable and simple crochet projects, this Easy to Make Mini Rabbit Applique – Step by Step Tutorial is perfect for you. Small crochet appliqués are fun to make, quick to complete, and perfect for adding a cute touch to various handmade items. Whether you’re looking to decorate baby blankets, clothing, bags, or even Easter crafts, this mini rabbit applique will instantly add charm and personality to your work. With just a little yarn, a crochet hook, and creativity, you can bring this delightful bunny design to life.
Creating a mini rabbit applique is a fantastic project for beginners and experts alike. It requires only basic crochet stitches, so even if you’re new to crocheting, you’ll find it enjoyable and easy to follow. This project is also a great way to use leftover yarn from other creations. With this step-by-step tutorial, you’ll learn how to shape the bunny’s head, ears, and body, and how to sew or glue the applique onto different surfaces. The best part is that you can customize your bunny with different colors, embellishments, or even tiny bows to make it unique.
This Easy to Make Mini Rabbit Applique – Step by Step Tutorial will guide you through each step clearly and carefully. From gathering your materials to finishing the final touches, you’ll have a cute and perfectly shaped rabbit applique ready to use or gift. Whether you want to make one or a whole set of colorful bunnies, this guide will help you achieve professional results in a simple, stress-free way. So, grab your crochet hook and let’s start creating this adorable mini rabbit together!
Materials You’ll Need for the Mini Rabbit Applique
Before you begin your Easy to Make Mini Rabbit Applique – Step by Step Tutorial, it’s important to prepare all the necessary materials. The great thing about this project is that it doesn’t require much—just a few basic crochet supplies and your favorite yarn colors.
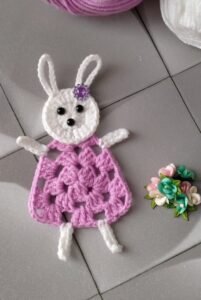
Start by choosing a soft, lightweight yarn. Cotton yarn is an excellent choice for appliqués because it provides a smooth and defined texture. You can also use acrylic yarn if you prefer a softer, fluffier look. For a realistic effect, light gray, white, or pastel pink shades work beautifully. However, don’t be afraid to experiment with bright or multicolored yarns for a fun twist.
Next, select a crochet hook that matches your yarn’s weight. Usually, a 2.5mm to 3.5mm hook works perfectly for small appliqués. A smaller hook helps maintain tight stitches, keeping your bunny shape neat and well-defined. You’ll also need a yarn needle for weaving in ends and assembling small parts, along with scissors for trimming excess yarn.
Optional accessories can enhance your project’s charm. For example, you can use small beads for the eyes or a tiny pink button for the nose. If you prefer a fully crocheted look, you can embroider these details instead. You might also want some fabric glue if you’re attaching the applique to items that can’t be stitched.
Finally, gather a few extra supplies like a stitch marker, which helps you keep track of your rounds, especially when making the rabbit’s body. Having everything ready before you start ensures a smooth, enjoyable crochet session without interruptions.
Step by Step Tutorial: Making the Mini Rabbit Applique
Now let’s begin the Easy to Make Mini Rabbit Applique – Step by Step Tutorial. We’ll start with the bunny’s body and then move on to its head and ears. Each step is simple and fun, even for beginners.
Begin with a magic ring, which will serve as the center of your rabbit’s body. Chain one, then make six single crochets into the ring. Pull the ring tight to close it. In the second round, make two single crochets in each stitch for a total of 12 stitches. Continue with one single crochet in the first stitch and two in the next around the third round, gradually increasing until the circle reaches the size you want for the body.
Once the body is complete, fasten off the yarn and leave a long tail for sewing. Now it’s time to make the head. Start with another magic ring and repeat a similar pattern but make the circle slightly smaller than the body. This will give the bunny its characteristic proportion with a round body and a smaller head.
After finishing the head, crochet the ears. Chain 6, then single crochet in the second chain from the hook, half double crochet in the next two stitches, and double crochet in the last two. This creates a long, narrow shape. Repeat for the second ear. You can make the ears slightly different in size or shape for a playful, handmade look.
Sew or glue the ears to the top of the head, and then attach the head to the body. Once assembled, your mini rabbit is almost complete. Add the final touches like small embroidered eyes, a nose, or a tiny bow on the neck. These details bring your bunny to life and make it irresistibly cute.
Decorating and Using Your Mini Rabbit Applique
Once your Easy to Make Mini Rabbit Applique – Step by Step Tutorial is complete, the fun part begins—decorating and using your adorable bunny creations! These appliqués can be used in many creative ways, making them a versatile and delightful addition to your crafts.
One of the most popular uses is adding them to baby blankets, hats, or clothes. The rabbit design adds a sweet and playful touch, perfect for baby gifts or nursery décor. You can make a few in different pastel colors and sew them in a line across a blanket or pillowcase.
They’re also wonderful for decorating bags, tote purses, or even keychains. Attach your mini rabbit to a small ring or clip, and you’ll have a cute accessory to carry everywhere. They make great handmade gifts that show creativity and care.
Another fun idea is to use these appliqués as part of your seasonal decorations. For example, during Easter, you can glue several mini rabbits onto greeting cards, baskets, or garlands. Mix them with crocheted flowers or eggs to create a festive, colorful look.
If you enjoy selling handmade crafts, mini rabbit appliqués are great for your shop or craft fair booth. They’re small, quick to make, and highly appealing to buyers. You can create themed sets, such as spring animals or Easter bunnies, and package them beautifully.
Finally, don’t forget to photograph your creations! Sharing your mini rabbit applique on social media or in crafting communities can inspire others and help you connect with fellow crocheters. It’s always rewarding to see how one simple pattern can spread creativity and joy.
Tips and Tricks for Perfecting Your Mini Rabbit
As you practice this Easy to Make Mini Rabbit Applique – Step by Step Tutorial, you’ll discover small adjustments that make your project even better. Here are some helpful tips to perfect your mini rabbit and achieve beautiful results every time.
First, pay attention to your stitch tension. Keeping your stitches consistent ensures that your rabbit’s shape stays even and balanced. If your stitches are too loose, the applique may look floppy; too tight, and it might curl up. Practice finding the right balance.
Second, block your finished applique if necessary. Gently dampen it, shape it with your hands, and let it dry flat. This helps smooth out uneven edges and makes your rabbit look professional. Blocking is especially useful if you plan to sew it onto flat surfaces.
You can also play with textures and yarn types to give your bunny a unique appearance. For example, using fluffy yarn can make it look soft and realistic, while using metallic or glitter yarn adds a touch of sparkle.
If you’re making multiple appliqués, consider varying their sizes. Smaller rabbits look adorable on baby socks or hats, while larger ones are perfect for bags or wall decorations. Adjusting your hook size or yarn thickness makes it easy to scale the pattern.
Color combinations can make a big difference too. Traditional white or gray rabbits are lovely, but pastel pink, blue, or even rainbow bunnies are just as charming. Don’t be afraid to get creative—crochet is about expressing your personal style!
Lastly, take your time with the finishing touches. Carefully weave in all yarn ends and securely attach the small parts. A neat finish elevates your work from cute to professional, ensuring your mini rabbit applique looks perfect from every angle.
FAQ
1. Is this mini rabbit applique suitable for beginners?
Yes! This Easy to Make Mini Rabbit Applique – Step by Step Tutorial uses only basic stitches like single crochet, half double crochet, and double crochet. Even beginners can follow it easily.
2. How long does it take to make one rabbit applique?
It usually takes between 20 to 40 minutes to complete, depending on your crochet speed and the size you choose.
3. What type of yarn is best for this project?
Cotton yarn is ideal because it provides a clean finish, but acrylic yarn works well too if you want a softer texture.
4. Can I wash the crochet appliqué?
Yes, but it’s best to hand wash it gently with mild soap and cold water, then let it air dry to preserve its shape.
5. How do I attach the applique to fabric?
You can sew it with matching thread using small stitches or use fabric glue for a quick, no-sew option.
6. Can I sell my finished mini rabbit appliqués?
Absolutely! Handmade appliqués are popular at craft fairs and online markets. Just make sure to take clear photos and package them nicely.
7. Can I modify the design?
Of course! You can add accessories like bows, flowers, or even tiny pom-poms for the tail to personalize each bunny.
Conclusion
This Easy to Make Mini Rabbit Applique – Step by Step Tutorial is a delightful project that combines simplicity, creativity, and charm. With just a few materials and some basic stitches, you can create adorable bunny designs perfect for decorating clothes, accessories, or home décor. Whether you make them for personal use, gifts, or to sell, these mini rabbits will bring smiles wherever they go.
Throughout this tutorial, you’ve learned how to shape, assemble, and decorate your crochet bunny in a way that’s easy to follow and fun to do. The possibilities for customization are endless—each mini rabbit can reflect your style and creativity.
Now that you’ve mastered this cute project, it’s your turn to pick up your hook and start crafting your own little bunnies! I’d love to hear your thoughts—please share your honest opinion and suggestions about this tutorial. Did you enjoy making your mini rabbit applique? Your feedback helps make future tutorials even better and inspires others to join the wonderful world of crochet!