
If you love crochet and handmade accessories, this Easy to make rose flower keychain – Step by Step Tutorial is the perfect project to try. This beautiful and practical piece combines creativity, color, and functionality in a small but eye-catching item. Whether you are a beginner or an experienced crafter, you can make this adorable keychain in no time and enjoy the process from start to finish. Plus, it’s an ideal gift for friends or a lovely item to sell at craft fairs.
The rose flower keychain is not only cute but also incredibly versatile. You can attach it to your bag, purse, backpack, or car keys to give your accessories a touch of handmade charm. Using only a few materials and simple crochet stitches, you can create something that looks elegant and professional. This step by step tutorial will guide you through every stage, ensuring your final piece is both sturdy and stylish.
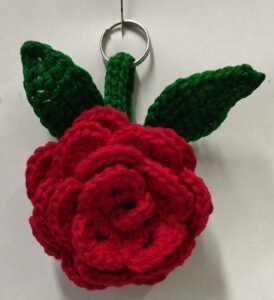
In this tutorial, you’ll learn how to crochet the rose petals, assemble them into a full bloom, and attach them securely to a keychain ring. We’ll also cover some tips for choosing the best yarn, color combinations, and finishing touches. By the end of this guide, you’ll be able to create your own unique rose flower keychain, perfect for personal use or as a thoughtful handmade gift. Let’s get started and bring this charming crochet flower to life!
Materials Needed for the Easy to Make Rose Flower Keychain
Before starting this Easy to make rose flower keychain – Step by Step Tutorial, it’s essential to gather all your materials. Having everything ready will make the process smoother and more enjoyable.
You’ll need cotton yarn in your favorite color for the petals and a bit of green for the leaves. Cotton yarn works perfectly for keychains because it’s durable, doesn’t fray easily, and holds the shape of the flower beautifully. You can also experiment with acrylic yarn if you prefer a softer texture.
Next, you’ll need a crochet hook suitable for your yarn weight—usually a 2.5mm or 3mm hook for fine cotton thread. A smaller hook helps the stitches stay tight and neat, making your keychain more compact and long-lasting.
You’ll also need a metal keychain ring or lobster clasp to attach the finished flower. You can find these in craft stores or online in different sizes. Choose one that’s sturdy and easy to open so you can securely fasten it to your keys or bag.
In addition to yarn and hooks, prepare a yarn needle to sew the pieces together, and scissors to trim any loose ends. A little bit of polyfill or leftover yarn can be used to add volume if you want a puffier flower.
Once all materials are gathered, you’re ready to start crocheting. Having your supplies neatly organized will make this project fun and relaxing, perfect for a quiet afternoon or weekend activity.
Step-by-Step Instructions to Crochet the Rose Flower
Now that you have all the materials, let’s begin the Easy to make rose flower keychain – Step by Step Tutorial. This part will guide you through crocheting the base, petals, and assembling your rose.
Start by making a foundation chain of about 50 stitches. This chain will be the base of your rose, so make sure it’s long enough to roll into a flower later.
In the second chain from the hook, make a single crochet (sc), then continue with a combination of single and double crochets to form texture. For example, you can alternate between 3 double crochets and 1 single crochet across the row. This variation will naturally create a ruffled effect that resembles petals.
Once you reach the end of the row, turn your work and crochet a second layer of petals. To do this, work 5 double crochets into the same stitch, skip one, and repeat. The petals will start to curl naturally as you go.
After finishing the strip, gently roll it into a spiral starting from one end. This will form the shape of your rose. Use your yarn needle to sew the base together securely so the flower doesn’t unravel.
If you want, you can crochet a few small green leaves using chain stitches and single crochets, then attach them to the back of the rose. This adds a beautiful finishing touch that makes your flower look realistic.
Assembling and Attaching the Keychain Ring
Once your rose is complete, it’s time to assemble everything into a beautiful rose flower keychain. This step is just as important as crocheting, as it ensures the final product is durable and professional-looking.
First, thread your yarn needle with a matching color of yarn. Attach the metal keychain ring to the back of the rose by sewing through the base several times. Make sure it’s firmly attached so it can handle everyday use without falling apart.
If you’re using a lobster clasp, you can attach it with a small metal jump ring. Simply pass the ring through one of the crochet stitches at the back of the flower and close it tightly using pliers. This method gives the keychain a more polished and elegant finish.
For added strength, you can use a drop of fabric glue at the knot to secure it further. Allow it to dry completely before using your keychain.
If you made small leaves earlier, position them neatly around the rose before sewing them down. The green leaves will make your rose pop and give it that natural, delicate look.
Once everything is attached, check that the flower hangs correctly and that the ring or clasp is facing the right direction. Adjust as needed, and your Easy to make rose flower keychain will be ready to use or gift!
Tips, Variations, and Creative Ideas
One of the best parts about this Easy to make rose flower keychain – Step by Step Tutorial is how versatile it is. You can customize it in many ways to match your personal style or to create themed gifts for different occasions.
Experiment with different yarn colors to create multicolored roses. Try red for a classic romantic look, yellow for friendship, or pink for something soft and feminine. You can even use variegated yarn for a unique gradient effect.
Consider adding beads or pearls to the center of the flower for a touch of elegance. Just make sure to sew them tightly so they stay secure during use.
If you want a more playful version, you can crochet mini roses and attach several of them to a single keychain ring. This creates a beautiful bouquet effect that’s sure to impress.
You can also adapt the pattern to make matching accessories like earrings, bag charms, or zipper pulls. Handmade sets like these are great for gifts and can be customized easily.
Finally, don’t forget to use your creativity. Crochet is all about personal expression, and every small detail—color, texture, or embellishment—can make your keychain unique. The more you practice, the more refined your technique and style will become.
Easy to Make Rose Flower Keychain
1. Can beginners make this rose flower keychain?
Yes! This Easy to make rose flower keychain – Step by Step Tutorial is perfect for beginners. It uses simple stitches like single crochet and double crochet, which are easy to learn and practice.
2. What type of yarn is best for this project?
Cotton yarn is highly recommended because it’s strong, holds its shape, and is easy to clean. However, acrylic yarn also works if you prefer a softer finish.
3. How long does it take to make one keychain?
On average, it takes about 30–45 minutes to complete one rose flower keychain, depending on your crochet speed and experience level.
4. Can I sell the keychains I make from this tutorial?
Absolutely! Handmade rose flower keychains make excellent items to sell at markets or online shops. Just make sure to use high-quality materials for a professional finish.
5. How can I make the keychain more durable?
Use tight stitches, secure the ends well, and apply a small amount of fabric glue to reinforce the base and attachment point. This will make your keychain sturdy and long-lasting.
6. Can I use other flower patterns instead of a rose?
Yes, you can easily adapt this tutorial to make daisies, sunflowers, or tulips. The process of attaching them to a keychain ring is the same.
Conclusion
Creating your own Easy to make rose flower keychain is a fun, rewarding, and creative experience. You’ve learned how to crochet the rose, assemble it, and attach it to a keychain ring—all using simple materials and techniques. This charming accessory adds a touch of handmade beauty to your daily life and makes a thoughtful gift for any occasion.
Now that you’ve mastered this step by step tutorial, don’t hesitate to try new colors, add embellishments, and make each keychain uniquely yours. Crochet allows endless creativity, and every project helps you improve your skills.
If you enjoyed this tutorial, leave your honest opinion and suggestions below. Your feedback helps inspire new ideas and keeps the creative community growing!