
Flower Power crochet bag-Step by Step Tutorial is a delightful and creative project that combines color, personality, and practicality into one accessory. This handmade bag has become popular among crochet lovers because it blends vintage charm with modern style. The floral motif brings brightness and joy to any outfit, making it perfect for everyday use, seasonal accessories, or even a special handmade gift. Throughout this article, we will explore how to make a Flower Power crochet bag, focusing on clear instructions, craft techniques, and finishing touches that give your bag a beautiful professional look.
Creating a Flower Power crochet bag-Step by Step Tutorial allows you to celebrate your creativity through yarn, textures, and decorative elements. You can choose your favorite color combinations, experiment with different flower styles, and adjust the size to suit your needs. Whether you want a large tote, a casual shoulder bag, or a small pouch, this project offers endless customization possibilities. The joyful floral squares that make up the bag are reminiscent of classic granny squares but with a more playful and expressive touch.
This tutorial is designed to be accessible for beginners while still offering enough detail and style to interest experienced crocheters. By following each step carefully, you will not only learn how to crochet beautiful flower motifs but also how to assemble them into a functional and sturdy bag. You will learn about choosing the right yarn, creating structured panels, attaching straps, and adding finishing touches that enhance durability and visual appeal. Now, let’s move forward and begin this colorful and enjoyable crafting experience.
Materials and Preparation
To start the Flower Power crochet bag-Step by Step Tutorial, you will first need to gather your materials. Choosing the right yarn is very important for the final look and strength of your bag. Medium-weight cotton yarn is highly recommended because it is durable, washable, and holds shape well. Cotton also gives your bag a natural and stylish texture. You may use multiple colors to highlight the flower motif or use a single color for a more minimal design.
Next, choose the correct crochet hook for your yarn. Most cotton yarns work well with hooks between 3.5 mm and 4.5 mm. Check the yarn label for the best recommendation. Using the proper hook size ensures your stitches are even and your bag maintains a stable structure. If your crochet tends to be loose, choose a slightly smaller hook for more firmness.
You will also need scissors, a yarn needle, and stitch markers. Stitch markers are especially helpful when working in rounds or counting stitches for each flower. A yarn needle is essential for weaving in loose ends and assembling the motifs neatly. Taking time to tidy the finishing details will make your bag look polished and professional.
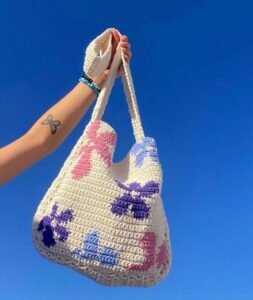
Before beginning, decide on your preferred color palette. The classic Flower Power crochet bag usually features vibrant, playful colors. You may choose pastel tones for a softer style or bold hues for a standout accessory. The choice of colors can completely change the personality of the final piece.
Once your materials are ready, take a moment to review the basic crochet stitches involved: chain stitch, slip stitch, single crochet, half double crochet, and double crochet. If you are familiar with these, you are ready to move on. If you need practice, spend a few minutes warming up with small swatches to ensure your tension is even.
Preparing your workspace will also make the process enjoyable. Choose a comfortable place with good lighting. Having all your materials organized and close by will allow you to focus fully on your creative work.
Crocheting the Flower Motifs
To build the Flower Power crochet bag-Step by Step Tutorial, you will begin by making multiple flower motifs. These motifs form the decorative squares that make up the front and back panels of the bag. Start by making a magic ring, which forms the center of your flower. In this ring, crochet a round of double crochets to form a neat foundation.
The next step is creating the petals. The petals can be made using clusters of double crochet stitches separated by chain spaces. This structure allows each petal to stand out clearly. Repeat this process evenly around the center, ensuring each petal looks symmetrical.
Once your petals are complete, you will begin shaping the motif into a square. This step transforms the flower from a round shape into a block that can be attached to others. Use combinations of double crochets, chains, and corner increases to form the square edges. The transition from circle to square is a satisfying step because you can see the flower becoming part of the final pattern.
Repeat this process to create enough motifs for your desired bag size. A small handbag may require 12–16 motifs, while a larger tote could require 24 or more. Consistency in size is key, so ensure your stitch tension remains the same across all motifs.
As you finish each motif, weave in the yarn ends neatly using a yarn needle. Doing this step as you go prevents loose threads from accumulating and makes assembly easier later. Keeping your motifs flat and smooth will help the bag come together beautifully in the next steps.
Feel free to experiment with different flower styles once you are comfortable. Some crafters add layered petals, textured stitches, or different color combinations. Your Flower Power crochet bag can be as simple or elaborate as you wish.
Assembling the Bag Panels
When you have completed the motifs, it is time to assemble the bag panels. Lay the motifs on a flat surface and experiment with your arrangement. Place colors evenly to create a unified and balanced design. Once you are satisfied with the layout, you will begin joining the squares.
One common joining method is slip stitching them together through the back loops only. This technique ensures a neat seam while keeping the front of the motif visually smooth. Begin joining motif by motif until you form a full rectangle for the front of the bag. Repeat the process to assemble the back panel.
Next, you will create the sides and bottom of the bag. You may continue using flower motifs or crochet solid panels depending on your desired structure. Solid sides make the bag more stable and allow the flowers to be the main focus. Using single crochet or half double crochet stitches is perfect for this purpose.
Once the sides and bottom are complete, attach them carefully to the front and back panels. Use a sturdy yarn and even stitching to ensure strength. This step determines the durability of your bag, so take your time.
Once assembled, test the bag’s shape by gently stretching it. If any areas feel weak, add reinforcing rows along the edges or inside corners. Reinforcement can be subtle but makes a big difference in long-term use.
After completing the basic structure, your bag should begin to take its final form. You are now ready to add the straps and finishing details that bring everything together.
Adding Straps and Finishing Touches
The straps of the Flower Power crochet bag-Step by Step Tutorial should be strong and comfortable. You can crochet the straps using thick rows of single crochet or create braided straps from multiple yarn strands. Make sure the straps are evenly placed and securely attached to support the bag’s weight.
If you want a more structured look, consider adding a lining. A simple cotton lining helps the bag maintain shape and prevents stretching. Cut fabric to match the interior dimensions and stitch it inside the bag carefully.
You can also add decorative elements to make your bag unique. Button accents, tassels, beads, or even small crochet flowers can bring extra charm. Just be mindful not to overload the design—the flowers are already the star of this project.
Once all details are complete, review the bag and check for loose threads or uneven seams. This final polish ensures your work looks clean and professional.
Congratulations! Your Flower Power crochet bag is now complete and ready to use, gift, or cherish.
FAQ – Frequently Asked Questions
1. Is this project suitable for beginners?
Yes, it is great for beginners who know basic crochet stitches and want to learn motif assembly.
2. What yarn works best for this bag?
Cotton yarn is ideal because it holds its shape and is durable for daily use.
3. How many flower motifs are needed?
The number depends on your desired size, but most bags use between 12 and 24 motifs.
4. Can I add a lining inside the bag?
Yes, adding a lining helps maintain structure and prevents stretching.
5. How do I keep the bag from stretching too much?
Use sturdy yarn, tight stitches, and consider adding a lining for support.
Conclusion
In this Flower Power crochet bag-Step by Step Tutorial, we learned how to gather materials, crochet flower motifs, assemble panels, and add straps and finishing touches.
This project is both practical and expressive, allowing you to show your creativity through color and design.
We hope you enjoyed this tutorial and feel inspired to create your own version. Please leave your sincere opinion and suggestions—we would love to hear your thoughts!