
If you are passionate about unique handmade crafts and love adding artistic flair to your accessories, then this Frida Kahlo crocheted coin purse – Step by Step Tutorial is perfect for you. This project combines the beauty of crochet with the iconic style of Frida Kahlo, creating a beautiful and practical item that is sure to stand out. Whether you’re an experienced crocheter or just starting, this guide will walk you through every detail to make your own charming coin purse inspired by the legendary artist.
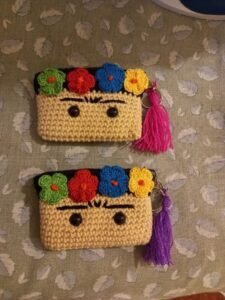
The Frida Kahlo crocheted coin purse is not just a simple wallet — it’s a statement piece. Inspired by Frida’s distinctive self-portraits, flowers, and bold colors, this crochet project captures her artistic essence in a small, functional design. It’s perfect for holding coins, jewelry, or small everyday items, while also serving as a conversation piece or thoughtful handmade gift for art lovers.
In this Step by Step Tutorial, we’ll go through everything from choosing the right materials to crocheting the purse’s base, adding the decorative elements, and assembling it into a finished masterpiece. The process is fun, creative, and rewarding, and by the end, you’ll have a one-of-a-kind crochet accessory that reflects both your craftsmanship and Frida’s artistic spirit.
Materials Needed for the Frida Kahlo Crocheted Coin Purse
Before beginning this Frida Kahlo crocheted coin purse – Step by Step Tutorial, it’s important to gather all the materials you’ll need. Having everything ready will make the process smoother and more enjoyable.
You’ll need medium-weight cotton or acrylic yarn in several colors: beige or light brown for the face, black for the hair, and bright colors like pink, red, yellow, and green for the flowers and decorations. You’ll also need a small amount of white and dark brown yarn for the eyes and eyebrows. Choose vibrant tones to reflect Frida Kahlo’s colorful and expressive style.
Next, select an appropriate crochet hook for your yarn. Typically, a 3.0 mm or 3.5 mm hook works best for small, tightly stitched projects like coin purses. This ensures a firm texture that holds its shape well.
You’ll also need a pair of scissors, a yarn needle for sewing parts together, and a zipper or clasp to close your purse securely. If you prefer, you can use a metal clasp frame for a vintage touch, which complements the artistic theme perfectly.
Finally, it’s helpful to have a stitch marker, some pins, and a bit of lining fabric if you’d like to line the inside of your purse. With these materials ready, you’re all set to start creating your Frida Kahlo crocheted coin purse from scratch.
Making the Base of the Coin Purse
The first step in this Frida Kahlo crocheted coin purse – Step by Step Tutorial is to crochet the base, which forms the main structure of the purse. Start by making a magic ring with your base color (usually beige or light brown to represent skin tone).
Work six single crochets into the ring and pull it tight. In the next round, increase in each stitch to make twelve single crochets. Continue increasing evenly around until you have a circle about the size of your palm—this will form one side of the coin purse.
Once you reach your desired size, stop increasing and crochet additional rounds without adding stitches to create the depth of the purse. The height should be about two inches, but you can adjust this depending on how deep you want your purse to be.
Repeat the same process to create the other side of the purse. Once both sides are finished, you can join them later by sewing or crocheting around the edges. Remember to leave the top part open for attaching the zipper or clasp.
This part of the Frida Kahlo crocheted coin purse creates the solid foundation for your design. Keeping your stitches even and tight is important, as it ensures that your purse will be durable and maintain its shape over time.
Creating Frida Kahlo’s Face and Hair
Now comes the most iconic part of the Frida Kahlo crocheted coin purse – Step by Step Tutorial — creating the face and hair. This section will give your project personality and instantly make it recognizable as Frida.
Using your base yarn color, crochet a small oval or circle for the face and position it on the front side of your purse. Secure it in place with a few small stitches using the same yarn color.
Next, it’s time to make the hair. Using black yarn, crochet a semicircle or curved strip to represent Frida’s signature hairstyle. You can attach it across the top of the face and slightly curve it around the edges to give it a natural shape.
One of Frida Kahlo’s most iconic features is her unibrow. To create this, use dark brown yarn and embroider a bold curved line above the eyes. Then, with black or brown thread, add small eyes beneath the brow. You can make simple stitched eyes or use tiny black beads for a more dimensional look.
Don’t forget to add her lips! With red or pink yarn, embroider a small curved line to create her signature expression. This small detail brings the crochet portrait to life and adds a charming touch to your Frida Kahlo crocheted coin purse.
Adding the Flowers and Decorative Details
In this part of the Frida Kahlo crocheted coin purse – Step by Step Tutorial, we’ll make the flowers that sit beautifully on top of Frida’s head. These flowers are a signature part of her look and make the purse colorful and lively.
To make a small crochet flower, start with a magic ring. Chain three and work two double crochets into the ring, then chain three again and slip stitch into the ring to form one petal. Repeat this process four or five times to make a complete flower. You can use different colors of yarn to make several flowers.
Once your flowers are finished, sew them along the top of the hair area. Mix different shades like red, pink, and yellow to make the design vibrant. You can even add small green leaves using a few stitches of green yarn to complete the floral crown.
For additional details, you can crochet tiny earrings or small accents around the edges. Metallic or gold-colored thread can be used to create jewelry details, adding a touch of elegance to the design.
If you want to make your Frida Kahlo crocheted coin purse even more unique, consider adding a few embroidery details like swirls, hearts, or tiny patterns around the border. These finishing touches make your purse truly one-of-a-kind and highlight the handmade artistry.
Assembling and Finishing the Coin Purse
Now that all the decorative pieces are ready, it’s time to assemble your Frida Kahlo crocheted coin purse – Step by Step Tutorial. This step brings everything together into a functional and beautiful accessory.
Take the two sides of your purse and align them carefully. Using a matching yarn color, crochet or sew them together around the edges. Make sure the stitches are tight and neat to give your purse a clean, finished look.
Leave the top part open and attach your zipper or metal clasp. Sew it securely using small, even stitches. If you’re using a zipper, ensure it opens and closes smoothly before sewing the final ends.
If you decided to add lining fabric, now is the time to insert it. Cut the fabric slightly smaller than your crochet base and sew it inside for extra durability and a polished finish.
Once everything is assembled, go over your purse and trim any loose threads. Gently press the crochet with a warm iron (use a protective cloth between the heat and your yarn) to give it a professional, flat appearance.
Congratulations — your Frida Kahlo crocheted coin purse is complete! It’s a wonderful mix of art, fashion, and craftsmanship that can be used daily or given as a special handmade gift.
Frida Kahlo Crocheted Coin Purse
1. Is this project suitable for beginners?
Yes! The Frida Kahlo crocheted coin purse – Step by Step Tutorial uses basic stitches and simple embroidery, making it great for beginners who want to try a creative project.
2. What type of yarn works best for this purse?
Cotton yarn works beautifully because it holds its shape well and gives a neat finish. However, acrylic yarn can also be used for a softer texture.
3. Can I change the design or colors?
Absolutely! Feel free to experiment with different colors, flower arrangements, or even accessories. The design is meant to be customizable.
4. How can I attach a clasp to my crocheted coin purse?
You can sew a metal clasp frame or a zipper at the top using a yarn needle and matching thread. Make sure it’s well aligned for easy opening and closing.
5. How long does it take to make this purse?
Depending on your crochet speed, it can take between three to five hours to complete, including decorations and finishing touches.
6. Can I sell the coin purses I make from this pattern?
Yes, as long as you make them by hand and give credit to your own craftsmanship. It’s a great product for handmade markets and gifts.
Conclusion
Through this Frida Kahlo crocheted coin purse – Step by Step Tutorial, you’ve learned how to create a truly artistic and functional piece inspired by one of the most beloved artists in the world. From shaping the base and adding the face to decorating with flowers and assembling the final purse, each step allows you to express your creativity and passion for handmade crafts.
This small but meaningful crochet project is not just practical—it’s a piece of art that carries Frida’s vibrant energy and your personal touch. It’s the perfect project for those who love crochet and appreciate art, culture, and originality.
I hope you enjoyed following this tutorial and feel inspired to create your own Frida Kahlo crocheted coin purse. Please leave your honest opinion and suggestions below — your feedback helps improve future tutorials and keeps the creative spirit alive in the crochet community!