
Beginning this Fun crochet mini bag keychain -Step by Step Tutorial is a wonderful way to explore creativity, learn new techniques, and produce a charming accessory that can be used or gifted. This tiny project is ideal for beginners because it requires only basic stitches and a small amount of yarn, while still offering endless possibilities for customization. Throughout this article, we will guide you carefully through each stage of the process, ensuring that you feel confident and inspired as you work through your own handmade mini bag keychain.
The great thing about a fun crochet mini bag keychain is that it combines practicality with style. These mini bag keychains are not only adorable but also useful for holding small items like coins, lip balm, USB drives, or even tiny notes. By following this Fun crochet mini bag keychain -Step by Step Tutorial, you will learn how to shape the mini bag, attach a keychain ring, and finish the design beautifully. It’s a small craft project that brings big satisfaction, especially for those who enjoy creating cute and functional accessories.
Another big advantage of working on this Fun crochet mini bag keychain -Step by Step Tutorial is that it allows you to use leftover yarn from previous projects. This means you can create multiple keychains in different colors without spending much. They make perfect gifts, party favors, market products, or personal accessories. With just a little time and creativity, you can design something unique that reflects your personality. This tutorial aims to make the process enjoyable, relaxing, and accessible to anyone who wants to try crochet.
Choosing the Right Materials for Your Mini Bag Keychain
Your journey through the Fun crochet mini bag keychain -Step by Step Tutorial begins with selecting the right materials. This project requires very little yarn, which makes it perfect for using scraps left from other creations. Cotton yarn is a great choice because it provides excellent stitch definition and durability. Soft acrylic yarn also works well for beginners who prefer a smoother texture.
The hook size you choose will influence the final structure of your mini bag. A smaller hook creates a tighter, more compact fabric, ensuring that the bag keeps its shape. This step of the Fun crochet mini bag keychain -Step by Step Tutorial is essential because the sturdiness of the bag matters when it will be used regularly on a keychain. Many crafters prefer hooks between 2.5 mm and 4 mm for projects of this size.
You will also need a keychain ring or clasp. These can be found in different shapes and finishes, allowing you to customize your mini bag. Metal rings generally provide more durability, especially if you plan to carry the keychain daily. Adding beads, buttons, or small charms is optional but can enhance the final look.
Choosing your yarn colors is one of the most enjoyable parts of this Fun crochet mini bag keychain -Step by Step Tutorial. You can choose pastel tones for a soft and cute appearance or bold colors for a more playful effect. Mixing two or three colors can also create a fun pattern. Striped yarn or gradient skeins add interest without extra effort.
Scissors, stitch markers, and a yarn needle will complete your material list. These simple tools help you achieve neat finishing touches, especially when weaving in ends or attaching the keychain. Having everything ready before starting will make your experience smoother and more enjoyable.
This step of selecting materials may seem simple, but it helps set the tone for the entire project. By choosing the right yarn, hook, and accessories, you ensure that your fun crochet mini bag keychain turns out beautiful, durable, and exactly the way you imagined.
Starting the Base and Building the Shape
Now that you have your materials, it’s time to begin shaping the mini bag in this Fun crochet mini bag keychain -Step by Step Tutorial. The project usually begins with a small chain or a magic ring, depending on the style you want. A chain base creates a rectangular or oval shape, while a magic ring results in a round or square mini bag. Either method works well for beginners.
After creating your foundation, work single crochet stitches along the chain or inside the ring. This step forms the first row and determines the thickness of the base. The Fun crochet mini bag keychain -Step by Step Tutorial is flexible, allowing you to adjust the size by adding or reducing stitches. Beginners often find it helpful to count stitches carefully to avoid uneven edges.
As you continue building the base, you will notice the shape becoming firmer. Some prefer to add increases at both ends to create a more structured bottom. This small detail enhances the final look of the mini bag, especially if you want it to hold small objects. Maintaining consistent tension ensures clean, even rows.
Once the base is complete, you will start working upward to form the body. This part of the Fun crochet mini bag keychain -Step by Step Tutorial is relaxing because it involves repeating rows of stitches until the bag reaches the desired height. You can experiment with different stitch types, such as half-double crochet or double crochet, to add texture.
Using stitch markers helps you track the beginning and end of each round. This is particularly useful when working in continuous rounds, a method many people prefer for a seamless appearance. Taking your time with this step ensures the mini bag remains symmetrical.
At this point, your mini bag will start looking like a tiny pouch. This is an exciting moment in the Fun crochet mini bag keychain -Step by Step Tutorial, as you begin to see the final design taking shape. With the base and body complete, you can move on to creating the handles or flap.
Adding Handles, Flaps, and Decorative Touches
This stage of the Fun crochet mini bag keychain -Step by Step Tutorial focuses on giving your mini bag personality and function. Handles are typically made by chaining a small number of stitches and attaching them to the top edges of the bag. They can be long, short, curved, or even braided, depending on the style you want.
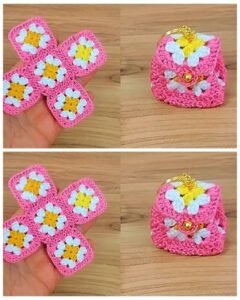
A flap is another adorable addition. It can be square, rounded, or triangular. To create one, simply extend a few extra rows from the back side of the mini bag. This provides a secure cover for the items inside. Many people enjoy adding small buttons or snaps for a decorative closure.
If you prefer a drawstring look, you can crochet a thin cord and weave it through small gaps near the top of the bag. This creates a playful and functional design, perfect for a tiny accessory. The Fun crochet mini bag keychain -Step by Step Tutorial allows you to try different finishing techniques until you find your favorite.
Decorative elements such as mini flowers, bows, or stars add personality. These can be crocheted separately and sewn on or created directly on the bag. They give the mini bag character and make it stand out. Color changes are another easy way to enhance the look.
Stitch textures also play a role in decoration. Puff stitches, shells, or clusters can transform a plain mini bag into something truly special. This part of the Fun crochet mini bag keychain -Step by Step Tutorial invites creativity and experimentation, allowing each piece to be unique.
Once you are satisfied with the decoration, weave in all loose ends carefully. This ensures a clean finish and helps the mini bag hold its shape over time. With the handles and decorative touches complete, your mini bag is now ready for the final step: attaching the keychain.
Attaching the Keychain and Finalizing the Project
The last part of the Fun crochet mini bag keychain -Step by Step Tutorial is attaching the keychain ring or clasp. This step is simple but important because it ensures the mini bag is secure and functional. You can attach the ring directly to one of the handles or use a small crocheted loop to connect it.
If your mini bag has a sturdy top edge, you can even attach the keychain ring through a corner stitch using a yarn needle or jump ring. This method gives a neat, professional finish. Making sure everything is firmly attached guarantees durability, especially if the keychain will be used daily.
Once the keychain is connected, give your mini bag a final check. Look for loose threads, uneven stitches, or gaps that need reinforcement. A quick inspection ensures that your creation looks polished and is ready for use or gifting. This is a satisfying moment in the Fun crochet mini bag keychain -Step by Step Tutorial.
Some crafters like to lightly block the mini bag to improve its shape. Blocking is optional for small projects, but it can help straighten edges and define stitch patterns. A quick steam or gentle shaping with your hands is more than enough for a tiny accessory like this.
At this point, your project is complete! You now have an adorable mini bag keychain that you can attach to your keys, backpack, purse, or give as a thoughtful handmade gift. It’s amazing how such a small project can bring so much joy and creativity.
Repeating the process with different colors and designs is easy and fun. This Fun crochet mini bag keychain -Step by Step Tutorial gives you the foundation to create endless variations and explore your imagination freely.
Fun Crochet Mini Bag Keychain
1. Do I need a lot of yarn for this project?
No. You only need small leftover pieces, making it a perfect scrap-yarn craft.
2. Can beginners make this mini bag keychain?
Yes! This project is very beginner-friendly and requires only basic crochet stitches.
3. What is the best hook size to use?
Hooks between 2.5 mm and 4 mm work best for small, compact shapes.
4. How long does it take to complete one mini bag keychain?
Most people finish one in 30 minutes to 1 hour, depending on their experience.
5. Can I sell the mini bag keychains I make?
Absolutely. They are popular handmade items and sell well at craft fairs or online.
6. Are there different ways to attach the keychain?
Yes. You can attach it to a handle, a crocheted loop, or connect a metal jump ring.
Conclusion
In this Fun crochet mini bag keychain -Step by Step Tutorial, you learned how to choose materials, build the base, add decorative touches, and attach the keychain ring.
This simple yet delightful project is perfect for beginners and experienced crafters alike. It allows for creativity, personalization, and the joy of making something truly unique.
If you enjoyed this tutorial, please leave your honest opinion and share your suggestions. Your feedback helps inspire more beautiful and helpful creations.