
Starting this Gingerbread crochet doll–Step by Step Tutorial, you are about to learn how to create one of the most charming and festive amigurumi dolls for the holiday season. The gingerbread crochet doll is perfect for decorating your home, giving as a gift, or adding to your handmade Christmas collection. This tutorial is designed for beginners and experienced crocheters alike, guiding you through every detail with a warm and easy-to-follow approach. From choosing the right yarn to sewing the final touches, this article ensures your crafting journey is enjoyable and successful.
The beauty of following a Gingerbread crochet doll–Step by Step Tutorial is that it allows you to combine creativity and tradition. Gingerbread themes are iconic for the holidays, bringing a nostalgic and joyful feeling to everyone who sees them. With this tutorial, you will learn how to crochet the body, add decorative details like buttons and icing, and personalize your doll in many fun ways. The techniques used here can also be applied to other amigurumi projects, enhancing your crafting skills for future creations.
Throughout this guide, you will notice that the gingerbread crochet doll project is beginner-friendly, highly customizable, and incredibly satisfying to complete. Each step has been carefully explained to help you build confidence as you craft. If you are preparing handmade items for Christmas markets, gifts, or personal use, this Step by Step Tutorial will help you create a high-quality doll with a professional finish. Before we move on to the detailed steps, let’s begin by exploring the essential materials you need for this holiday project.
Materials Needed for Your Gingerbread Crochet Doll
When starting your Gingerbread crochet doll–Step by Step Tutorial, the first important step is selecting the right materials. Soft acrylic or cotton yarn is the most recommended choice because it offers durability and helps the doll keep its shape. Brown yarn is essential for the gingerbread body, but you can also add white, red, green, and pastel colors for details like icing and decorations.
The crochet hook size you choose will depend on the yarn weight. Most amigurumi dolls use a hook slightly smaller than usual to create tight stitches, ensuring no stuffing shows through. A 2.5 mm to 3.5 mm hook usually works well, providing the stability needed for shaping the doll’s body and limbs. Always test your stitches before beginning the full project to ensure the tension is comfortable and consistent.
Other necessary materials include fiberfill stuffing, stitch markers, a yarn needle, and scissors. Stuffing should be soft and evenly distributed to avoid lumps in your doll. Stitch markers help you keep track of rounds, especially when crocheting in continuous spirals—a common technique in amigurumi work. The yarn needle is essential for sewing pieces together and weaving in those final, important ends.
Safety eyes can be used if the doll is for decoration, but embroidered eyes are a safer option for children. Embroidery also allows more personalization, such as different expressions or sleepy eyes. The choice depends on whether your gingerbread doll will be decorative or intended for play. This Gingerbread crochet doll–Step by Step Tutorial recommends secure stitching for every detail to ensure long-lasting results.
You may also want to gather small decorative accessories like ribbon, miniature bells, or crochet appliqués for buttons. These additions enhance the charm of your gingerbread doll and allow you to give it festive character. Remember, every detail you include should be securely attached, especially if the doll will be handled frequently.
After preparing all the materials, you will be ready to start crocheting the head and body. Having everything at hand makes the process smoother and prevents interruptions in your creative flow. With your tools prepared, let’s move to the next stage of this Step by Step Tutorial.
Crocheting the Body of the Gingerbread Doll
The first crocheting step in this Gingerbread crochet doll–Step by Step Tutorial is creating the head and torso. Most gingerbread doll patterns begin with a magic ring, allowing you to build a tight, clean starting point. Working in continuous spirals, you will expand the circle gradually to shape the head. This technique creates a smooth, seamless form that is typical for amigurumi.
Once the head reaches the desired size, you will continue straight rounds to form the top portion of the body. It is important to maintain consistent stitch tension during this stage, as uneven stitches may alter the doll’s shape. Keeping a stitch marker at the first stitch of each round helps ensure accuracy and prevents losing track of your work. This step sets the foundation for the entire doll.
When shaping the body, gentle increases and decreases create the natural curve of the torso. The transition from head to body should look smooth and cohesive. If you prefer a slightly chubby gingerbread character, you can add additional increase rows before tapering the bottom. Using this technique allows you to customize the doll’s silhouette.
Before finishing the body, it’s time to add stuffing. Fiberfill should be inserted gradually to prevent lumps and maintain the doll’s structure. You can gently shape the stuffing with your fingers, ensuring the head remains round and firm. Stuffing evenly is one of the key factors in creating a beautiful, polished amigurumi piece.
After stuffing, you will continue the rounds until you reach the base of the body. A final series of decreases will close off the bottom securely. Make sure all stitches are tight and even to prevent gaps. Once the body is fully assembled, you are ready to move on to the fun details that give your gingerbread crochet doll life and personality.
With the main structure complete, your doll already resembles the classic gingerbread shape, setting the stage for the arms, legs, and decorative accents. Now let’s move forward to add these essential elements.
Creating the Limbs and Attaching Them
This section of the Gingerbread crochet doll–Step by Step Tutorial focuses on crocheting the arms and legs. Limbs are usually created in small cylinders using single crochet stitches worked in the round. These parts should be firm but flexible, allowing the doll to retain shape while offering a soft, squeezable feel.
The arms are typically shorter and slightly thinner than the legs. You will begin with a magic ring and gradually increase until the width is right. Once you reach the desired thickness, continue straight rounds until the arm reaches the preferred length. A small amount of stuffing in the lower portion of the arm helps maintain structure without making it too stiff.
Legs follow a similar process but are slightly longer. Some crafters prefer adding a small flattening row at the bottom to form feet, giving the doll additional character. Stuffing should be added gradually to prevent lumps and to keep the legs symmetrical. Always ensure both limbs match in size and shape for a balanced appearance.
When attaching limbs, a yarn needle and tight whip stitches create strong connections. Sew the arms slightly below the neckline and the legs evenly at the bottom of the torso. Take your time during this step, as symmetrical placement significantly enhances the quality of your finished doll. A few extra stitches can make the attachment more durable.
After attaching each limb, gently tug to check stability. A well-secured arm or leg should not move or stretch excessively. This is especially important if the doll will be handled by children or used as a decoration that may be picked up often. The gingerbread crochet doll design benefits greatly from a sturdy, well-formed structure.
Once the limbs are in place, the doll’s silhouette becomes clearly defined and full of personality. With the basic structure completed, it’s time to move to the decorative elements that make gingerbread dolls so recognizable and festive.
Decorating the Gingerbread Crochet Doll
Now comes the most delightful part of this Gingerbread crochet doll–Step by Step Tutorial: adding the decorative icing, buttons, and facial features. These creative details bring your doll to life and give it the adorable charm associated with gingerbread characters.
Decorative icing is usually created using white yarn. A simple scalloped or wavy stitch can be crocheted separately and sewn onto the arms, legs, or head. These lines mimic icing decoration found on real gingerbread cookies. You can place them on the wrists, ankles, and top of the head for a classic look. Secure stitching ensures the icing remains in place.
Buttons add another festive touch. They can be crocheted circles in bright red, green, or blue yarn. Some crafters create small spheres using amigurumi techniques for a more 3D look. Position the buttons down the center of the doll’s torso and sew them securely. These colorful details enhance the holiday theme beautifully.
The face is one of the most important decorative elements. You can embroider the eyes using black yarn or thread, creating a sweet and gentle expression. Add small eyebrows or eyelashes for extra character. A smiling mouth can be stitched with red or pink yarn, giving your gingerbread doll a warm and inviting look.
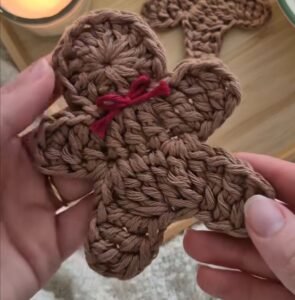
If you want to personalize your gingerbread crochet doll, consider adding bows, scarves, or mini hats. These accessories can be crocheted quickly and attached firmly. They allow you to customize each doll differently, making them perfect for gift-giving or holiday collections. Even small variations in placement or color can create a completely unique design.
After adding all decorations, give your doll a final inspection. Make sure all pieces are securely stitched, the stuffing is evenly distributed, and the facial expression is symmetrical. These finishing touches elevate your doll from simple amigurumi to a polished, professional-looking creation. Your gingerbread crochet doll is now ready to display, gift, or enjoy.
Gingerbread Crochet Doll
What yarn is best for a gingerbread crochet doll?
Soft acrylic or cotton yarn in brown tones is ideal, along with white and festive colors for decorations.
Is this tutorial suitable for beginners?
Yes. This Gingerbread crochet doll–Step by Step Tutorial is written in a simple, friendly, and detailed way perfect for beginners.
Do I need safety eyes?
You may use safety eyes if the doll is for decoration, but embroidered eyes are recommended for children’s toys.
How long does it take to complete the doll?
Most crafters finish it within a day or two, depending on their pace and experience level.
Can I customize the decorations?
Absolutely. Buttons, icing, accessories, and colors can all be personalized to fit your creative vision.
Is the doll washable?
Yes, but always follow the washing instructions for the yarn used. Hand washing is usually best for amigurumi.
Conclusion
In this Gingerbread crochet doll–Step by Step Tutorial, you learned how to gather materials, crochet the body and limbs.
Assemble the doll, and decorate it with festive details. This project is ideal for holiday crafting and offers endless opportunities for customization.
If you enjoyed this tutorial, please leave your sincere opinion and share suggestions—your feedback helps inspire future crochet projects and guides!