
Granny Squares into a Breathtaking Crochet Christmas Tree!-Step by Step Tutorial is a charming and creative way to bring handmade holiday magic into your home. This project transforms classic granny squares into a three-dimensional Christmas tree that can be displayed as décor, used as a table centerpiece, or given as a heartfelt handmade gift. Throughout this tutorial, we will explore how to choose colors, crochet the squares, assemble the tree, and add decorative finishing touches. Using the concept of Granny Squares into a Breathtaking Crochet Christmas Tree!-Step by Step Tutorial allows you to appreciate the beauty of traditional crochet techniques while creating something meaningful and festive.
Crocheting a Christmas tree using granny squares is a wonderful activity for both beginners and experienced crafters. Granny squares are known for their simplicity, versatility, and endless design possibilities. You can create each square in different shades of green, or even mix in pops of red, gold, and white to mimic ornaments and lights. The beauty of this idea is that every tree created will be unique. The process is enjoyable, relaxing, and perfect for working on while cuddling with a warm blanket and a cup of hot chocolate on a winter evening. Handmade decorations bring warmth to holiday spaces, and this crochet tree is no exception.
The Granny Squares into a Breathtaking Crochet Christmas Tree!-Step by Step Tutorial is ideal for those searching for a creative, affordable, and meaningful holiday craft. You can customize the size by making more or fewer squares. You can choose luxurious yarns for an elegant look or playful colors for a more whimsical style. This project is also eco-friendly because it allows you to use leftover yarn scraps. Whether you place your finished tree on a mantle, dining table, or in a cozy reading corner, it will add personality, charm, and festive joy to your home during the holiday season.
Materials and Color Selection
To begin this festive crochet project, selecting the right materials is essential. Yarn choice plays a huge role in the final appearance of your crochet Christmas tree. Acrylic yarn is popular for decorative pieces because it holds shape well and is available in many vibrant colors. Cotton yarn can also be used if you prefer a slightly firmer texture. The most important part is choosing colors that remind you of the cozy warmth of Christmas.
Green shades are typically used for the majority of the granny squares. You can choose one shade for a uniform and classic tree look or use several different shades to add visual depth and dimension. Mixing dark, medium, and light greens creates a richer, more realistic effect, almost like pine branches reflecting winter light.
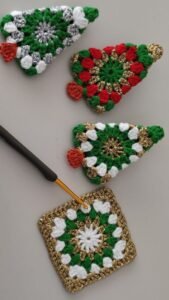
To add a festive touch, consider incorporating accent colors. Red squares can symbolize ornaments, while gold or yellow squares can highlight decorative lights. White squares may represent snow or frosty sparkle. These accents can be arranged strategically when assembling your tree to create a balanced design.
In addition to yarn, you will need a crochet hook that matches your chosen yarn weight. Most medium-weight yarns work best with crochet hooks between 4mm and 5.5mm. A yarn needle is also necessary for sewing squares together and weaving in loose ends. Scissors will help you trim yarn as you switch colors or finish pieces.
Optional decorative accessories include miniature bells, beads, tiny pom-poms, and ribbon. These can be added to the finished tree once assembled, giving it extra personality and festive cheer. As long as your materials bring joy and reflect your personal style, your crochet tree will turn out beautiful and meaningful.
Crocheting the Granny Squares
The foundation of this Granny Squares into a Breathtaking Crochet Christmas Tree!-Step by Step Tutorial is creating the individual granny squares. If you are new to granny squares, this is a wonderful opportunity to learn a timeless crochet technique. Traditional granny squares begin with a center ring and are worked outward in rounds.
Start by making a slip knot and chaining four stitches. Then, join the first and last stitch to form a ring. This ring will be the center of your square. Work your first round of stitches into the middle of the ring. The most common stitch combination involves sets of double crochets separated by chain spaces, forming the recognizable square shape.
As you continue working, turn your square after each round if desired. Turning helps create an even shape, but this step is optional. Always keep count of stitches to ensure symmetry and prevent accidental size variations among squares. A consistent size ensures your finished tree looks neat and balanced.
You will need multiple granny squares for this project. The number depends on how large you want your tree to be. A small tree may use around twelve squares, while a larger display piece may need twenty or more. Arrange your squares flat before joining them to preview design placement.
Remember to weave in all loose yarn ends before assembly. This step keeps the back of each square tidy and prevents unraveling. It may feel time-consuming, but it adds a professional finish to your final creation. Once your squares are complete and ready, you can move on to assembling your festive Christmas tree.
Assembling the Crochet Christmas Tree
Now comes the exciting stage of your Granny Squares into a Breathtaking Crochet Christmas Tree!-Step by Step Tutorial: assembling the tree. Lay your squares flat and sort them from largest to smallest if you plan to shape your tree in tiers. You can arrange them into a triangle formation, placing larger squares at the bottom and smaller ones toward the top.
To join the squares, use your yarn needle and yarn that matches or complements your project colors. Whip stitch or slip stitch methods are commonly used to attach granny squares together. Whip stitching is simple and creates a nearly invisible seam. Slip stitching, on the other hand, adds a slightly raised edge for visible texture.
Work slowly and carefully as you join each square. Pay attention to alignment, ensuring that edges match evenly. Crocheted items are stretchy, so gentle handling helps maintain straight, clean lines. If a square seems slightly larger than the others, block it ahead of time to resize it evenly.
Once your squares are joined into a triangular or tree shape, you may add an optional crochet trunk. A small rectangle made using rows of single crochet works wonderfully to mimic a tree base. Attach it to the bottom center of your tree for a natural finishing touch.
If you want to create a standing three-dimensional tree, make two identical tree panels and crochet or sew them together, stuffing lightly with fiberfill. This gives your tree volume and allows it to stand upright on shelves or tabletops. The final look is cozy, decorative, and delightful.
Adding Decorative Finishing Touches
One of the most joyful aspects of this Granny Squares into a Breathtaking Crochet Christmas Tree!-Step by Step Tutorial is decorating your tree. Crocheted ornaments or embellishments can turn your handmade piece into a truly magical holiday display. Tiny crocheted stars, hearts, or snowflakes can be added for charming detail.
Consider crocheting a star to place at the top of your tree. A small five-point star made from golden or metallic yarn creates a lovely focal point. Attach the star by sewing it carefully or using a small stitch to secure it in place. The star adds symbolism and completes the Christmas tree theme.
Pom-poms add fun texture and color. You can create small pom-poms using leftover yarn and attach them randomly to represent ornaments. Beads or pearl embellishments can be stitched into rows or scattered for shimmer and sparkle.
You can also crochet a mini garland. This is easily created by chaining a long strand and weaving it gently across the tree’s surface. Soft metallic yarn works particularly well for a festive and elegant effect. Ribbon can also be tied into small bows and attached throughout the tree.
Finally, once your decorations are in place, take a moment to admire your craftsmanship. It is a beautiful, heartfelt piece that reflects patience, creativity, and holiday spirit. Handmade décor carries a personal meaning that store-bought decorations simply cannot match.
FAQ
How many granny squares do I need for the Christmas tree?
The number depends on the desired size. A small tree may use 10–12 squares, while a larger tree may use 20 or more.
What yarn works best for this project?
Medium-weight acrylic or cotton yarn works well because they hold shape and display color vibrantly.
Can beginners make this crochet Christmas tree?
Yes! Granny squares are beginner-friendly, and the project is great for learning or practicing crochet.
Can I wash the crocheted Christmas tree?
Yes, but hand washing is recommended to protect embellishments and seams.
How do I make the tree stand up?
Create two tree panels, sew them together, and lightly stuff the inside for a three-dimensional effect.
Conclusion
Throughout this Granny Squares into a Breathtaking Crochet Christmas Tree!-Step by Step Tutorial, we explored how to choose colors, crochet the granny squares, assemble the tree, and add festive decorative touches.
This project brings together creativity, tradition, and holiday warmth. It is a beautiful way to celebrate the season while crafting with care and joy. I hope this tutorial has inspired you to create your own crochet Christmas tree.
Please leave your honest opinion and any suggestions. Your feedback helps improve future tutorials and encourages creativity in our crafting community.