
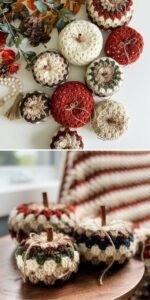
Starting a creative project with a Granny Stitch Pumpkin Pattern- Step by Step Tutorial is a wonderful way to mix seasonal charm with crochet tradition. The granny stitch has been loved by crocheters for generations because of its simple, repetitive design that creates both beauty and texture. When applied to a pumpkin project, it brings together warmth, coziness, and a touch of nostalgia. These crocheted pumpkins are not only decorative but also a great way to practice and showcase your skills.
The versatility of a granny stitch pumpkin makes it an ideal craft project for fall, especially during Halloween or Thanksgiving. You can place them around your home as autumn décor, use them as table centerpieces, or even give them as thoughtful handmade gifts. With this Granny Stitch Pumpkin Pattern- Step by Step Tutorial, you can learn the process from beginning to end, ensuring that your finished pumpkin turns out charming and unique.
This project is suitable for both beginners and experienced crocheters. The granny stitch is repetitive and easy to memorize, while shaping it into a pumpkin adds just the right amount of challenge to keep the project engaging. The result is a handmade decoration that feels timeless and personal. With the detailed instructions in this tutorial, you’ll soon have your own collection of cozy pumpkins to display proudly.
Materials Needed for Granny Stitch Pumpkin
To begin the Granny Stitch Pumpkin Pattern- Step by Step Tutorial, you’ll first want to gather the right materials. Choosing the proper supplies makes the process smoother and ensures your pumpkin looks its best once completed.
Start with yarn in seasonal shades. Orange is the traditional pumpkin color, but you can also experiment with white, green, yellow, or even variegated yarn for a modern touch. Cotton or acrylic yarn both work well for this project, with medium-weight yarn being the most versatile. The type of yarn you use will slightly affect the texture and firmness of your pumpkin.
For your crochet hook, check the yarn label for the recommended size. Typically, a 4.0 mm to 5.0 mm hook works well for medium-weight yarn. Using the right hook size ensures that your stitches are consistent and the granny stitch pattern forms neatly.
You will also need a yarn needle for sewing parts together and weaving in ends. Scissors are essential, and stitch markers can be very helpful if you want to keep track of your stitches or rounds.
To give your pumpkin shape and fullness, you’ll need stuffing material such as polyester fiberfill. Some crafters also like to use fabric scraps or cotton batting as eco-friendly alternatives. Stuffing is what transforms your flat crochet piece into a plump pumpkin.
For the pumpkin stem, you can either crochet it using brown or green yarn or use natural materials like a small stick or cinnamon stick. This gives the pumpkin an authentic, rustic touch. Optional embellishments like ribbon, twine, or felt leaves can add extra detail to your design.
Once you have all your materials ready, you’ll find the process much easier and more enjoyable. Preparation is key to making the Granny Stitch Pumpkin Pattern- Step by Step Tutorial a smooth and creative experience.
Step by Step Tutorial for the Pumpkin
The Granny Stitch Pumpkin Pattern- Step by Step Tutorial starts with creating the main body of the pumpkin using the granny stitch. This familiar stitch involves clusters of double crochets, usually worked in sets of three, creating the iconic granny texture.
To begin, make a foundation chain long enough to form the width of your pumpkin. The length of the chain determines how tall your finished pumpkin will be. After the foundation chain, you’ll work rows of granny stitch clusters until the piece is wide enough to wrap around and form the pumpkin’s body.
Once you’ve crocheted a rectangle using granny stitch, the next step is sewing the short edges together to form a tube. This step is simple but transforms the flat piece into a three-dimensional base for the pumpkin. Make sure your stitches are secure so the stuffing will not escape later.
After forming the tube, gather one end tightly using a running stitch with your yarn needle. This closes the bottom of the pumpkin. Pull the yarn tight and secure it with knots to keep the base firmly shut.
Now it’s time to stuff your pumpkin. Add enough fiberfill or stuffing to make it plump, but avoid overstuffing, as this can stretch the stitches and distort the shape. Adjust the filling until the pumpkin feels firm but soft enough to maintain its structure.
Finally, gather the top opening in the same way you did for the bottom. Once secured, you’ll notice the pumpkin shape come to life. At this stage, you can add details like segmenting the pumpkin by wrapping yarn around its body or attaching a crocheted stem on top. The Granny Stitch Pumpkin Pattern- Step by Step Tutorial ensures that even beginners can achieve a satisfying result.
Creative Ideas and Uses for Granny Stitch Pumpkins
The beauty of the Granny Stitch Pumpkin Pattern- Step by Step Tutorial is that it leaves plenty of room for creativity. These pumpkins can be customized in countless ways to match your personal style or seasonal décor.
One idea is to experiment with colors. While orange is traditional, white pumpkins add a chic, farmhouse look, and multicolored yarn can create a playful, modern design. Metallic or sparkly yarns can even make your pumpkins festive enough for holiday décor.
Another customization is size. By simply adjusting the starting chain or the number of rows, you can create pumpkins of all shapes and sizes. A group of pumpkins in different sizes displayed together creates a charming autumn centerpiece.
Adding embellishments also makes your pumpkins more unique. Try attaching felt leaves, ribbons, or small crocheted vines. Natural materials like twigs, acorns, or cinnamon sticks for stems also give them an authentic and rustic touch.
These pumpkins also make thoughtful handmade gifts. Whether for friends, family, or coworkers, a crocheted pumpkin shows effort and creativity. They are especially appreciated around fall holidays and make beautiful hostess gifts.
If you enjoy selling handmade crafts, these pumpkins are excellent items for craft fairs or online shops. They are beginner-friendly to make, yet attractive enough to appeal to buyers looking for seasonal décor. The Granny Stitch Pumpkin Pattern- Step by Step Tutorial gives you the perfect foundation for turning this idea into a creative business.
Finally, you can even use the same method to create other themed decorations. By changing the yarn colors, your pumpkins can transform into squash, gourds, or other fall harvest items. This flexibility is one of the reasons granny stitch projects remain timeless and versatile.
Tips for Beginners and Finishing Touches
If you’re new to crochet, don’t worry. The Granny Stitch Pumpkin Pattern- Step by Step Tutorial is designed to be beginner-friendly, but there are still tips that can help you succeed.
First, practice your granny stitch before starting the pumpkin. Get comfortable with forming clusters of double crochet stitches so your pattern looks even and consistent.
Second, focus on maintaining even tension. Uneven tension can cause your stitches to look messy or your piece to be lopsided. Take your time and try to relax as you crochet.
Third, don’t overstuff your pumpkin. While it may seem tempting to fill it tightly, too much stuffing can stretch the granny stitch and ruin the texture. Aim for a balance that gives fullness without distorting the design.
Fourth, consider adding segment lines to make your pumpkin look more realistic. You can do this by wrapping yarn vertically around the pumpkin and tying it at the top and bottom. This creates the natural ridges found in real pumpkins.
Fifth, get creative with the stem. A crocheted stem works well, but you can also insert a small stick, cork, or cinnamon stick for a natural finish. Embellishments like ribbons, lace, or twine bows can make your pumpkin extra charming.
Lastly, don’t be afraid to experiment. Each pumpkin doesn’t have to look identical. The handmade quality is what makes them special, and with the Granny Stitch Pumpkin Pattern- Step by Step Tutorial, every creation will have its own unique charm.
FAQ about Granny Stitch Pumpkin Pattern- Step by Step Tutorial
1. Is the granny stitch pumpkin suitable for beginners?
Yes, the granny stitch is one of the easiest patterns to learn, making this pumpkin project perfect for beginners.
2. How long does it take to make one pumpkin?
Depending on your skill level, one pumpkin usually takes between 1 and 2 hours to complete.
3. What type of yarn works best for this project?
Both cotton and acrylic yarn work well. Medium-weight yarn is recommended for the best results.
4. Can I wash my granny stitch pumpkin?
Yes, but it’s best to hand wash gently and let it air dry to maintain its shape.
5. Can I make the pumpkins in different sizes?
Absolutely! Adjusting the starting chain and rows will give you larger or smaller pumpkins.
6. How do I make the pumpkin look more realistic?
You can add vertical yarn wraps to create segments and attach a natural stem like a cinnamon stick or twig.
Conclusion
The Granny Stitch Pumpkin Pattern- Step by Step Tutorial is a fun, creative, and rewarding project that combines the charm of granny stitch with the cozy feel of autumn. From gathering your materials to finishing with a stem and embellishments, this guide walks you through everything you need to know to create your own handmade pumpkins.
These crocheted pumpkins are perfect for decorating your home, giving as gifts, or even selling at craft fairs. They are customizable, beginner-friendly, and a great way to celebrate the fall season.
We hope this tutorial has inspired you to try making your own granny stitch pumpkins. Please share your sincere opinion about this guide and leave suggestions for future tutorials—we’d love to hear your feedback and continue crafting together!