
If you are looking for a creative and fun project to celebrate the spooky season, this Halloween crochet bandana- Step by Step Tutorial is the perfect choice. Crocheting your own bandana allows you to create a unique accessory that combines comfort, style, and a festive touch for Halloween. Whether you want to wear it yourself or give it as a gift, this tutorial will guide you through the entire process in simple steps.
The best part about following a Halloween crochet bandana- Step by Step Tutorial is the ability to customize it to your liking. You can choose from various yarn colors like orange, black, purple, or even glow-in-the-dark yarn to make your bandana truly stand out. Plus, crocheting is a relaxing hobby that lets you enjoy some peaceful moments while creating something special for the season.
In this guide, we will walk you through everything: gathering materials, learning the stitches, crocheting the main piece, and adding decorative details to make it perfect for Halloween. By the end of this Halloween crochet bandana- Step by Step Tutorial, you will have a stylish accessory that shows off your crafting skills and spreads the Halloween spirit.
Materials and Preparation for Halloween Crochet Bandana
Before starting the actual crocheting, preparation is key in this Halloween crochet bandana- Step by Step Tutorial. Having the right materials on hand will make your work easier and ensure a professional-looking final result.
First, choose the right yarn. Cotton yarn is a popular choice because it is soft, breathable, and comfortable to wear. However, you can also use acrylic yarn if you prefer something warmer for chilly autumn nights. Pick colors like orange, black, and purple for a classic Halloween vibe.
Next, you will need a crochet hook that matches your yarn weight. Most bandanas work well with a 4mm or 5mm hook, but always check the yarn label for recommendations. Having a yarn needle for weaving in ends and a pair of sharp scissors is also essential.
Before you begin the Halloween crochet bandana- Step by Step Tutorial, it is a good idea to measure the size of the bandana you want to create. A standard triangular bandana is about 20 inches wide at the top and 10 inches from the center to the point, but you can adjust the size according to personal preference.
Make sure to have stitch markers handy if you are new to crochet. They help you keep track of rows and stitches, making it easier to follow the tutorial without losing your place.
Lastly, find a comfortable and well-lit space to work. Crocheting requires focus, and a peaceful environment will make the experience much more enjoyable as you follow this Halloween crochet bandana- Step by Step Tutorial.
Crocheting the Main Body of the Bandana
With all materials ready, it is time to start crocheting the main body of your Halloween crochet bandana- Step by Step Tutorial. This section forms the base of your bandana, so take your time to ensure each stitch is neat and even.
Begin with a slip knot and chain four stitches. Join them with a slip stitch to form a small ring. This is the starting point for your triangular bandana, and you will be building rows from here to create the desired shape.
For the first row, chain three (this counts as your first double crochet) and make two double crochets into the center of the ring. Chain two, then add three more double crochets into the same center ring. This forms the first triangle-shaped row of your bandana.
Turn your work and chain three to start the next row. Work three double crochets into the chain-two space from the previous row, then chain two again, and add three more double crochets into the same space. Continue this pattern, increasing rows until your bandana reaches the desired size.
To make the Halloween crochet bandana- Step by Step Tutorial beginner-friendly, always remember that each row starts and ends with double crochets, and the chain-two space at the center is where you will create increases to form the triangle shape.
As you add rows, your bandana will gradually grow wider and longer. The number of rows you crochet will depend on the final size you want, but typically 15–20 rows create a good standard-sized bandana.
Adding Decorative Halloween Details
Now comes the fun part of the Halloween crochet bandana- Step by Step Tutorial—adding decorative elements to give your bandana a festive Halloween look. This is where you can get creative and personalize your project.
One simple way to decorate is by adding a border. After finishing the main triangle, crochet a round of single crochets around the edges using a contrasting color, like black or purple, to frame the bandana beautifully.
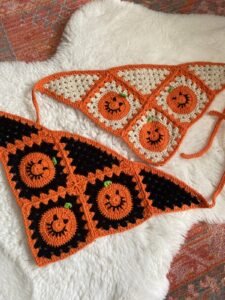
For a spooky touch, you can crochet small appliqués like pumpkins, bats, or spiderwebs and sew them onto the corners of the bandana. These little details will make your accessory unique and perfect for Halloween celebrations.
Another idea is to use variegated yarn that automatically creates stripes or patterns as you crochet. This saves time while adding visual interest to your bandana without needing extra decorations.
If you like sparkle, you can weave a thin metallic or glittery yarn along the border to give your Halloween crochet bandana- Step by Step Tutorial a magical glow when it catches the light.
Finally, you can attach small tassels or pom-poms to the corners of the bandana. These finishing touches not only look cute but also give the bandana a playful and festive charm.
Tips for Wearing and Caring for Your Crochet Bandana
Once your Halloween crochet bandana- Step by Step Tutorial is complete, it is time to enjoy wearing it and showing off your handmade creation. Here are some tips to keep it looking great and lasting longer.
When wearing the bandana, fold the top edge slightly before tying it around your neck or head. This helps it sit comfortably and prevents it from slipping out of place.
If you made your bandana with cotton yarn, it will be breathable and perfect for mild weather. For colder nights, use acrylic or wool yarn for extra warmth and comfort.
To keep the bandana clean, gently hand wash it in cold water with mild soap. Avoid using hot water or harsh detergents, as they can damage the yarn fibers and make the colors fade.
Lay the bandana flat to dry instead of hanging it, as hanging can stretch the fibers and change its shape. Blocking the bandana by shaping it while it dries will keep it looking neat and even.
Store the bandana flat in a drawer or box when not in use. Folding it neatly helps maintain its shape and prevents tangles or snags.
Lastly, consider making more than one bandana in different colors or sizes. This way, you will have options to match different Halloween outfits or even share them as thoughtful handmade gifts.
FAQ About Halloween Crochet Bandana- Step by Step Tutorial
Q1: How long does it take to crochet a Halloween bandana?
A: It usually takes between 2 to 4 hours, depending on your skill level and the size of the bandana. Beginners might take a little longer, while experienced crocheters can finish faster.
Q2: What is the best yarn for a Halloween crochet bandana?
A: Cotton yarn works well for a lightweight bandana, while acrylic or wool yarn provides warmth for cooler weather. Choose colors like orange, black, and purple for a festive look.
Q3: Can I make the bandana bigger or smaller?
A: Yes, you can adjust the number of rows in the main triangle section to create the size you prefer. More rows make a bigger bandana, fewer rows make a smaller one.
Q4: Do I need to know advanced crochet techniques?
A: No, this Halloween crochet bandana- Step by Step Tutorial is beginner-friendly and mainly uses basic stitches like chain, slip stitch, and double crochet.
Q5: Can I use leftover yarn for this project?
A: Absolutely! This is a great way to use scrap yarn, especially for decorative elements like borders or small appliqués.
Conclusion
This Halloween crochet bandana- Step by Step Tutorial showed you how to prepare materials, crochet the main body, add festive decorations, and care for your finished bandana. With just a few simple stitches, you can create a handmade accessory that adds charm and style to any Halloween outfit.
We hope this guide inspires you to start your own project and enjoy the process of crocheting for the spooky season.
Please share your honest opinions and suggestions—we would love to hear how your Halloween crochet bandana- Step by Step Tutorial turned out and any creative ideas you added to make it your own!