
If you have ever struggled with keeping your glasses safe and in one place, then learning Hello Kitty Crochet Glasses Holder- Step by Step Tutorial is the perfect solution. This charming project combines practicality with creativity, allowing you to craft a useful item while showcasing your love for handmade crochet pieces. The design is inspired by the iconic Hello Kitty character, giving it a playful and decorative touch. Whether you are a beginner or experienced crocheter, this project can be an enjoyable journey into functional crochet art.
The appeal of creating a Hello Kitty Crochet Glasses Holder- Step by Step Tutorial lies in its ability to blend cuteness with purpose. Instead of simply leaving your glasses on a table where they might get scratched or misplaced, you can store them in a soft, cozy holder. This makes it not only a protective accessory but also a delightful decorative piece for your bedside table, desk, or living room. Because it is handmade, it carries a personal charm that store-bought holders simply cannot replicate.
Another reason why the Hello Kitty Crochet Glasses Holder- Step by Step Tutorial is so popular is that it offers room for customization. You can experiment with different yarn colors, sizes, and decorative details to suit your style. Whether you prefer a classic pink Hello Kitty design or want to create a completely unique version, the project allows you to be as creative as you want. In addition, it makes a thoughtful handmade gift for friends, family members, or children who are fans of Hello Kitty.
Materials Needed for Hello Kitty Crochet Glasses Holder
To begin this Hello Kitty Crochet Glasses Holder- Step by Step Tutorial, you will first need to gather the right materials. Choosing good-quality supplies ensures that your project turns out sturdy, durable, and visually appealing. A soft yet firm yarn is ideal, as it will provide enough structure to hold the glasses while still feeling gentle to the touch.
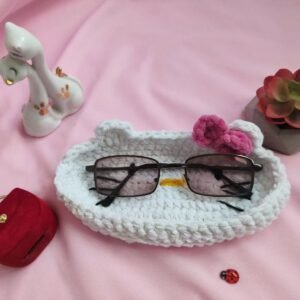
Start with cotton or acrylic yarn in classic Hello Kitty colors like white, pink, black, and yellow. White will form the base of the holder, while pink is usually used for the bow and accents. Black is needed for the whiskers and outline, and yellow for the nose. If you want to add your own creative twist, you can select alternative colors that match your personality or home decor.
Next, you will need a crochet hook suitable for your chosen yarn. Most tutorials recommend a 3.5mm to 4mm hook, which creates neat stitches without leaving gaps. Using the correct hook size ensures that your glasses holder will have enough firmness to stand upright and hold your eyewear securely.
You will also need basic crochet tools like scissors, a yarn needle, and stitch markers. The yarn needle will help in sewing the pieces together, especially the bow, ears, and facial features. Stitch markers are handy to keep track of rounds and ensure your project stays symmetrical.
Stuffing material is another essential item for this tutorial. Polyester fiberfill is commonly used to give the holder its soft, cushioned shape. This helps the glasses sit comfortably without sliding around. If you prefer eco-friendly alternatives, cotton stuffing or recycled fabric scraps can also be used.
Finally, prepare small embellishments such as safety eyes or black embroidery thread if you want to crochet or embroider the facial features. Adding these details carefully will bring the Hello Kitty design to life and give your holder its recognizable charm.
Step by Step Instructions for Crochet Glasses Holder
Once your materials are ready, it’s time to dive into the Hello Kitty Crochet Glasses Holder- Step by Step Tutorial. The process involves crocheting the main base, shaping the head, adding details, and assembling all the parts. This step-by-step guide ensures you can follow along easily, even if you are new to crochet projects.
Begin with the base of the glasses holder, which is typically shaped like a cylinder. This shape provides a secure cavity where your glasses can rest. Work in continuous rounds using single crochet stitches to create a sturdy fabric. The base should be firm enough to stand upright without collapsing.
Next, crochet the top part of the cylinder to form the Hello Kitty head. This requires slight shaping to achieve the rounded look. Increasing and decreasing stitches gradually will help you create the correct form. As you near the end, leave an opening for stuffing and insert fiberfill to give it structure. Then, close the opening securely to maintain the rounded shape.
Once the head is completed, move on to crocheting the smaller details. Start with the ears, which are simple triangular shapes. Make two identical ears and sew them symmetrically onto the top of the head. Be sure to position them evenly so the design remains balanced.
The iconic bow is a key feature of Hello Kitty. Crochet a small rectangle, pinch the middle, and wrap it with yarn to form the bow shape. Sew it onto one ear for the signature look. You can experiment with different colors for the bow to personalize your design.
For the facial features, embroider or crochet small details such as the eyes, nose, and whiskers. Place them carefully to match Hello Kitty’s well-known expression. Black thread or yarn is perfect for the whiskers, while safety eyes add a polished touch if you prefer not to embroider.
Finally, assemble all the parts together and make sure everything is securely attached. Once complete, your glasses holder should stand upright, display the adorable Hello Kitty face, and serve as a safe resting place for your glasses.
Tips to Personalize Your Hello Kitty Glasses Holder
One of the best aspects of this Hello Kitty Crochet Glasses Holder- Step by Step Tutorial is the freedom to personalize your design. Customization allows you to create a piece that not only serves its purpose but also reflects your creativity and personality.
A simple way to personalize the holder is by choosing unique color schemes. Instead of the traditional white and pink, you might use pastel shades, bold neon colors, or even holiday-inspired palettes. This makes the holder versatile and suitable for different occasions or decor themes.
Another idea is to add extra embellishments. For example, small crochet flowers, stars, or hearts can be sewn onto the holder to enhance its decorative look. You can also add beads, sequins, or embroidery to give it a touch of sparkle.
You might also consider making variations of Hello Kitty characters. By altering details such as bow size, facial expressions, or accessories, you can create a whole collection of themed holders. This is particularly fun if you want to gift multiple handmade pieces to friends or family.
For children, you can adapt the design to make it more playful. Adding bright colors, oversized bows, or even small crochet outfits for the character can make the holder more appealing to younger fans.
Finally, personalization extends to size as well. If you wear larger glasses, you can adjust the dimensions by adding more rows or stitches. Conversely, smaller glasses holders can be made for children or for reading glasses. This adaptability ensures your project is both functional and tailored to your needs.
Common Mistakes and How to Avoid Them
Like any crochet project, following the Hello Kitty Crochet Glasses Holder- Step by Step Tutorial can come with a few challenges. However, by being aware of common mistakes, you can avoid them and enjoy a smoother crafting experience.
One frequent mistake is choosing the wrong yarn type or size. If the yarn is too thin or soft, the holder might collapse instead of standing upright. To avoid this, always choose a medium-weight yarn that provides structure.
Another mistake is miscounting stitches, especially when working in continuous rounds. Losing track of stitches can cause the base or head to become uneven. Using stitch markers helps maintain accuracy and prevents frustration.
Some beginners may also overstuff or understuff the holder. Overstuffing makes the shape rigid and difficult to use, while understuffing causes it to collapse. The key is to insert just enough fiberfill to keep the holder firm yet soft.
Attaching the features unevenly is another issue. Misaligned ears, bow, or facial features can distort the overall look of Hello Kitty. Take your time to position the parts carefully before sewing them on.
Skipping the final step of securing knots and weaving in yarn ends can lead to pieces loosening over time. Always double-check that everything is securely fastened so the glasses holder lasts longer.
Lastly, rushing through the process can reduce the quality of your work. Crochet requires patience, so take your time and enjoy the creative journey.
FAQ About Hello Kitty Crochet Glasses Holder
1. Can beginners follow this Hello Kitty Crochet Glasses Holder- Step by Step Tutorial?
Yes, this tutorial is beginner-friendly. The project uses basic stitches such as single crochet, making it accessible even if you are new to crochet.
2. What type of yarn is best for this project?
Medium-weight cotton or acrylic yarn works best because it provides durability and structure. Cotton is especially good for a neat, clean finish.
3. How long does it take to complete the glasses holder?
On average, it takes about 3 to 5 hours, depending on your skill level and how detailed you want the features to be.
4. Can I wash the crochet glasses holder?
Yes, you can hand wash it gently with mild soap and let it air dry. Avoid machine washing, as it may distort the shape.
5. Is it possible to resize the holder for different glasses?
Absolutely. You can adjust the height and width by adding or reducing rows in the base and head section.
6. Can I sell the finished glasses holders?
Yes, handmade crochet items like this are popular at craft fairs and online shops. Just ensure you add your unique touches to the design.
Conclusion
Creating a Hello Kitty Crochet Glasses Holder- Step by Step Tutorial is both a practical and enjoyable project. It allows you to make a safe and charming place for your glasses while exploring creativity through crochet.
With the right materials, step-by-step guidance, and personal touches, you can craft a holder that is functional, adorable, and truly unique.
I hope this tutorial has inspired you to try making your own Hello Kitty glasses holder. If you do, please share your sincere opinion and suggestions—I would love to hear how your project turned out and what creative variations you came up with!