
How to Crochet a Flower Granny Square Bag – Step by Step Tutorial is the perfect guide for crafters who love creating unique, handmade accessories. This project blends the timeless charm of granny squares with the vibrant beauty of crocheted flowers, resulting in a stylish and functional bag. Whether you are a beginner looking to explore new skills or an experienced crocheter seeking fresh inspiration, this tutorial will walk you through every stage of the process.
Crocheting a flower granny square bag is not just about making something pretty—it’s also an opportunity to practice essential crochet techniques. The pattern involves creating individual granny squares with a central flower motif, joining them together, and finishing with sturdy straps. The beauty of this project lies in its adaptability; you can play with colors, yarn textures, and flower designs to make a bag that reflects your personality.
With this step by step tutorial, you will learn how to select the right materials, crochet each square with precision, assemble them into a durable bag, and add the final touches that make your work stand out. By the end, you will not only have a stunning handmade accessory but also gain confidence in your crochet skills. Now, let’s dive into the detailed process and bring your crochet bag to life.
Choosing Materials for Your Flower Granny Square Bag
When learning how to crochet a flower granny square bag – step by step tutorial, the first step is gathering the right materials. The type of yarn you choose will determine the look, feel, and durability of your bag. Cotton yarn is an excellent choice because it is sturdy, holds its shape well, and comes in vibrant colors perfect for flowers. Acrylic yarn is also a good option if you want something lightweight and budget-friendly.
The crochet hook size should match your yarn’s requirements, usually indicated on the yarn label. A medium hook, like 4 mm or 4.5 mm, works well for most granny square bags. Choosing the correct hook size ensures your stitches are even and your squares are consistent in size.
You will also need a yarn needle for sewing pieces together, scissors for trimming ends, and stitch markers if you want to keep track of your rounds. Some crafters like to add a fabric lining to their bag for extra sturdiness and a polished finish. If you decide to do this, you will also need basic sewing supplies.
Selecting the right color palette can make your bag truly special. Many crocheters prefer contrasting colors for the flowers and background to make the floral motif stand out. Bright, cheerful colors like yellow, pink, and turquoise work beautifully, while neutral tones like beige or grey create a more sophisticated look.
Consider the number of granny squares your design requires. Most small to medium bags use between 12 and 20 squares, but the exact number depends on your desired bag size. Having a clear plan from the start will help you avoid running out of yarn midway through the project.
Finally, ensure your workspace is comfortable and well-lit. Crocheting flowers and granny squares requires focus, and good lighting helps you see your stitches clearly, reducing mistakes and strain.
Crocheting the Flower Granny Squares
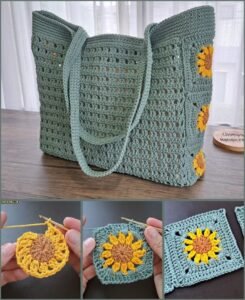
Creating the floral granny squares is the heart of this how to crochet a flower granny square bag – step by step tutorial. Start by making the flower motif in the center. This usually begins with a magic ring or a small chain circle, followed by rounds of petals in your chosen colors.
The first round forms the base of the flower, typically using double crochet stitches to create a full, rounded look. You can experiment with petal shapes by adjusting the number of stitches in each petal. For example, taller stitches create elongated petals, while shorter ones make them more compact.
After completing the flower, switch to the background color to form the granny square shape. This transition usually involves crocheting chain spaces and clusters of double crochet stitches, gradually expanding the square. Maintaining even tension ensures all your squares are the same size, which will make assembly easier later.
Count your stitches carefully as you work. Granny squares rely on symmetry, and even a single missed stitch can distort the shape. Using stitch markers at the corners can help you keep track of where to add increases.
Once you’ve completed your square, fasten off and weave in the yarn ends neatly. Repeat this process until you have enough squares for your bag. You can create all your flowers first, then complete the squares, or finish each square one at a time—it’s a matter of personal preference.
This stage is also an opportunity to be creative with your designs. Try using a variety of flower types in your squares or varying the background colors to create a patchwork effect.
Assembling the Flower Granny Square Bag
The next stage in how to crochet a flower granny square bag – step by step tutorial is assembling your squares into the bag shape. Lay out your completed granny squares on a flat surface and arrange them until you are happy with the design.
Most bags are constructed by joining squares in rows and then sewing or crocheting the rows together. You can use slip stitches, single crochet, or a whip stitch for joining—each creates a different finish. Slip stitch joins give a subtle, seamless look, while single crochet joins create a decorative ridge.
When joining, ensure the right sides of your squares are facing outwards. Align the stitches carefully to avoid uneven edges. Take your time during this stage; neat joins can greatly enhance the overall appearance of your bag.
After joining the body squares, fold the piece into the desired bag shape and join the sides. Some designs use a rectangular layout folded in half, while others involve more complex arrangements for unique shapes.
Add a base if you want extra stability. This can be a row of single crochet stitches worked around the bottom edge or a separate crocheted piece sewn into place. A sturdy base helps your bag keep its shape, especially if you plan to carry heavier items.
If you are adding a fabric lining, sew it at this stage before attaching the straps. The lining should fit snugly inside the bag and be secured along the top edge.
Adding Straps and Finishing Touches
The final stage in how to crochet a flower granny square bag – step by step tutorial is adding straps and embellishments. Straps can be crocheted directly onto the bag or made separately and sewn on. Popular strap styles include simple single crochet bands, braided straps, or thicker, reinforced straps for extra strength.
Make sure your straps are the same length and securely attached. Uneven or loosely sewn straps can cause discomfort and affect the bag’s balance when worn.
You can also add decorative elements such as tassels, pom-poms, or crochet buttons. These small touches personalize your bag and give it a professional finish.
Consider closing options for your bag. Some crafters add zippers, buttons, or drawstrings to secure the contents. If you prefer an open tote style, you can skip closures altogether.
Blocking your bag is a great way to give it a polished look. Lightly dampen the bag and shape it to the desired dimensions, allowing it to dry completely before use. This step helps even out the stitches and sets the overall shape.
Once finished, your flower granny square bag is ready to use or gift. Each time you carry it, you’ll showcase your crochet skills and creativity.
FAQ – How to Crochet a Flower Granny Square Bag
1. Can beginners make a flower granny square bag?
Yes, this project is suitable for beginners who are comfortable with basic stitches like chain, single crochet, and double crochet. The step-by-step approach makes it manageable.
2. How long does it take to make one bag?
The time varies depending on your speed and the complexity of your design. On average, you can complete it in a few days to a week.
3. What is the best yarn for a granny square bag?
Cotton yarn is ideal for durability and structure, while acrylic yarn offers a lighter, softer feel.
4. Can I make the bag without a lining?
Yes, but a lining adds durability and prevents items from poking through the gaps in the crochet.
5. How many granny squares do I need?
Most bags require between 12 and 20 squares, depending on the size and shape you want.
6. How do I make my bag sturdier?
Use a tighter stitch tension, choose a sturdy yarn, and consider adding a lining or reinforced base.
Conclusion
In this guide on how to crochet a flower granny square bag – step by step tutorial, we explored everything from choosing materials to crocheting flower squares, assembling them, and adding the finishing touches.
By following these instructions, you can create a beautiful, durable bag that reflects your personal style. I hope you feel inspired to try this project and make it your own.
Please share your honest opinion about this tutorial and leave suggestions for future guides—your feedback helps make each new project even better.