
Learning How to crochet a ghost for Halloween 🎃- Step by Step Tutorial is a fun and creative way to bring handmade charm to your spooky season decorations. Whether you’re a beginner or an experienced crocheter, making a cute little ghost can add a personal touch to your Halloween setup. Handmade crafts like these are perfect for parties, gifts, or simply to decorate your home during the holiday season.
One of the best things about learning How to crochet a ghost for Halloween 🎃- Step by Step Tutorial is that it allows you to customize your ghost in terms of size, color, and style. While white is the traditional color for ghosts, you can experiment with fun shades like purple, orange, or even glow-in-the-dark yarn to create something truly unique. The process is simple and enjoyable, making it suitable for crafters of all skill levels.
Another great advantage of following this How to crochet a ghost for Halloween 🎃- Step by Step Tutorial is the sense of accomplishment when you finish your first ghost. The project is small enough to complete in a single sitting, and once you learn the basic steps, you can create an entire family of adorable ghosts to display around your home or give as thoughtful handmade gifts to friends and family.
Materials Needed to Crochet a Ghost
Before you start the How to crochet a ghost for Halloween 🎃- Step by Step Tutorial, you need to gather the right materials. The main item, of course, is yarn. White acrylic yarn works well because it’s easy to handle, washable, and holds its shape nicely. However, feel free to use any color you prefer for a unique look.
The next essential tool is a crochet hook. A size 3.5mm or 4mm hook is perfect for small projects like this. It creates neat stitches that give your ghost a polished appearance without taking too long to finish.
You’ll also need some stuffing material to give your ghost a three-dimensional shape. Polyester fiberfill is lightweight and soft, making it the most popular choice for amigurumi-style crochet projects.
Don’t forget to have a pair of scissors and a yarn needle nearby. The scissors are for trimming yarn ends, while the needle will help you sew the different parts of the ghost together neatly.
For the eyes and mouth, you can use black yarn, embroidery thread, or even small safety eyes if you want a more defined look. These facial features bring your ghost to life and give it personality.
Lastly, keep a stitch marker handy if you are new to crocheting in the round. It helps you track where each round begins and ends, preventing mistakes and ensuring a symmetrical ghost shape.
Crocheting the Ghost’s Body
The first step in the How to crochet a ghost for Halloween 🎃- Step by Step Tutorial is making the body. Start with a magic ring, which creates a tight center for the base of your ghost. This prevents any stuffing from showing through the stitches later.
After making the magic ring, crochet six single crochet stitches into the ring and pull it tight. This forms the first round. Use your stitch marker here to keep track of where each new round begins.
For the next few rounds, you will increase gradually. This means adding two single crochet stitches into one stitch at regular intervals. Increasing helps the body widen into a round shape, perfect for holding the stuffing.
Continue crocheting without increasing after reaching the desired width. This creates the body’s main section and gives your ghost the right height. Keep the stitches even and tight to prevent gaps where the stuffing could peek through.
Once the body is tall enough, start decreasing by skipping some stitches at intervals. Decreasing slowly tapers the body, forming a nice rounded top for the ghost.
Before closing the top completely, fill the body with stuffing. Use small amounts at a time to distribute the filling evenly, keeping the shape smooth and well-formed.
Adding the Ghost’s Features
Now comes the fun part of the How to crochet a ghost for Halloween 🎃- Step by Step Tutorial: adding facial features and details. Start by deciding on the placement of the eyes. If you’re using safety eyes, attach them before closing the body entirely. This keeps them secure and prevents them from falling out later.
For crocheted or embroidered eyes, use black yarn or thread. Simple oval or circular shapes work best for a cute and friendly look, while slightly slanted eyes can give your ghost a mischievous expression.
The mouth can be as simple as a small curve for a smile or a round “O” shape for a surprised look. Experiment with different styles until you find one that matches your Halloween décor theme.
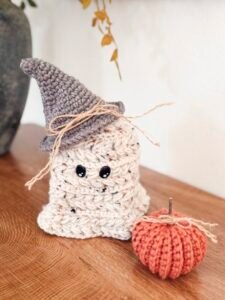
If you want to add extra personality, consider giving your ghost tiny accessories. A little bow tie, mini witch hat, or even a small felt pumpkin can make your ghost stand out. These details make each piece unique and fun.
Secure all facial features tightly so they stay in place even if the ghost is handled frequently. The goal is to create a decoration that is both adorable and durable.
After completing the features, weave in any loose yarn ends neatly on the inside of the ghost. This keeps the outer surface clean and professional-looking.
Final Touches and Display Ideas
The last stage of the How to crochet a ghost for Halloween 🎃- Step by Step Tutorial involves adding finishing touches and deciding how to display your ghost. If you want a classic ghostly shape, leave the bottom open and slightly frilled to resemble a floating figure.
Another option is to crochet a flat base and attach it to the bottom, allowing your ghost to stand upright on tables or shelves. This works especially well if you plan to use them as centerpieces for Halloween parties.
Consider making multiple ghosts in different sizes. A small family of ghosts looks adorable when displayed together, and varying their expressions adds character to your decorations.
You can also turn your crochet ghost into a hanging ornament. Simply attach a loop of yarn at the top so it can be hung from windows, door handles, or even on a Halloween tree if you have one.
If you used glow-in-the-dark yarn, place the ghosts where they can charge under light during the day. At night, they will emit a soft glow, adding a spooky yet playful vibe to your Halloween setup.
Finally, give your ghost a quick fluffing to adjust the stuffing and make sure it looks its best before displaying it proudly in your home.
FAQ about Crocheting a Ghost for Halloween
1. Is this project suitable for beginners?
Yes, the How to crochet a ghost for Halloween 🎃- Step by Step Tutorial is beginner-friendly and uses basic stitches that are easy to learn.
2. How long does it take to crochet one ghost?
On average, it takes one to two hours to complete a small ghost, depending on your skill level.
3. What size crochet hook should I use?
A 3.5mm or 4mm crochet hook works well for most yarn types used in this project.
4. Can I wash the crochet ghost?
Yes, if you use washable yarn and stuffing, the ghost can be hand-washed gently and air-dried.
5. Do I have to use white yarn only?
No, you can use any color you like. Creative shades like purple, orange, or glow-in-the-dark yarn add a fun twist.
6. Can I sell the ghosts I make using this tutorial?
Absolutely! Handmade ghosts are popular at craft fairs and online shops, especially around Halloween.
Conclusion
In this How to crochet a ghost for Halloween 🎃- Step by Step Tutorial, we explored everything from gathering materials to crocheting the body, adding features, and displaying your finished creation.
This project is fun, simple, and perfect for adding a handmade touch to your Halloween celebrations.
Now that you know how to crochet your own Halloween ghost, give it a try! Share your honest opinion about this tutorial and let us know if you have ideas or suggestions for future crochet projects—we’d love to hear from you!