
If you have ever wondered how to crochet a granny square bucket hat – step by step tutorial, you are in the right place. This charming, retro-inspired accessory has become a trendy fashion statement while remaining practical and customizable. Whether you are a beginner or an experienced crocheter, creating your own bucket hat using the timeless granny square technique can be both fun and rewarding. With the right yarn, hook, and a little patience, you will have a hat that is stylish, unique, and handmade with love.
The beauty of the granny square bucket hat lies in its versatility. You can make it using vibrant colors for a bold statement or opt for neutral shades for a more classic look. The process is straightforward: you create several granny squares, join them together, and then shape them into a hat. This step-by-step method ensures that even beginners can follow along without feeling overwhelmed. Plus, it is an excellent way to use leftover yarn from other crochet projects.
In this tutorial, we will break down exactly how to crochet a granny square bucket hat from start to finish. We will cover the tools and materials you need, how to make perfect granny squares, how to assemble the hat, and how to customize it to match your personal style. By the end, you will have all the knowledge you need to create a beautiful handmade accessory that you can proudly wear or gift to someone special.
Materials and Tools Needed
Before you start learning how to crochet a granny square bucket hat – step by step tutorial, gather all the necessary supplies. This preparation will make the process smoother and help you avoid interruptions while working.
You will need a crochet hook that matches the yarn weight you choose. Typically, a 4 mm to 5 mm hook works well for medium-weight yarns, which are popular for hats. Selecting the right yarn is crucial because it affects the structure, comfort, and appearance of your bucket hat. Cotton yarn is a great choice for warmer weather, while acrylic or wool blends are ideal for cooler seasons.
A yarn needle will be essential for weaving in loose ends once your granny squares are complete. Scissors are necessary for trimming excess yarn, and stitch markers can help keep track of your starting points, especially if you are a beginner. These tools might seem simple, but they can make a big difference in the efficiency and neatness of your crochet project.
Choosing your color palette is one of the most enjoyable steps. You can go for bold, contrasting colors for a playful look or choose a monochromatic scheme for an elegant style. Since granny square bucket hats are made from multiple pieces, this is your chance to experiment with colors and patterns.
Lastly, make sure you have a comfortable workspace with good lighting. Crocheting requires attention to detail, and a well-lit, organized space will help you work more efficiently. Setting everything up before you start will also keep your creative momentum going.
Once all your tools are ready, you can confidently move on to creating the foundation of your hat: the granny squares.
Making the Perfect Granny Squares
The foundation of how to crochet a granny square bucket hat – step by step tutorial begins with creating individual squares. The granny square is a classic crochet motif that is both easy to learn and highly versatile.
Start by making a slip knot and chaining four stitches. Join the chain with a slip stitch to form a small loop. This loop will serve as the center of your granny square. Chain three stitches to act as your first double crochet, then work two more double crochets into the loop. This forms your first cluster.
Next, chain two to create a corner, then add three double crochets into the center loop again. Repeat this process until you have four clusters, each separated by chain-two spaces. Finish the round by slip-stitching into the top of the beginning chain-three. You now have the first round of your granny square.
For the second round, start in any corner space by chaining three and adding two double crochets, then chain two and work three more double crochets in the same space. Continue working around, adding three double crochets in each space and creating chain-two corners. This pattern is what gives the granny square its distinctive, open, lacy look.
Continue adding rounds until your granny squares reach the size you want. For a bucket hat, smaller squares around 3–4 inches across tend to work best. Keep your stitches even and consistent to ensure your squares fit together neatly when assembled.
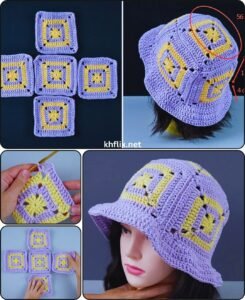
Repeat this process until you have enough squares for your hat. Typically, you will need about six for the crown and several more for the sides, depending on your desired hat size.
Assembling Your Bucket Hat
Once your granny squares are complete, the next step in how to crochet a granny square bucket hat – step by step tutorial is joining them together. This is where your project starts taking shape and transforming into a wearable accessory.
Arrange your squares in the desired layout. For the crown of the hat, join the squares edge to edge in a circle, making sure the corners align neatly. You can join them using a slip stitch seam or by sewing them together with a yarn needle. Both methods work well, so choose the one you are most comfortable with.
After forming the crown, begin attaching additional rows of squares to build the sides of the hat. This step determines the hat’s depth and fit, so it is important to measure as you go. If you want a snug fit, keep the number of squares minimal; for a looser fit, add more squares or rounds.
Once the sides are assembled, you can add the brim. For the brim, switch to working in continuous rounds rather than attaching more squares. Start with single crochets all the way around, then gradually increase stitches every few rounds to create a gentle outward flare. This will give your bucket hat its characteristic shape and provide sun protection.
Make sure to keep your tension consistent while adding the brim to avoid uneven edges. The size of the brim can be adjusted to your preference—short for a casual look or wide for a more dramatic style.
Finally, weave in all loose ends with your yarn needle. This step is essential for durability and gives your hat a professional, finished look.
Customizing and Styling Your Hat
The final step in how to crochet a granny square bucket hat – step by step tutorial is making it truly your own. Customization is where you can showcase your personality and creativity.
One easy way to personalize your hat is through color combinations. Try alternating light and dark shades in your squares for contrast or create a gradient effect by gradually changing colors. You can also experiment with different stitch patterns within your granny squares to add texture.
Adding embellishments is another option. You can sew on small crochet flowers, beads, or buttons for extra flair. Just make sure these additions are securely fastened so they don’t come loose during wear.
If you want your hat to have a softer, slouchier feel, consider using a lighter yarn or adding an extra row to each square. For a more structured look, use a stiffer yarn and keep your stitches tight.
Another customization idea is lining the inside of your bucket hat with a lightweight fabric. This adds comfort, hides the seams, and can make the hat warmer for cooler months. Choose a fabric that complements your yarn colors for a coordinated look.
Finally, remember that bucket hats can be styled in many ways. Pair yours with a sundress for a summer picnic, wear it to the beach, or even use it as a statement piece during music festivals. The versatility of a granny square bucket hat means you can adapt it for almost any occasion.
FAQ – How to Crochet a Granny Square Bucket Hat
1. How many granny squares do I need for a bucket hat?
Usually, you will need around six for the crown and 10–12 for the sides, depending on your head size and the size of the squares.
2. What type of yarn is best for a granny square bucket hat?
Cotton yarn is perfect for summer, while acrylic or wool blends are better for cooler seasons. Choose a yarn that feels comfortable against your skin.
3. Can beginners make a granny square bucket hat?
Yes! The granny square is a beginner-friendly motif, and assembling the hat is straightforward with basic crochet skills.
4. How long does it take to crochet one?
Depending on your speed and skill level, you can finish a hat in 1–3 days.
5. Can I make the brim larger?
Absolutely. Simply add more increase rounds when crocheting the brim until it reaches your desired width.
6. How do I wash my crochet bucket hat?
Follow the care instructions for your yarn. Most cotton hats can be gently hand-washed and laid flat to dry.
Conclusion
Now that you know how to crochet a granny square bucket hat – step by step tutorial, you can create a stylish and personalized accessory that combines comfort, fashion, and the satisfaction of handmade craftsmanship.
We covered everything from materials and making perfect granny squares to assembling, customizing, and styling your hat.
I’d love to hear your thoughts—leave a sincere opinion and share any suggestions you might have for improving this tutorial. Your feedback will help make future crochet guides even better.