
If you have ever wondered how to crochet a little fish- step by step tutorial, you have come to the right place. Crocheting is one of the most creative and relaxing hobbies out there, and making a small, cute fish can be the perfect project for beginners or experienced crocheters alike. Whether you want to use your little fish as a keychain, a toy, or even as home décor, this guide will walk you through everything you need to know. By following this how to crochet a little fish- step by step tutorial, you will not only learn new skills but also create something truly unique and handmade.
Before diving into the project, it is important to gather all the materials and understand the basic techniques needed. Many people love the idea of creating something small and adorable that does not take too much time to complete. That is why a how to crochet a little fish- step by step tutorial is so useful. It allows you to follow along at your own pace while ensuring that you get clear and structured instructions that are easy to understand.
In this article, we will cover everything from the materials you need to the final touches that will bring your fish to life. We will break it down into clear sections with tips, tricks, and detailed steps. By the end, you will be able to confidently say you know how to crochet a little fish- step by step tutorial and maybe even create more for friends and family.
Materials and Tools Needed for Your Crochet Little Fish
To begin this how to crochet a little fish- step by step tutorial, you need to gather some simple materials that are easy to find. Having the right tools will make the process smoother and more enjoyable. The good news is that you do not need to spend a lot of money, and you might already have some of these items at home.
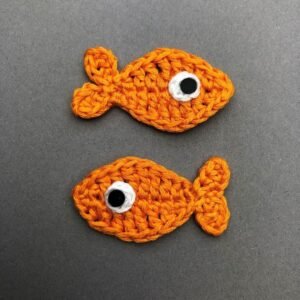
First, you will need yarn in the color of your choice. Many people prefer using cotton yarn because it gives the fish a neat look and is easy to work with. Bright colors like blue, orange, or yellow can make your fish look lively and fun. Having multiple colors can also add some nice contrast to the fins and tail.
Next, you need a crochet hook that matches the thickness of your yarn. Most yarn labels give recommendations for hook sizes, so be sure to check. For small projects like this, a smaller hook usually works best because it keeps the stitches tight and neat. A size between 2.5 mm and 3.5 mm is often perfect.
You will also need some stuffing material to fill the inside of your fish. Polyester fiberfill is commonly used because it is soft, lightweight, and washable. This will give your fish a nice 3D shape. Some people even add a small rattle inside if they want to turn it into a baby toy.
Another essential tool is a yarn needle. This is used to weave in the ends and sew the different parts of the fish together. A pair of scissors will also be needed to cut the yarn neatly. Optional items include safety eyes if you want to give your fish a more realistic look, or you can simply stitch the eyes using black yarn.
Lastly, make sure you have a stitch marker handy. This small tool will help you keep track of where each round begins, especially if you are new to crocheting in the round. Following this how to crochet a little fish- step by step tutorial becomes much easier when you stay organized from the start.
Step-by-Step Instructions for Crocheting the Little Fish
Now that you have your materials ready, we can begin the actual crocheting process. The how to crochet a little fish- step by step tutorial will guide you through each stage carefully so you can create a neat and cute little fish without feeling overwhelmed.
The first step is to start with a magic ring. This is a basic technique in crochet that allows you to begin projects in the round without leaving a hole in the center. If you are not familiar with it, do not worry—there are plenty of simple ways to practice before you start your fish.
After creating the magic ring, you will crochet several single crochet stitches into it. This forms the base of your fish’s body. By increasing the number of stitches in each round, the body will gradually widen, giving it a rounded, three-dimensional shape.
Once the body reaches the desired size, you will start decreasing the stitches to form the tail end of the fish. This is done by crocheting two stitches together at regular intervals, which makes the body taper nicely. The how to crochet a little fish- step by step tutorial explains exactly when to increase and decrease so your fish keeps the right proportions.
The tail itself is made separately using chains and single crochets, then attached to the body. You can make it as big or as small as you like. Some people even add extra fins on the sides for a more detailed look.
Finally, after stuffing the body with fiberfill, you will close up the opening and sew on any additional details, such as fins or eyes. The result will be a charming little fish that looks like it just swam out of your imagination.
Tips to Customize Your Crochet Little Fish
One of the best things about this how to crochet a little fish- step by step tutorial is how easy it is to customize. You can change the size, colors, or even add fun accessories to make each fish unique.
To make a bigger fish, simply use thicker yarn and a larger hook. This will create a larger body without changing the number of stitches. On the other hand, using thin yarn and a small hook will give you a tiny fish, perfect as a keychain or ornament.
Color combinations also make a big difference. Stripes, polka dots, or even rainbow colors can be added by switching yarns at different rounds. This gives your fish a playful and creative touch.
Adding small accessories such as a little bow, a hat, or embroidered patterns on the fins can make your fish stand out even more. Many crafters love personalizing each project, especially when giving them as gifts.
If you want your fish to look realistic, consider using safety eyes or even small beads for the eyes. These small details make a big difference in the final look. However, if you are making a baby toy, it is safer to stitch the eyes with yarn.
Finally, do not be afraid to experiment. Crocheting is about creativity, and this how to crochet a little fish- step by step tutorial can be a starting point for countless variations and ideas.
Common Mistakes and How to Avoid Them
Even with a clear how to crochet a little fish- step by step tutorial, beginners sometimes run into small challenges. The good news is that most mistakes are easy to fix once you understand what went wrong.
One common issue is uneven tension. If your stitches are too tight, the fish might look stiff and hard to shape. If they are too loose, stuffing may show through. Practicing a few rounds on scrap yarn before starting the real project can help you find the right tension.
Another mistake is losing track of the stitch count. This can make the fish lopsided or misshapen. Using a stitch marker and counting carefully at the end of each round prevents this problem.
Sometimes beginners forget to stuff the fish before closing the body. Once the opening is closed, it is difficult to add the filling evenly. Always remember to stuff firmly but gently before sealing the last round.
Color changes can also be tricky. If not done neatly, they can leave gaps or uneven lines. Practice switching colors at the end of a round rather than in the middle for a cleaner look.
Finally, do not rush. Crocheting should be enjoyable and relaxing. Taking your time ensures each part of your fish looks neat and well-made, just as shown in the how to crochet a little fish- step by step tutorial.
FAQ About How to Crochet a Little Fish
1. How long does it take to crochet a little fish?
It usually takes between one to two hours, depending on your skill level and the size of the fish you are making.
2. Can I use leftover yarn for this project?
Yes, this is a perfect project for using small amounts of leftover yarn since the fish does not require much material.
3. Do I need to know advanced crochet techniques?
No, basic stitches like single crochet, increase, and decrease are all you need for this project.
4. Can I wash the crochet fish?
If you use washable yarn and stuffing, the fish can be gently hand-washed and air-dried.
5. What can I use the little fish for?
It can be a keychain, a toy, a decorative piece, or even part of a mobile for a baby’s crib.
6. Is this project beginner-friendly?
Yes, the how to crochet a little fish- step by step tutorial is designed to be simple and easy to follow for beginners.
Conclusion
We have reached the end of this how to crochet a little fish- step by step tutorial, and by now you should feel confident enough to start your own project.
From gathering materials to adding the final touches, we covered everything you need to create a charming little fish that you can personalize in countless ways.
I hope this guide was helpful and inspiring. If you try making your own crochet little fish, please leave a sincere opinion about your experience and share any suggestions for future tutorials. Your feedback helps make each project even better for everyone!