
If you have ever wondered how to crochet an apple coaster-step by step tutorial, you are in the right place. Crocheting is not only a relaxing hobby but also a way to create practical and decorative items for your home. An apple coaster is a small, fun, and seasonal project that is perfect for beginners as well as experienced crocheters who want something quick and enjoyable to make. By following this guide, you will learn everything from choosing the right yarn to finishing touches that make your coaster look polished and professional.
The best thing about an apple coaster is that it is both functional and decorative. It can protect your furniture from heat or moisture while adding a touch of handmade charm to your table. Whether you want to make them for your kitchen, as gifts for loved ones, or even as items to sell at craft fairs, learning how to crochet an apple coaster-step by step tutorial gives you the confidence and skills to create something truly special.
This project also allows you to practice essential crochet stitches in a simple format. You will be working mainly with circles and basic shapes, which makes it a beginner-friendly design. At the same time, you will enjoy watching your project take shape quickly, with a satisfying result that can be completed in just a few hours. In the next sections, we will go over everything you need to know, from gathering materials to shaping and finishing your apple coaster.
Materials and Preparation for the Apple Coaster
To begin learning how to crochet an apple coaster-step by step tutorial, you need to prepare your materials. The choice of yarn is important for the final look of your coaster. Cotton yarn is recommended because it absorbs moisture and is heat-resistant, which is perfect for coasters. Choose a red or green yarn for the apple body, a small amount of brown for the stem, and a little green for the leaf.
You will also need an appropriate crochet hook size. A 3.5 mm to 4 mm hook usually works well with cotton yarn. Using the right hook size ensures your stitches are tight and sturdy, so the coaster maintains its shape when in use. Make sure you also have scissors and a yarn needle to weave in the ends when finishing your project.
Before starting, it is always a good idea to practice the stitches you will use. This project typically includes chain stitches, slip stitches, single crochet, and double crochet. If you are a beginner, take a few minutes to practice these stitches to build confidence before beginning the coaster.
Another important step is to decide on the size of your coaster. Standard coasters are about 4 to 5 inches in diameter, but you can adjust by adding or reducing rounds. Having a clear idea of the size helps keep your project consistent.
Once your materials are ready, find a comfortable place to sit with good lighting. Crocheting is a relaxing activity, and creating the right atmosphere helps you focus and enjoy the process. This preparation stage ensures your apple coaster crochet tutorial goes smoothly from beginning to end.
Finally, keep a small notebook or your phone nearby to track your rounds. Especially for beginners, it can be easy to lose count, so marking your progress helps maintain even stitches and a neat final look.
Step-by-Step Guide to Crocheting the Apple Body
The main part of learning how to crochet an apple coaster-step by step tutorial is making the apple body. This is usually created by crocheting in the round, starting from the center and increasing gradually to form a circle. Begin with a magic ring or a chain-4 loop closed with a slip stitch to form the center.
Next, you will work several single crochets into the ring to form the first round. For example, 8 to 10 single crochets are a good start. Pull the yarn tail to close the ring tightly. This creates the foundation for your coaster and ensures no hole appears in the middle.
On the next round, you will increase by placing two single crochets in each stitch. This doubles the stitch count and begins to expand the circle. Make sure your stitches are even and not too tight so the coaster lies flat.
Continue increasing in each round by following the formula: in round three, place two single crochets in one stitch, then one in the next, and repeat. In round four, place two single crochets in one stitch, then one single crochet in the next two stitches, and so on. This gradual increase creates a flat circle that will become the apple base.
Keep crocheting until the coaster reaches your desired size, usually around 12 to 14 rounds depending on your tension and yarn weight. Remember to check that the circle remains flat; if it starts to curl, your stitches are too tight, and if it ruffles, they may be too loose.
Once the circle is complete, finish off by slip stitching into the last stitch and fastening off. You now have the apple body, which forms the main part of your coaster. The next step will be adding the small but important details that make it look like a real apple.
Adding the Stem and Leaf
Now that you have the apple base, the next stage in how to crochet an apple coaster-step by step tutorial is adding the stem and leaf. These small elements bring your project to life and give it a recognizable apple appearance.
For the stem, use brown yarn. Attach the yarn at the top edge of the coaster and chain about 5 stitches. Then, single crochet back down the chain to create a small but firm stem. Slip stitch into the base and fasten off securely. The stem should be short and upright, just like on a real apple.
Next, create the leaf using green yarn. You can crochet a small chain of 7 to 8 stitches, then work single crochet, half double crochet, and double crochet into the chain to create a leaf shape. On the way back down, mirror the stitches on the other side of the chain. This forms a symmetrical leaf that looks natural.
Attach the leaf near the stem using a slip stitch or by sewing it with the yarn needle. Make sure it is positioned slightly at an angle to give a natural, organic look. Weaving in all loose ends carefully will give your coaster a professional finish.
Adding these details may seem small, but they completely transform the project. Without them, the coaster is simply a round shape. With the stem and leaf, it becomes a charming apple design that stands out on your table.
At this stage, take a moment to admire your work. You have learned not only to crochet in the round but also to add creative details. These skills can be applied to many other crochet projects. This is the magic of a handmade apple coaster tutorial—turning basic stitches into delightful designs.
Once finished, your coaster is ready to use or gift. But before that, let’s discuss some finishing touches to make sure it is both beautiful and durable.
Finishing Touches and Care Instructions
The final step in how to crochet an apple coaster-step by step tutorial is giving your project the finishing touches it deserves. After attaching the stem and leaf, use a yarn needle to weave in any loose ends neatly. This prevents unraveling and keeps the coaster looking clean.
Blocking is another important step. Wet blocking or steam blocking helps the coaster lie flat and hold its shape. Simply dampen the coaster, pin it to a flat surface in the correct shape, and let it dry completely. This makes the apple look polished and even.
If you want to make the coaster sturdier, consider adding a felt backing. Cut a round piece of felt slightly smaller than the coaster and stitch or glue it onto the back. This provides extra thickness and stability, especially if the coaster will be used frequently.
Proper care will also extend the life of your apple coaster. Since cotton yarn is machine washable, you can wash it gently with cold water and mild soap. Air drying is recommended to maintain its shape and prevent shrinkage.
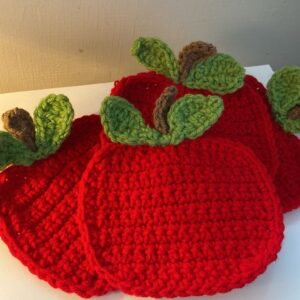
Another nice finishing touch is making a set of apple coasters in different colors. Red, green, and even yellow apples create a cheerful and colorful collection. They also make thoughtful handmade gifts for friends and family.
By taking time with these finishing details, you ensure your project not only looks handmade but also feels durable and high-quality. That is the true beauty of a step by step apple coaster tutorial—teaching you not only the process but also the care that goes into handmade creations.
FAQ About How to Crochet an Apple Coaster
1. Can beginners make an apple coaster easily?
Yes! This project is ideal for beginners because it uses basic stitches like chain, single crochet, and double crochet. The tutorial breaks it down into easy steps.
2. What type of yarn is best for crocheting apple coasters?
Cotton yarn is the best choice because it absorbs moisture, withstands heat, and holds its shape well, making it perfect for functional coasters.
3. How long does it take to make one apple coaster?
On average, it takes about 1–2 hours to complete one coaster, depending on your crochet speed and experience.
4. Can I make larger or smaller apple coasters?
Yes, you can adjust the size by adding or reducing the number of rounds when crocheting the apple base.
5. Are apple coasters good for gifts?
Absolutely! Handmade apple coasters make charming and practical gifts for birthdays, holidays, or housewarmings.
6. Do I need special tools for this project?
No, just yarn, a crochet hook, scissors, and a yarn needle are enough to complete the project. Blocking tools are optional but helpful.
Conclusion
In this guide on how to crochet an apple coaster-step by step tutorial, you learned how to prepare materials, crochet the apple body, add a stem and leaf, and finish your project with care.
The result is a beautiful, functional handmade item that can brighten up your home or make a thoughtful gift.
Now it’s your turn to try this project and enjoy the creative process. Crochet is all about patience, practice, and personal expression. If you make your own apple coaster, share your thoughts, leave a sincere opinion, and let us know any suggestions for improving this tutorial. Your feedback helps inspire even more handmade creativity!