
If you are looking for a fun and easy crochet project that brings a touch of sweetness to your handmade crafts, then How to Crochet Cupcake Applique – Step by Step Tutorial is the perfect choice for you. Crochet appliques are small decorative motifs that can be attached to other crochet items like blankets, hats, or bags to make them more charming and unique. The cupcake applique is especially adorable—it adds a playful and cheerful element to your projects and is suitable for crafters of all skill levels.
Creating a crochet cupcake applique is not only enjoyable but also a great way to use up leftover yarn. It allows you to experiment with colors, textures, and patterns without committing to a large project. With just a few simple stitches and a bit of creativity, you can crochet beautiful cupcake appliques that look sweet enough to eat. This Step by Step Tutorial will walk you through the entire process, from choosing the right yarn to stitching the finishing touches.
By learning How to Crochet Cupcake Applique – Step by Step Tutorial, you’ll gain new crochet skills and discover how small details can make a big impact on your creations. You’ll find that this project is versatile, quick to make, and a perfect addition to many handmade items. Whether you’re decorating a child’s blanket or personalizing a tote bag, these appliques will instantly make your project stand out with a whimsical touch.
Materials You’ll Need to Crochet a Cupcake Applique
Before starting your How to Crochet Cupcake Applique – Step by Step Tutorial, make sure you have all the materials you need. Having everything prepared helps you work smoothly and enjoy the process. The best part about this project is that it requires only a small amount of yarn and very simple tools.
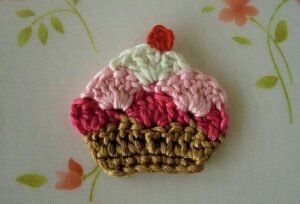
To create your cupcake applique, you’ll need three main yarn colors: one for the cupcake base, one for the frosting, and one for decorative details such as cherries, sprinkles, or hearts. Cotton yarn is an excellent choice because it holds its shape well and has a clean, polished look. You can also use acrylic yarn if you prefer a softer texture.
Next, you’ll need a crochet hook that matches your yarn weight—commonly a 3.5mm or 4mm hook works great for this project. You’ll also need a yarn needle for weaving in ends and scissors for cutting the yarn. If you want to add extra embellishments like beads or small buttons, keep those nearby as well.
A stitch marker can be useful if you want to keep track of your rows, especially if you’re new to crochet. Although the cupcake applique is small, accuracy is important to ensure all pieces fit together perfectly.
Once your materials are gathered, find a comfortable workspace with good lighting. Having a calm, organized setup helps you enjoy the crafting process even more and makes your stitches look cleaner.
Finally, have your favorite color combinations in mind before you start. Cupcakes are all about creativity and fun—think of pastel pinks, mint greens, sunny yellows, or chocolate browns to give your applique a deliciously cute look.
Step-by-Step Instructions to Crochet the Cupcake Base and Frosting
Now that you have your materials ready, it’s time to begin the main part of How to Crochet Cupcake Applique – Step by Step Tutorial. The design consists of two main parts: the cupcake base and the frosting on top. Each part is made separately and then sewn or joined together.
-
Start the cupcake base: Begin with the color you’ve chosen for the cupcake wrapper. Make a magic ring or chain four and join with a slip stitch to form a small loop. Then chain one and work several single crochets (around eight to ten) into the ring. Join with a slip stitch and pull the ring tight.
-
Shape the wrapper: Continue crocheting in rounds or rows, depending on your preferred design. For a more defined cupcake look, work half-double crochet or double crochet stitches to make it taller. Alternate between front and back post stitches to create a ribbed texture that mimics a real cupcake wrapper.
-
Change color for frosting: Once the base is finished, switch to your frosting color. Join the yarn at the top of the base and begin crocheting in rows to create a wavy, fluffy texture that resembles icing. You can achieve this effect by alternating double and half-double crochet stitches in the same row.
-
Add frosting details: To make the frosting more realistic, you can add small picots or scalloped edges. This adds a soft, whipped cream-like finish that makes your applique look extra sweet.
-
Make a cherry or topping: Using a small amount of red or pink yarn, make a tiny circle or ball to represent a cherry on top. Sew or glue it securely to the frosting.
-
Assemble the applique: Place the frosting piece on top of the cupcake base and stitch around the edges using a yarn needle. Make sure the pieces are centered and securely attached. You can also use a small amount of fabric glue if preferred.
By the end of these steps, you’ll have a perfectly shaped cupcake applique ready to decorate any project you like.
Decorating and Customizing Your Cupcake Applique
One of the most enjoyable parts of How to Crochet Cupcake Applique – Step by Step Tutorial is adding your personal touch. Customizing your cupcake design gives you endless possibilities to make each one unique.
Start by playing with different color combinations. For instance, a light pink frosting with a chocolate brown base looks classic and cute, while pastel blue with white frosting gives a cool, refreshing vibe. You can also use bright, bold colors for a playful, cartoon-style look.
If you want to add texture and sparkle, consider using metallic or glitter yarns for the frosting. They create a shimmering effect that looks magical, especially for holiday or birthday-themed crafts.
Another fun idea is to embroider small sprinkles using leftover yarn in various colors. Simply make tiny stitches across the frosting area to mimic candy decorations. You can also add small beads to represent shiny sugar pearls.
For a more three-dimensional effect, try layering your appliques. Crochet two cupcake bases and lightly stuff one before sewing them together. This gives your applique a soft, plushy feel that works beautifully for children’s projects.
Finally, experiment with attaching your cupcake appliques to different items. They look adorable on tote bags, hats, scarves, baby blankets, and even kitchen towels. Wherever you add them, they instantly brighten up the piece and make it feel special.
Helpful Tips for a Professional Finish
Even a small project like How to Crochet Cupcake Applique – Step by Step Tutorial can benefit from a few helpful tips to make your work neater and more polished. Paying attention to small details ensures that your finished applique looks high-quality and long-lasting.
First, always make sure your tension is even throughout the project. Uneven tension can cause your applique to curl or look uneven. If your stitches are too tight, try using a slightly larger hook; if too loose, go down a hook size.
Second, weave in your yarn ends carefully. Use a yarn needle and weave in at least an inch of tail to prevent unraveling over time. Trim the ends neatly once they’re secured.
Third, block your applique once it’s finished. Lightly dampen it and pin it to a flat surface, allowing it to dry in shape. Blocking helps smooth out the stitches and gives your applique a more professional look.
Fourth, if you’re attaching the applique to another project, use matching thread or yarn for sewing. This makes the attachment invisible and keeps the focus on the design itself.
Fifth, store your finished appliques flat in a clean, dry place. Avoid folding or stacking them too tightly, as this can distort their shape.
And lastly, always remember that practice makes perfect! The more you crochet appliques, the faster and more consistent your stitches will become. Each new piece you make will look better than the last.
Common Mistakes to Avoid When Crocheting Cupcake Appliques
While following How to Crochet Cupcake Applique – Step by Step Tutorial, beginners often make small mistakes that can affect the final result. Fortunately, these are easy to fix with a bit of attention and patience.
One common mistake is forgetting to count stitches, which can make your cupcake base uneven. Always count your stitches at the end of each row to ensure symmetry.
Another issue is using the wrong yarn weight. If the yarn is too thick, your applique may become bulky. On the other hand, if it’s too thin, the stitches may appear loose and fragile. Choose medium-weight yarn for best results.
Sometimes, color changes can leave small gaps or loose threads. To prevent this, always pull the new yarn color tightly and secure the ends before continuing.
Crocheting too tightly is another frequent problem. Tight stitches make it hard to insert the hook and can distort the shape of the frosting. Keep your hand relaxed and let the yarn flow naturally.
Avoid over-decorating your applique with too many beads or embellishments, as this can make it heavy and distract from the cupcake design itself.
Lastly, don’t rush through the steps. Take your time with each part, especially when assembling and sewing the pieces together. Careful stitching ensures your applique looks neat and durable.
FAQ – How to Crochet Cupcake Applique
1. Can I make the cupcake applique bigger or smaller?
Yes! Simply use thicker yarn and a larger hook for a bigger applique, or finer yarn and a smaller hook for a tiny one.
2. What type of yarn works best for appliques?
Cotton yarn is ideal because it gives a crisp, clean finish. However, acrylic yarn also works well if you want a softer texture.
3. Can I wash crochet cupcake appliques?
Yes, most can be hand washed with mild soap and cool water. Be sure to air dry to maintain the shape.
4. How can I attach the applique to other projects?
You can sew it on with matching yarn or use fabric glue if you prefer a non-sewing method. Sewing is usually more durable.
5. Can I sell the appliques I make using this tutorial?
Absolutely! Handmade appliques are popular in craft markets and online shops. Just make sure to use your own creativity in colors and decoration.
6. What if my applique curls up after finishing?
This usually happens due to tight tension. Gently block your applique by dampening and pinning it flat to fix the shape.
Conclusion
Learning How to Crochet Cupcake Applique – Step by Step Tutorial is a delightful way to expand your crochet skills while creating something cute and versatile. These sweet little appliques can be customized in endless ways and added to many different projects.
By following this detailed guide, you’ve learned how to craft the base, create the frosting, decorate creatively, and finish your applique like a pro. Whether you’re making them for fun, as gifts, or for sale, cupcake appliques always bring a smile to anyone who sees them.
We hope you enjoyed this tutorial! Please share your honest opinion and leave your suggestions below. Your feedback helps us create more inspiring and easy-to-follow crochet guides for crafters like you.