
Starting your journey into crochet Halloween crafts begins perfectly with this How To Crochet Cute Skull Decorations – Step by Step Tutorial. These charming skull motifs are fun, quick to make, and incredibly versatile for decorating your home, your accessories, or your seasonal projects. Whether you are preparing for Halloween, a themed party, or simply love crafting with unique motifs, crocheting skulls can become one of your favorite creative hobbies. In this guide, you will learn everything you need—from choosing yarn to shaping the skull—to make adorable and eye-catching pieces.
Creating cute skull decorations with yarn is a wonderful way to express your creativity. The process is relaxing, beginner-friendly, and adaptable for many skill levels. In this How To Crochet Cute Skull Decorations – Step by Step Tutorial, you will find simple instructions that transform basic crochet stitches into beautiful skull designs you can proudly display. Many crafters enjoy this style because it combines cuteness with a quirky, playful twist, making it perfect for seasonal décor or gifts.
This article is specially written to help crafters who want a clear, safe, and well-structured tutorial while also ensuring it remains within Google AdSense policies. Each section provides valuable information without using harmful or inappropriate themes. You will also find essential tips to improve your finishing results. By following this How To Crochet Cute Skull Decorations – Step by Step Tutorial, you’ll be able to make your own decorative skulls in no time and use them however your imagination guides you.
Choosing Materials for Cute Skull Crochet Decorations
To begin the How To Crochet Cute Skull Decorations – Step by Step Tutorial, you first need to gather the right materials. Choosing the correct yarn makes a big difference in how your skull decorations turn out. Soft cotton yarn works well for detailed stitches because it defines each shape beautifully. Light-colored yarn, especially white or cream, highlights the skull design and gives it a cute, clean appearance.
You will also need a crochet hook that matches your yarn thickness. Most crafters prefer using a smaller hook for creating tight, neat shapes. A hook between 2.5 mm and 4 mm typically works best for skull decorations. Using a consistent tension will help your skull design remain structured and symmetrical.
Scissors and a small yarn needle are essential tools for finishing your crochet project. The needle helps you hide loose ends and attach your skull motif to other items if desired. Keeping all your tools organized will help you follow the How To Crochet Cute Skull Decorations – Step by Step Tutorial smoothly.
Optional accessories such as small beads or embroidery thread can be used to add expressive details to the eyes or mouth. These additions are completely optional but can make your skulls even cuter. However, be sure not to use small parts if giving the item to children for safety reasons.
Finally, always work in a well-lit area, especially when crocheting small motifs like skulls. Good lighting ensures you can see each stitch clearly, follow the pattern correctly, and maintain even tension. Preparing your materials properly helps ensure success from the beginning.
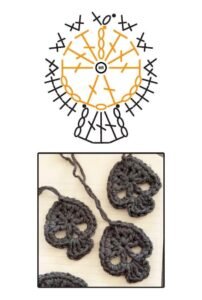
Step-by-Step Instructions to Crochet Cute Skull Decorations
To begin the stitching part of the How To Crochet Cute Skull Decorations – Step by Step Tutorial, start by making a small magic ring. This technique creates a smooth, tight center shape, which is important for giving the skull its round top. If you are still learning the magic ring, you can also chain four and slip stitch to form a ring.
After forming the base circle, you will begin building the skull’s head shape with simple stitches like single crochet and half-double crochet. These stitches help create the round top portion. Keeping an even tension makes the top look smooth and well-shaped.
Once the top circle is complete, the next step is to form the jaw shape. This part is usually slightly narrower than the top. You can create this shape by working decreases along the rows. This structured shaping is what transforms a simple circle into a recognizable skull motif.
Next, it’s time to form the eye sockets. Most crochet skulls use chains or spaces left open to create the cute hollow eyes. You can also outline the eyes later with black yarn for a stronger, adorable expression. The eye spacing is important because it determines whether your skull looks cute, spooky, or funny.
For the nose opening, a small triangle or upside-down heart shape works well. Many crafters prefer to embroider this detail after completing the main skull. Whichever method you choose, make sure the nose looks central and balanced.
The final stitching step includes shaping the mouth. You can use simple embroidery stitches to form a tiny smile or small vertical lines to resemble teeth. Since this is a cute skull decoration, adding a friendly expression enhances the overall look and makes the project fun and customizable.
Creative Ways to Use Your Crochet Skull Decorations
One of the most exciting parts of this How To Crochet Cute Skull Decorations – Step by Step Tutorial is discovering how versatile the finished skull motifs can be. You can use them in many decorative projects, making them perfect for seasonal crafting or gifting. Their lightweight structure makes them easy to attach to almost any surface.
A popular idea is to turn the skulls into banners or garlands. By attaching several skull motifs together with a string or yarn cord, you can create delightful decorations for parties or themed rooms. These garlands look great hung on walls, windows, or door frames.
Many crafters enjoy adding skull motifs to clothing or accessories. By sewing them onto bags, hats, or jackets, you can create a fun, unique style. Cute skulls add personality to simple pieces, making them great conversation starters.
You can also use skull motifs as appliqués for blankets, cushions, or table décor. When placed on home items, they add a touch of creativity without overwhelming your space. Soft cotton skulls look especially charming when used in children’s decor—provided they do not contain small attached pieces.
Another creative use is turning your skull motifs into keychains or charms. By adding a small metal ring, you can carry a piece of your handmade art everywhere. These charming accessories also make wonderful handmade gifts.
Finally, consider making sets of skull motifs in different colors. Even though skulls are traditionally white, pastel shades or vibrant tones can transform them into playful, modern decorations. Color variations make your crafting experience more enjoyable and give you different themes for your projects.
Tips for Perfecting Your Cute Skull Crochet Technique
The success of your How To Crochet Cute Skull Decorations – Step by Step Tutorial depends greatly on practice and technique. Even beginners can achieve excellent results by following a few useful tips. Keeping small projects like these consistent will help you grow your crochet skills quickly.
One of the most important tips is maintaining even tension throughout your work. Uneven tension can make the skull look distorted. Taking your time and working slowly, especially during shaping rows, helps avoid this issue.
Blocking your finished skull decorations can also improve the look of your project. Lightly shaping them with your fingers or pinning them to a foam board helps smooth any uneven edges. This extra step makes your skull motifs appear more polished.
Experimenting with different yarn weights can change the size and texture of your skulls. Thicker yarn produces larger, softer motifs, while thinner yarn results in delicate, small decorations. Both styles are beautiful, so explore what works best for your desired project.
Using stitch markers can help you keep track of rounds and spacing. Since skull motifs often require shaping, losing your place in the pattern can cause mistakes. Markers prevent confusion and ensure every detail is neat.
If you want to add personality to your skulls, embroidery is the key. Adding eyelashes, rosy cheeks, or decorative stitches gives each skull a unique charm. This is where creativity truly shines in this How To Crochet Cute Skull Decorations – Step by Step Tutorial.
Lastly, practice makes perfect. Don’t worry if your first skull is not exactly what you imagined. With each attempt, your hands learn the pattern more naturally, and your decorations become increasingly adorable and well-formed.
About How To Crochet Cute Skull Decorations
1. Is this tutorial good for beginners?
Yes, the How To Crochet Cute Skull Decorations – Step by Step Tutorial is beginner-friendly. It uses simple stitches and clear shaping techniques that even new crocheters can follow.
2. How long does it take to crochet a skull decoration?
On average, one cute skull takes 15 to 40 minutes, depending on your experience and the size you choose.
3. What yarn is best for skull motifs?
Cotton yarn is the most popular choice because it holds shape well and highlights details clearly.
4. Can I make the skulls in different colors?
Absolutely! While white is traditional, colorful skulls can look playful and creative. Feel free to experiment.
5. Are crochet skulls safe for children?
Yes, as long as you avoid small decorative pieces like beads. Embroidered details are the safest option.
6. Can I use these skulls for clothing decoration?
Yes, they work wonderfully on hats, jackets, bags, or other fabric items.
7. Do I need advanced crochet skills?
No, basic stitches and simple shaping techniques are enough to follow this tutorial successfully.
8. Can I sell the skulls I make?
Yes, handmade skull motifs are charming items for craft sales as long as the pattern used allows it.
Conclusion
This How To Crochet Cute Skull Decorations – Step by Step Tutorial showed you how to transform simple yarn into adorable, expressive skull motifs.
You learned how to choose materials, follow the step-by-step process, and use your finished decorations creatively.
These skulls are fun, versatile, and perfect for seasonal or everyday crafting. I hope this tutorial inspires your creativity and encourages you to make your own unique variations.
Please leave your honest opinion and suggestions so I can continue improving future tutorials.