
Learning how to crochet eyeglass cord – step by step tutorial is not only a creative activity but also a practical project that can be completed by beginners and experienced crafters alike. Eyeglass cords are useful accessories that help you keep your glasses safe and within reach at all times. By making your own with crochet, you can customize it to your personal style, choosing colors, yarns, and designs that reflect your personality. This small but functional project is also an excellent way to practice crochet stitches and create something you can use daily.
Crocheting an eyeglass cord is not complicated, but it does require attention to detail. The durability of the cord depends on your yarn choice, the tightness of your stitches, and how well you secure the ends. With the right materials and step-by-step instructions, you can easily create a fashionable and sturdy cord that looks professional. What makes this project appealing is that it combines functionality with creativity, allowing you to crochet something that serves as both an accessory and a necessity.
In this how to crochet eyeglass cord – step by step tutorial, you will learn how to select the best yarn, prepare your crochet hook, and master simple stitches to form a strong and elegant cord. The process is straightforward and relaxing, making it a perfect project for evenings or weekends. Whether you want to make one for yourself or as a gift, this tutorial will walk you through every step in a clear and easy-to-follow way. By the end, you will have a beautiful eyeglass cord that not only prevents you from misplacing your glasses but also adds a handmade touch to your style.
Materials Needed for Crocheting an Eyeglass Cord
When following how to crochet eyeglass cord – step by step tutorial, the first step is gathering the right materials. Choosing suitable supplies ensures that your eyeglass cord will be both durable and attractive. Most crocheters prefer lightweight yarns such as cotton or mercerized thread because they provide a sleek finish and resist fraying. Heavier yarns can also be used but may create a bulkier result, which is less comfortable to wear.
The crochet hook size is equally important. A smaller hook works well with thin yarns or crochet thread, while a medium-sized hook can be used for lightweight yarns. Matching the yarn with the correct hook size helps you achieve consistent tension and a professional look. Beginners often find it easier to start with slightly larger hooks to see the stitches more clearly.
Aside from yarn and hook, you will also need eyeglass cord ends or silicone grips that attach to the arms of your glasses. These are usually inexpensive and widely available. They are crucial because they ensure the cord stays firmly attached to your glasses without slipping off. You can also use small metal findings or adjustable beads for extra security.
Scissors and a yarn needle are also essential tools. The scissors will help you cut the yarn neatly, while the needle is used to weave in loose ends. Some crafters like to add decorative beads, charms, or even small tassels at the ends of the cord to personalize their creation further. These small touches turn a simple accessory into a stylish handmade piece.
Choosing the right color scheme is another fun part of the process. You might want a neutral tone that blends with your wardrobe, or perhaps a bright and bold cord that makes your glasses stand out. Multi-colored yarns or variegated threads are excellent for adding dimension without needing advanced colorwork skills.
In summary, preparing the correct materials sets the foundation for a successful project. By having everything ready before you start, you can focus on enjoying the process without unnecessary interruptions. This preparation is a small but vital step in making your eyeglass cord both durable and beautiful.
Step by Step Instructions to Crochet Eyeglass Cord
Now that you have your materials, it’s time to dive into how to crochet eyeglass cord – step by step tutorial. The first step is creating a slip knot and securing it onto your hook. From there, you will begin by making a chain stitch, which forms the base of your cord. Depending on the desired length of your eyeglass cord, you may need to chain between 80 and 120 stitches. Adjust this length based on whether you prefer a shorter or longer cord.
Once you have your chain, the next step is to reinforce it with slip stitches or single crochet stitches. Slip stitches create a tighter and firmer cord, while single crochet adds slightly more texture and thickness. Either option works well, so choose based on your preference. As you work down the chain, ensure your tension remains even to avoid unwanted twists or uneven edges.
If you would like a more decorative cord, you can alternate between stitches. For example, try combining single crochets and chain spaces to create a lacy effect. Another variation is to work in half-double crochets for a slightly bulkier cord. These variations not only add beauty but also give your cord a unique, handmade charm.
After completing your chosen stitch pattern across the length of the chain, fasten off the yarn securely. Using a yarn needle, weave in the ends carefully so that they do not unravel with use. It’s important to weave them tightly since the cord will be subject to frequent movement and stretching.
The final step is attaching the silicone grips or eyeglass ends. Simply insert the ends of your cord into the grip holders and secure them in place by tying knots or using small metal crimps if available. Make sure they are firmly attached because this is what will hold your glasses securely.
With the instructions completed, you now have a fully functional eyeglass cord. The process is simple, yet it allows plenty of room for customization. Each handmade cord you create can be different, depending on yarn, color, and stitch choice. This flexibility is what makes crocheting such a rewarding craft.
Customizing Your Crochet Eyeglass Cord
One of the most exciting aspects of how to crochet eyeglass cord – step by step tutorial is the ability to customize your design. While the basic method is straightforward, you can enhance your cord in endless creative ways. Personalization ensures that your accessory is not just functional but also a reflection of your personality.
Adding beads to your cord is one popular customization option. Wooden, glass, or metallic beads can be threaded onto your yarn before you begin crocheting and incorporated into your stitches. This adds a touch of elegance and makes the cord look more like jewelry. For a simpler approach, beads can also be added after the crochet work is finished by threading them onto the ends.
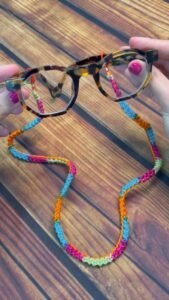
Another customization option is to use multiple colors. Color blocking, stripes, or even gradient yarns can completely change the look of your eyeglass cord. If you enjoy experimenting, try using leftover yarn scraps to create a multicolored design that is both unique and eco-friendly. The possibilities are endless when it comes to playing with color.
Some crocheters like to add charms or pendants to the ends of their cords. These small accessories not only look stylish but also make it easier to identify your glasses among others. From tiny tassels to miniature crochet flowers, these details turn a simple cord into a fashionable piece.
You can also vary the stitch patterns for different textures. For example, a spiral cord can be achieved by working around the chain in continuous stitches. A braided look can be created by crocheting three thin cords and then weaving them together. These creative techniques allow you to showcase your crochet skills while making something functional.
Finally, consider making matching sets. You could crochet an eyeglass cord along with a matching pouch or case, creating a cohesive set. This makes for an excellent handmade gift idea for friends or family members who wear glasses. A thoughtful, customized gift like this is sure to be cherished.
Tips and Tricks for a Professional Finish
To make your how to crochet eyeglass cord – step by step tutorial look polished, it’s helpful to follow some finishing tips. Even simple crochet projects benefit from careful attention to detail, and small adjustments can make your work look much more professional.
First, always check your tension. If your stitches are too tight, the cord may feel stiff and uncomfortable. If they are too loose, the cord may stretch too much or look sloppy. Practicing even tension ensures that the cord is both functional and attractive.
Blocking is another useful step, even for small projects like eyeglass cords. Gently wetting your cord and laying it flat to dry can help set the stitches in place and give the cord a smoother appearance. This is particularly effective when working with cotton or natural fibers.
Weaving in ends properly is essential. Use a yarn needle to hide the loose ends inside the stitches, ensuring they do not unravel over time. Double-check the attachment points at the ends where the grips are connected, as this area experiences the most stress during use.
If you want your cord to be extra strong, consider using a thin nylon thread or fishing line alongside your yarn. This reinforcement makes the cord more durable without changing its appearance significantly. It’s an excellent tip for cords that will be used frequently.
Another trick is to test the length before finishing the ends. Try the cord on your glasses while still on the hook to make sure it is the right size for your comfort. Adjust the chain length as needed before committing to the final design.
Lastly, don’t hesitate to experiment and create multiple versions. The more you practice this tutorial, the better your technique will become. Over time, your cords will look cleaner, stronger, and more stylish, making your handmade accessories stand out.
FAQ about Crocheting Eyeglass Cords
1. Can beginners make a crochet eyeglass cord?
Yes, this project is beginner-friendly. The stitches required are simple, mainly chain, slip stitch, and single crochet. With patience, even those new to crochet can complete it successfully.
2. What is the best yarn for crocheting eyeglass cords?
Lightweight cotton or crochet thread works best because it provides strength, durability, and a neat finish. Avoid very bulky yarns, as they may feel uncomfortable when worn.
3. How long should an eyeglass cord be?
The average length is between 25 to 30 inches, but it can be adjusted based on personal preference. Longer cords give more flexibility, while shorter ones feel less bulky.
4. Do I need special findings for the ends?
Yes, silicone grips or eyeglass cord ends are recommended. They securely attach the cord to your glasses and prevent slipping. These are inexpensive and easy to find in craft stores.
5. Can I wash my crochet eyeglass cord?
Yes, but it depends on the yarn used. Cotton cords can usually be hand-washed and air-dried, while delicate yarns may require gentler care. Always check the yarn label for instructions.
6. How can I make my eyeglass cord more stylish?
You can add beads, charms, or use colorful yarns to make it more decorative. Experimenting with stitch patterns and accessories will give your cord a unique and stylish look.
Conclusion
In this guide on how to crochet eyeglass cord – step by step tutorial, we explored everything from choosing materials and learning the stitches to customizing your design and finishing with professional tips. Crocheting an eyeglass cord is a small but rewarding project that combines creativity with practicality. Whether you are a beginner or an experienced crocheter, this project allows you to practice your skills while making something functional and stylish.
Now that you know the process, it’s your turn to try making your own crochet eyeglass cord. Remember that every handmade piece reflects your personal touch, so don’t be afraid to experiment with colors, beads, or stitch variations. We hope this tutorial inspired you to create something unique and useful.
If you found this guide helpful, we would love to hear your opinion. Share your thoughts and suggestions in the comments, and let us know how your crochet eyeglass cord turned out. Your feedback is valuable and helps us bring more creative tutorials like this in the future.