
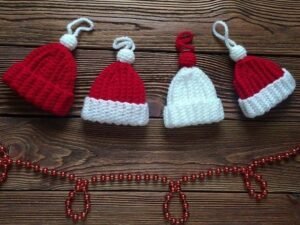
How to Crochet Santa Hat Keychain-Step by Step Tutorial is a charming and festive way to bring holiday spirit to your everyday items. Whether you want to personalize your keys, decorate gift bags, or add a handmade touch to Christmas tree ornaments, creating a mini Santa hat is both enjoyable and beginner-friendly. In this guide, we will explore how to craft this adorable accessory while using simple crochet techniques. Throughout the article, the term How to Crochet Santa Hat Keychain-Step by Step Tutorial will be emphasized to help guide and inspire crafters at all skill levels.
This project is perfect for those who enjoy seasonal crafting or are looking for creative holiday gift ideas. The miniature size makes it quick to produce, making it ideal for gift exchanges, stocking stuffers, or market sales. Even if you are new to crochet, the process is approachable because the design uses basic stitches and simple shaping. With a bit of patience, you can create a piece that looks detailed and festive without requiring advanced skills.
Before we begin, it is helpful to gather your materials and familiarize yourself with the basic stitches required. The How to Crochet Santa Hat Keychain-Step by Step Tutorial will walk you through every stage, from choosing yarn and hooks to attaching the keychain ring. Take your time and enjoy the journey of crafting something meaningful. Handmade items carry a warm sentiment that store-bought gifts simply cannot replicate.
Materials Needed for the Santa Hat Keychain
To start this How to Crochet Santa Hat Keychain-Step by Step Tutorial, gather all necessary supplies before beginning. Working in an organized manner helps make the experience more enjoyable and smooth. You’ll need red and white yarn, a crochet hook suitable for your yarn weight, scissors, a yarn needle, and a keychain ring.
Choose yarn that is soft but sturdy enough to hold its shape. Cotton or acrylic yarns work well for this project because they offer structure. Using lightweight yarn will help keep the keychain small and practical. Also, remember that even small changes in yarn thickness can affect the final size of your Santa hat.
The crochet hook size should match the yarn you are using. Most commonly, hooks between 2.5 mm and 4 mm are suitable for miniature accessories. Using a slightly smaller hook than recommended can help keep stitches tight, which is ideal for a keychain that will endure daily handling.
A yarn needle will be used to weave in ends and attach different parts securely. Clean finishing is important because it improves durability and gives your piece a professional appearance. Don’t skip this step, as loose ends can unravel over time.
The keychain ring is what transforms your handcrafted Santa hat from decorative item into a functional accessory. Choose a stainless steel ring for durability. You may also want to use a jump ring to make attachment easier. This will help the hat hang neatly when attached to bags, zipper pulls, or keys.
Finally, keep your scissors nearby to trim yarn as needed. Keeping your workspace tidy can make the crafting process smoother. With all materials gathered, you’re ready to begin the How to Crochet Santa Hat Keychain-Step by Step Tutorial successfully.
Step-by-Step Instructions to Crochet the Santa Hat
To begin the How to Crochet Santa Hat Keychain-Step by Step Tutorial, start by making a magic ring. The magic ring creates a tight and seamless starting point that prevents gaps at the top of the hat. After forming your ring, crochet several single crochet stitches into the center and pull the ring closed.
Once the top of the hat is formed, you will continue working in rounds to increase the circumference. Increasing gradually helps shape the hat into a cone. Count your stitches carefully to ensure even shaping. Keeping track of each round helps maintain consistency, especially for beginners.
As the hat grows, maintain smooth stitch tension. If your stitches are too loose, the hat may not hold its shape; if too tight, it may curl or warp. Consistency is key. The How to Crochet Santa Hat Keychain-Step by Step Tutorial emphasizes practicing even movement to make your final piece look polished and neat.
When the red portion of the hat reaches the desired length, switch to white yarn to create the fluffy brim. The white section should be slightly thicker or use textured stitches to mimic the soft trim of a real Santa hat. A simple slip stitch or single crochet border works well for this part.
Next, create a small pom-pom or crochet a small ball for the tip of the hat. Attach it carefully so that it is secure and centered. The pom-pom adds the classic Santa charm that makes this design instantly recognizable and festive.
Finish by weaving in all loose ends using your yarn needle. Clean finishing ensures durability and enhances the appearance. When your hat is complete, attach it to the keychain ring securely using a jump ring if necessary. Your handcrafted Santa hat keychain is now complete, and you can admire your work proudly.
Adding Personal Touches and Variations
One of the benefits of the How to Crochet Santa Hat Keychain-Step by Step Tutorial is the creative flexibility it allows. While the traditional colors are red and white, you can experiment with other color variations. For example, using pastels can create a softer and playful aesthetic, while deep jewel tones can add elegance.
You may choose to embellish your Santa hat with beads, sequins, or tiny bells. These extra touches can add charm and personality, making each keychain unique. Just be mindful to attach embellishments securely to ensure they remain intact during use.
Another creative idea is to customize the keychain as a personalized gift. For example, adding initials using embroidery or small letter charms can make each keychain feel thoughtful. Personalized handmade gifts often become keepsakes that people treasure over time.
If you enjoy making seasonal items in batches, consider creating sets of Santa hat keychains. They can be used for holiday gatherings, office gift exchanges, or party favors. Handmade keepsakes often carry sentimental value that adds joy and appreciation.
Experimenting with yarn textures can also inspire new variations. Using fluffy yarn for the brim can enhance the soft wintery aesthetic. On the other hand, metallic yarn can add sparkle and festive cheer. The possibilities are endless and enjoyable to explore.
As you continue practicing, you may refine your technique and even create your own patterns. The process of learning and adapting opens the door to creativity and confidence in your crochet skills.
Tips for Beginners and Troubleshooting
Beginners may encounter some challenges while following the How to Crochet Santa Hat Keychain-Step by Step Tutorial, but patience and practice help overcome them. One common issue is uneven stitch tension. Try to relax your grip and maintain consistent movement while stitching.
Another challenge is shaping the cone evenly. Counting stitches carefully in each round helps maintain uniform growth. If you notice unevenness, gently adjust the stitches before moving to the next row. Small corrections make a big difference.
If attaching the pom-pom feels difficult, consider using a crochet ball instead of a yarn-wrapped pom. Sometimes crocheted balls are easier to secure and maintain shape more consistently.
When switching colors from red to white, carry the yarn neatly inside the hat to avoid visible tails. Alternatively, cut and reattach cleanly, but be sure to weave ends firmly to prevent unraveling.
Don’t worry if your first attempt is not perfect. Crafting is a learning process, and each project helps build confidence and skill. Over time, your speed, accuracy, and creative intuition will grow naturally.
Always remember to enjoy the journey. Handcrafting should be relaxing, satisfying, and fun. The true value of the project lies not only in the finished product but also in the experience of creating something special.
FAQ
1. What materials do I need to make the Santa hat keychain?
You will need red and white yarn, a crochet hook suitable for your yarn size, scissors, a yarn needle, and a keychain ring.
2. How long does it take to make one keychain?
Most people can complete one keychain in 30 minutes to an hour, depending on skill level and familiarity with stitches.
3. Is this project suitable for beginners?
Yes, the project uses simple stitches and a small design, making it ideal for beginners.
4. Can I use different yarn colors?
Yes, you can personalize your Santa hat keychain with any color combination you like.
5. How do I attach the keychain ring?
Use a yarn needle or jump ring to securely fasten the top of the hat to the keychain ring.
6. Can I sell the keychains I make from this tutorial?
Yes, handmade Santa hat keychains are popular items for holiday markets and craft fairs.
Conclusion
In this How to Crochet Santa Hat Keychain-Step by Step Tutorial, you learned how to gather materials, shape the hat, create the pom-pom, attach the keychain ring, and customize your design.
This project is fun, beginner-friendly, and perfect for adding handmade charm to your holiday season.
If you enjoyed this tutorial, consider leaving your honest opinion and suggestions. Your feedback helps improve future guides and inspires new creative ideas.