
If you’re looking for a charming and practical project, how to crochet strawberry keychain – step by step tutorial is the perfect place to start. This adorable accessory not only adds a pop of color and personality to your keys or bags, but it also makes a wonderful handmade gift. Whether you are new to crochet or already experienced, this tutorial will guide you carefully through every stage to ensure your strawberry turns out sweet and stunning.
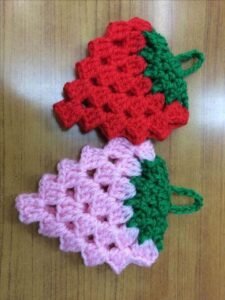
The crochet strawberry keychain is a small but satisfying project. It requires very little yarn, takes minimal time, and allows you to practice essential techniques like shaping, increasing, and finishing. Because it’s compact, it’s a great way to use leftover yarn scraps in a creative way. The results are always impressive — a vibrant red berry with a bright green leafy top and a loop to attach to a keyring.
In this detailed article, we will walk through the entire process of how to crochet strawberry keychain – step by step tutorial, including the tools you’ll need, basic stitches used, assembly tips, and personalization ideas. You’ll learn not only the mechanics of making the strawberry but also how to elevate it into a charming and professional-looking piece. Let’s dive into this colorful and joyful crochet project!
Materials and Tools You’ll Need
To begin this how to crochet strawberry keychain – step by step tutorial, it’s essential to gather your materials. Choosing the right yarn, hook, and accessories makes a big difference in the final look of your keychain. You’ll need some basic crochet tools and a few extras to complete the project with a polished touch.
First, choose a worsted weight or cotton yarn in red and green shades. Red is for the berry body, and green is for the leafy top. Cotton yarn holds shape well, which is perfect for small accessories. You can also use acrylic yarn, but cotton gives a more defined finish. Make sure the yarn is smooth and easy to work with, especially if you’re a beginner.
Use a crochet hook that matches your yarn size. For most worsted or medium-weight yarns, a 3.5mm to 4mm hook works perfectly. A smaller hook creates tighter stitches, giving the strawberry a firm structure. If the stitches are too loose, the filling might show through, so a slightly smaller hook is better.
You’ll also need a yarn needle for sewing the parts together, a stitch marker to keep track of your rounds, and scissors. For stuffing the strawberry, use fiberfill or leftover yarn scraps. A small amount goes a long way. Lastly, to complete the keychain, you’ll need a metal keyring or lobster clasp, which you can easily attach at the end.
Some optional tools include hot glue for securing knots, fabric stiffener if you want a firmer keychain, and beads or embroidery thread if you’d like to add decorative seeds to your strawberry. These extras are not required but can give your keychain a unique touch.
Now that your materials are ready, it’s time to learn how to crochet the strawberry body and bring your tiny fruit to life. Follow each step closely for the best results.
Step-by-Step Instructions for the Strawberry Body
The main part of the how to crochet strawberry keychain – step by step tutorial focuses on creating the red berry shape. This portion involves working in the round using basic stitches and slight increases and decreases for shaping. You’ll begin with a magic ring and work your way to a conical strawberry form.
Start by creating a magic ring and working six single crochets into it. Pull the ring tight and join with a slip stitch. The magic ring technique is perfect for projects like this because it creates a tight, clean center. It ensures that your stuffing won’t fall through a hole at the top.
In the next few rounds, increase the number of stitches to create the widening body of the strawberry. For example, in round 2, you’ll crochet two single crochets in each stitch (12 stitches total). Continue increasing evenly across several rounds until you reach the desired width of the strawberry — usually around 18 stitches.
Once you’ve built up the widest part of the berry, begin decreasing evenly to shape it into a cone. Work single crochet decreases across several rounds until the opening becomes small enough to stuff. At this point, gently add fiberfill to make your strawberry plump and rounded.
Continue crocheting and decreasing until the top closes almost completely. Leave a long tail for sewing. Thread the yarn needle and close the top tightly with a few stitches. Make sure everything is secure before moving on to the leafy green top.
The result should be a small, neat strawberry shape that stands firmly on its own. The red body is now complete, and you’re ready to create the green top that adds the perfect finishing touch to your crochet strawberry keychain.
Crocheting the Leafy Top and Assembly
No how to crochet strawberry keychain – step by step tutorial would be complete without the iconic leafy crown that defines a strawberry. This decorative part is quick to make and adds character to your project. The green leafy top is crocheted separately and then sewn onto the top of the strawberry.
To create the leaves, start with a magic ring using green yarn and work six single crochets into the ring. Don’t close it too tight this time — you’ll be working little points or “leaves” from each stitch around the circle. These are typically small chains that loop and return into the same stitch, forming a petal-like structure.
Each leaf can be made by chaining 4, then slip stitching back into the base stitch. You’ll do this around the circle to make 6 little leaf points. You can customize the length of the chains if you prefer longer or curlier leaves, depending on the style you want.
After finishing the leaves, fasten off and leave a long tail. Place the green leafy top over the closed end of your red berry, making sure it aligns well with the center. Use your yarn needle to sew it neatly onto the berry, securing each leaf down if you want them to stay in place.
Now it’s time to attach the keychain hardware. Use a small jump ring or directly sew a loop of yarn at the top of one of the green leaves, making sure it’s firmly attached. Then you can connect your metal keyring or clasp. Make sure all parts are secure so it can handle everyday use.
At this stage, you can personalize your strawberry further. Add tiny yellow or white embroidery stitches as seeds. Or, if you prefer, leave it smooth for a minimal look. The versatility of this project allows for plenty of creative freedom.
Congratulations — your crochet strawberry keychain is now assembled! It’s ready to hang on a bag, gift to a friend, or brighten up your keys.
Tips, Tricks, and Customization Ideas
Once you’ve mastered the basics of how to crochet strawberry keychain – step by step tutorial, you can have fun experimenting with variations and ideas. Crocheting becomes even more exciting when you add your personal touch, and this project offers many opportunities for that.
Try using different yarn textures and colors. You could make pastel strawberries, rainbow-themed berries, or even glittery ones using metallic thread. This small project allows you to be bold without wasting materials.
Add details like seed beads, embroidery, or even tiny faces using safety eyes or felt pieces to create kawaii-style keychains. These cute touches are especially popular if you plan to sell your creations or give them as gifts.
You can also make a series of fruit keychains — strawberries, cherries, lemons — and bundle them together for a fun set. This is a great way to explore your skills and keep projects exciting. Once you get confident, you can even scale up and create large strawberry plushies.
Another great idea is to turn these into bag charms, zipper pulls, or party favors. They’re excellent for craft fairs or holiday stocking stuffers. Handmade items with love and detail always stand out and get noticed.
If you’re teaching kids or beginners, this project is perfect because it’s short, fun, and colorful. Break it into smaller steps and let each person customize their keychain. It builds confidence and keeps creativity flowing.
Above all, enjoy the process. Crocheting is not just about the finished product — it’s about the relaxation and joy it brings as you create something beautiful and useful with your own hands.
FAQ – Frequently Asked Questions
What stitches are used in the crochet strawberry keychain?
The main stitches include single crochet, slip stitch, and magic ring. These are all beginner-friendly and used to shape the body and leaves of the strawberry.
How long does it take to make one strawberry keychain?
On average, it takes about 30 to 45 minutes to make one keychain, depending on your skill level and customization. Once you’ve practiced, you can make them even faster.
Can I use any type of yarn for this project?
Yes, but cotton yarn is recommended for best results. It holds shape well and gives a clean finish. You can also experiment with acrylic or blended yarns.
How do I clean my crochet keychain?
Gently hand wash using mild soap and cold water. Let it air dry. Avoid machine washing as it can deform the stuffing or damage small parts like beads.
Can I sell the keychains I make from this tutorial?
Absolutely! Handmade keychains are popular at markets and online shops. Just be sure your finished product is safe, secure, and well-assembled.
Do I need stuffing for the strawberry?
Yes, stuffing gives the strawberry its rounded shape. Fiberfill is best, but yarn scraps can also work. Just make sure the filling is even.
Conclusion
We’ve reached the end of our detailed guide on how to crochet strawberry keychain – step by step tutorial. From gathering materials and crocheting the body to attaching the leafy top and customizing it, you’ve now learned everything needed to create a delightful handmade accessory. These mini strawberries are fun, fast, and flexible — perfect for personal use or gifts.
Crocheting small items like keychains can be a gateway to larger, more complex projects. They help you build skills, try new techniques, and express creativity. Plus, you end up with something you can proudly carry around or share with others.
If you enjoyed this tutorial, please leave your honest feedback or suggestions in the comments. What did you love most about the process? What would you like to see next? Your thoughts help improve future content and inspire more beautiful creations. Happy crocheting! 🍓