
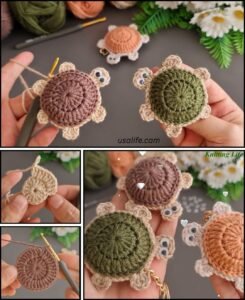
How to crochet turtle making for beginners – step by step tutorial is one of the most enjoyable projects for anyone starting their crochet journey. This project combines creativity, relaxation, and the satisfaction of crafting a small, cute animal by hand. For beginners, learning how to crochet a turtle not only teaches basic stitches but also shows how simple shapes can come together to form something adorable and useful. Throughout this article, we will explore every step of the process, from materials to the final touches, so you can easily follow along and create your own crochet turtle.
Many beginners are intimidated by animal crochet patterns because they think they are too advanced. However, a turtle is actually one of the simplest animals to make with yarn. The basic shape is round, the stitches are repetitive, and the project is small enough to be completed in a short time. By working through this tutorial, you’ll develop confidence in your skills and gain a project that is both fun and rewarding. You will also be able to customize your turtle with different colors, sizes, and details to make it unique.
The beauty of this step by step tutorial is that it makes crochet accessible to everyone, even those who have never held a hook before. As you follow each stage, you’ll learn essential techniques like creating a magic ring, working in the round, and shaping with increases and decreases. With patience and practice, you’ll see your turtle come to life stitch by stitch. By the end, you’ll not only have a lovely handmade turtle but also valuable crochet skills you can apply to many other projects.
Materials and Tools Needed for Crochet Turtle Making
To begin this How to crochet turtle making for beginners – step by step tutorial, you’ll first need to gather your materials. Having the right tools makes the process smoother and ensures that your turtle turns out neat and sturdy. Basic crochet projects require simple supplies, most of which are affordable and easy to find.
First, you’ll need yarn. For beginners, cotton or acrylic yarn is the best choice because it is soft, durable, and easy to work with. Choose medium-weight yarn so your stitches are easier to see and control. Green and brown are the most common colors for a turtle, but you can use any shades you like. Bright or pastel colors make the turtle look playful and unique.
Next, you’ll need a crochet hook. For most medium-weight yarns, a 3.5 mm to 4 mm hook works perfectly. Make sure your hook matches the yarn thickness to keep your stitches even. A comfortable grip hook can also make a big difference for beginners learning to control tension.
Don’t forget about stuffing. Polyester fiberfill is the most popular choice for filling crochet toys because it’s soft, light, and keeps its shape. It gives the turtle its 3D form and ensures it looks cuddly. A small pair of scissors will also be necessary to cut yarn ends cleanly.
A yarn needle is another important tool. This blunt-tipped needle helps you sew the different parts of the turtle together and weave in loose ends. It ensures your project looks neat and professional. Beginners sometimes overlook this step, but finishing touches make a huge difference in the final appearance.
Finally, you might want to use safety eyes or simply stitch the eyes with black yarn. Safety eyes give a polished look, but embroidered eyes are safer for small children. Whichever you choose, make sure they are secure and aligned properly to give your turtle a cute and friendly expression.
Step by Step Instructions for Crocheting the Turtle Body
The turtle’s body is the central piece, and in this How to crochet turtle making for beginners – step by step tutorial, we’ll break it down into easy steps. Working in the round is a core technique you’ll practice here.
Begin by making a magic ring. This is the foundation for many crochet toys because it creates a tight, closed circle. Place six single crochets inside the ring to start shaping the body. Pull the yarn tail to close the circle tightly.
Next, you’ll work in continuous rounds. This means you don’t join at the end of each round but keep crocheting in a spiral. Use a stitch marker to keep track of the first stitch of each round. Increase evenly by adding stitches until you form a flat circle. This will be the turtle’s belly.
Once you reach the desired size for the belly, you’ll stop increasing and continue with even single crochet rounds. This creates the height of the turtle’s shell. The sides start curving upward, giving the body its dome-like shape.
After building enough height, it’s time to decrease gradually to close the body. Add stuffing as you go to keep the shape full. Make sure the stuffing is evenly distributed so the turtle doesn’t look lopsided.
When the body is almost closed, add the final bit of stuffing. Then decrease stitches until the hole is completely shut. Fasten off the yarn securely and weave in the ends with a yarn needle. Now you have the base of the turtle’s body ready.
At this stage, you can already see the turtle form taking shape. The next steps will involve creating the shell details, legs, and head to bring it fully to life.
Crocheting the Turtle’s Head, Legs, and Tail
Now that the body is finished, this step by step tutorial continues with the smaller parts of the turtle. Each of these parts is worked separately and then sewn onto the body.
Start with the head. The head is also crocheted in the round, beginning with a magic ring. Increase gradually until you reach the desired size, then crochet several even rounds to add length. Before closing, insert some stuffing to give it shape. Finish with decreases and fasten off, leaving a long tail of yarn for sewing.
The legs are made in a similar way but smaller. Each leg starts with a magic ring and a few stitches, then builds slightly outward. They don’t need much stuffing; just enough to keep their form. Make four legs of equal size to ensure balance when they are attached to the body.
The tail is the smallest part. It only requires a few stitches in a tiny round. Some patterns make the tail flat, while others give it a little puff. Either way, it adds character to your turtle.
Once all parts are crocheted, use your yarn needle to sew them onto the turtle’s body. Position the head at the front, legs evenly on the sides, and the tail at the back. Secure each piece tightly so they don’t come loose during handling.
Finally, attach the eyes. Whether you use safety eyes or embroidery, place them carefully to give your turtle a cute, friendly expression. A well-placed smile or eye position can completely change the personality of your turtle.
This process teaches beginners about shaping and assembly, which are essential skills for many other crochet projects.
Tips for Customizing and Perfecting Your Crochet Turtle
Once you’ve mastered the basics, this How to crochet turtle making for beginners – step by step tutorial can be personalized in countless ways. Adding your own style makes the turtle more meaningful and fun.
You can experiment with colors. Instead of the classic green shell, try making a rainbow turtle, a pastel-colored one, or even a turtle with seasonal themes like Christmas red and white or Halloween black and orange.
Adding patterns to the shell is another creative option. Stripes, spots, or even embroidered flowers can give the turtle’s back a unique look. These details make the project more advanced while still being accessible for beginners ready to try new things.
Varying the size of your turtle is simple. Using thicker yarn and a larger hook will create a bigger turtle, while thinner yarn and a smaller hook make a miniature version. This flexibility allows you to make turtles for different purposes, from toys to keychains.
Don’t forget to adjust the stuffing firmness. A softly stuffed turtle feels like a plush toy, while a firmer stuffing gives it a more solid shape. Each variation changes the turtle’s final look and feel.
You can also personalize with accessories. Add a tiny bow, a hat, or even a little scarf to your turtle. These small extras make it extra special and give it personality.
Lastly, practice is the key to perfecting your crochet turtle. The more turtles you make, the better your stitches will look, and the easier the process will become. Over time, you’ll be able to crochet without even looking at detailed instructions.
FAQ – How to Crochet Turtle Making for Beginners
Q1: Is crocheting a turtle suitable for complete beginners?
Yes, this project is perfect for beginners. The shapes are simple, and the step by step instructions make it easy to follow.
Q2: How long does it take to crochet a turtle?
Depending on your speed, it can take 2 to 5 hours. Beginners may take longer, but with practice, the time decreases.
Q3: Can I use any yarn for this project?
You can use most types of yarn, but cotton or acrylic is best for beginners because they are easy to work with and hold shape well.
Q4: Do I need safety eyes?
No, safety eyes are optional. You can also embroider eyes with black yarn if you prefer or if the toy is for a child.
Q5: How do I make my turtle bigger or smaller?
Simply change the yarn weight and hook size. Thicker yarn makes a larger turtle, while thinner yarn makes a smaller one.
Q6: Can I wash my crochet turtle?
Yes, but it depends on the yarn. Cotton and acrylic turtles can usually be washed gently by hand. Avoid very hot water or harsh detergents.
Q7: What is the hardest part for beginners?
The magic ring can be tricky at first, but once you master it, the rest of the project flows easily.
Q8: Can I sell the turtles I make?
Yes, many crafters sell handmade turtles. Just make sure to practice until your stitches are neat and consistent.
Conclusion
In this guide, we explored How to crochet turtle making for beginners – step by step tutorial, covering everything from materials and body construction to assembling the head, legs, and tail. We also looked at customization options and answered the most common questions beginners have.
Crocheting a turtle is a fun, relaxing, and rewarding project that teaches essential crochet techniques while producing a cute, handmade creation.
Now that you’ve learned the process, try it out and enjoy the journey of creating your first turtle. Don’t forget to leave your honest opinion and suggestions about this tutorial. Your feedback helps improve future projects and inspires more creative ideas!