
How to Make a Crochet Bag with a Net Pattern- Step by Step Tutorial is a fun and creative way to make a handmade accessory that is stylish, functional, and eco-friendly. If you have ever wanted to create your own crochet bag, this project is perfect for you. Not only will you learn the basic crochet techniques, but you will also be able to design a beautiful bag with a unique net pattern that can be customized in different colors and sizes.
Making a crochet bag with a net pattern is suitable for both beginners and experienced crafters. Beginners can practice simple stitches while creating a useful item, while experienced crocheters can experiment with different yarns and patterns for a more personalized design. The best part is that this bag can be used for shopping, trips to the beach, or as a fashionable everyday accessory.
In this step-by-step tutorial, we will guide you through the entire process, from choosing the right materials to completing the final details. We will also provide tips for making your bag durable, decorative ideas to personalize your project, and answers to the most common questions people have about crochet bags with net patterns.
Materials Needed to Make a Crochet Bag with a Net Pattern
Before you start this How to Make a Crochet Bag with a Net Pattern- Step by Step Tutorial, it is essential to gather all the materials to make your work smoother and more organized. Having everything ready ensures you can focus on crocheting without interruptions.
First, you will need yarn suitable for making bags. Cotton yarn is highly recommended because it is strong, washable, and holds its shape well. It is also available in many colors, so you can choose shades that match your personal style.
Next, you will need the correct crochet hook size for your chosen yarn. The hook size will affect the tightness and flexibility of the net pattern, so check the yarn label for the recommended hook size. Usually, a 4mm to 5mm hook works well for this type of project.
You will also need scissors to cut the yarn neatly, a yarn needle for weaving in the ends, and stitch markers to keep track of your rounds or rows. These small tools help keep your project organized and professional-looking.
Optional accessories include wooden handles, metal rings, or even lining fabric if you want to make your bag sturdier or add a more polished finish. These details can elevate the look of your crochet bag with a net pattern and make it even more practical.
Finally, choose a clean and comfortable workspace with good lighting. Crocheting is more enjoyable when you can see your stitches clearly and work in a relaxed environment.
Step-by-Step Instructions for the Crochet Net Bag
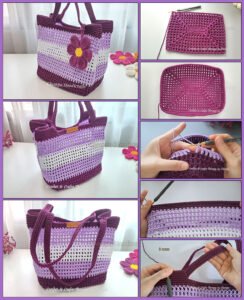
Now let’s start the main part of this How to Make a Crochet Bag with a Net Pattern- Step by Step Tutorial. The bag will be made in three parts: the base, the net body, and the handles.
Begin by crocheting the base of the bag. Most net bags use a simple oval or rectangular base made with single crochet stitches. This creates a sturdy foundation that can hold weight without stretching too much.
Once the base reaches the desired size, you will start working on the net pattern for the body of the bag. This pattern usually involves chains and single crochet or double crochet stitches to create open spaces that form the net effect.
Continue working in rounds or rows, depending on your pattern, gradually building up the body of the bag. The net pattern allows the bag to stretch slightly, making it perfect for carrying groceries, beach items, or other everyday essentials.
When the bag body reaches the height you want, stop the net pattern and work a few rounds of single crochet stitches at the top. This creates a solid edge where you will attach the handles or straps.
Finally, make the handles. You can crochet simple straps using chain stitches and single crochet rows, or attach ready-made wooden or fabric handles for a more decorative touch. Secure the handles firmly to the top edge to ensure they can support the bag’s weight.
Tips for Customizing and Decorating Your Crochet Bag
One of the most exciting things about this How to Make a Crochet Bag with a Net Pattern- Step by Step Tutorial is how easy it is to customize. You can personalize your bag in countless ways to make it truly unique.
Experiment with different yarn colors to create stripes, gradients, or multicolor patterns. A two-tone design can give your bag a trendy, modern look.
Consider adding decorative elements like tassels, pom-poms, or crochet flowers. These small details make your bag stand out and reflect your personal style.
If you prefer a bag with a lining, you can sew a simple fabric lining inside. This prevents small items from slipping through the net holes and gives the bag a polished, finished appearance.
Another option is to adjust the size of the net holes. Using longer chains between stitches will make larger holes, while shorter chains create a tighter net pattern. This allows you to control the bag’s flexibility and design.
Finally, you can add closures like buttons, zippers, or drawstrings at the top of the bag for extra security. These features make your crochet bag with a net pattern more practical for everyday use.
Common Mistakes to Avoid and Helpful Tips
Even though this How to Make a Crochet Bag with a Net Pattern- Step by Step Tutorial is beginner-friendly, there are a few common mistakes to watch out for so your project turns out perfectly.
One common mistake is using yarn that is too thin or stretchy. This can make the bag lose its shape or be unable to hold weight properly. Always choose sturdy yarn like cotton for durability.
Another mistake is skipping stitch markers when working in rounds. Without them, it’s easy to lose track of where each round starts, which can make the bag uneven or lopsided.
Some beginners also make the handles too thin or attach them loosely. Handles need to be strong enough to support the bag’s weight, so use multiple rows of stitches and secure them tightly to the top edge.
Avoid making the net holes too large unless you specifically want a very open design. Larger holes might look nice but can make the bag less practical for carrying small items.
Always measure your bag’s size as you go to ensure it meets your needs. It’s easier to adjust the height or width during the process than after finishing the entire project.
Finally, weave in all yarn ends carefully for a neat finish. A well-finished bag looks professional and lasts longer.
FAQ About How to Make a Crochet Bag with a Net Pattern
Q1: Is this crochet net bag suitable for beginners?
A: Yes, the basic stitches used in this step-by-step tutorial are beginner-friendly and easy to learn.
Q2: How long does it take to make a crochet net bag?
A: Depending on your speed, a simple bag can be completed in one or two days, while more detailed designs may take longer.
Q3: Can I use different yarn types for this bag?
A: Yes, but cotton yarn is recommended because it is strong and holds shape well. Other yarns may stretch too much under weight.
Q4: How can I make the bag stronger for heavy items?
A: Use a tighter stitch pattern for the base, choose thick cotton yarn, and add a fabric lining for extra support.
Q5: Can I wash my crochet bag?
A: Most cotton crochet bags are washable. Hand washing with mild detergent is recommended to maintain the bag’s shape and color.
Q6: Can I sell crochet bags made from this tutorial?
A: Yes, handmade crochet bags are popular items to sell at craft fairs or online, especially eco-friendly designs like this one.
Conclusion
This How to Make a Crochet Bag with a Net Pattern- Step by Step Tutorial has guided you through every stage of creating a stylish and functional handmade bag. From gathering materials to crocheting the base, net pattern, and handles, you now have all the instructions needed to complete this project successfully.
Making a crochet bag is a creative and rewarding experience. You can customize it with colors, decorations, linings, and different handle styles to make it unique and practical for your needs.
We hope this tutorial has inspired you to start your own crochet bag project. Please leave your honest opinion and suggestions so we can continue to bring you more fun and creative crochet tutorials in the future.