
How to make a crochet bunny tutorial is a delightful and creative process that allows crafters of all skill levels to explore the beauty of handmade creations while developing valuable crochet techniques. Whether you are a beginner picking up your first hook or an experienced artisan looking for a charming new project, learning How to make a crochet bunny tutorial can be both relaxing and rewarding. This guide will walk you through every essential aspect, ensuring you feel confident as you create your own adorable crochet bunny.
When diving into How to make a crochet bunny tutorial, it’s important to understand that preparation is key. Choosing the right yarn, hook size, and tools can significantly impact the final result. Soft yarns often work best for bunny projects because they enhance the cuddly appearance, while a suitable hook ensures even stitches. By carefully selecting your materials, you set a strong foundation for success and make the entire crafting process smoother and more enjoyable.
Another essential aspect of How to make a crochet bunny tutorial is patience and consistency. Crochet projects, especially those involving shaping like a bunny, require attention to detail. Counting stitches, maintaining even tension, and following instructions step by step will help you achieve a polished result. As you continue reading, you’ll discover how each stage contributes to bringing your crochet bunny to life.
Understanding the Basics of Crochet Bunny Creation
Before starting How to make a crochet bunny tutorial, it’s crucial to familiarize yourself with basic crochet stitches. Common stitches such as single crochet, increase, and decrease are frequently used in bunny patterns. Mastering these foundational techniques ensures that your project progresses smoothly without frustration.
In How to make a crochet bunny tutorial, stitch consistency plays a major role in shaping the bunny. Uneven stitches can lead to irregular shapes, so practicing beforehand is highly recommended. Take time to crochet small swatches until your tension feels natural and steady.
Another key element in How to make a crochet bunny tutorial is understanding pattern reading. Crochet patterns use abbreviations and symbols that may seem confusing at first. However, once you learn how to interpret them, you’ll find it much easier to follow instructions accurately.
The magic ring technique is often used in How to make a crochet bunny tutorial to start circular pieces like the head and body. This method allows you to close the center tightly, creating a neat and professional finish. Practicing this technique beforehand can make a big difference in your results.
Counting stitches is essential in every step of How to make a crochet bunny tutorial. Missing or adding stitches accidentally can alter the shape of your bunny. Using stitch markers can help you keep track and avoid mistakes.
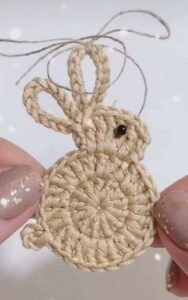
Finally, understanding the structure of the bunny is important in How to make a crochet bunny tutorial. Most crochet bunnies are made from separate parts such as the head, body, ears, and limbs, which are later assembled. Knowing this helps you stay organized throughout the process.
Choosing Materials and Tools for Your Crochet Bunny
Selecting the right materials is a vital step in How to make a crochet bunny tutorial. Yarn type, thickness, and color all influence the final appearance of your bunny. Soft, medium-weight yarn is often ideal for beginners because it is easier to handle and produces a neat finish.
Hook size also plays an important role in How to make a crochet bunny tutorial. A smaller hook creates tighter stitches, which is especially important when making stuffed toys to prevent filling from showing through. Always match your hook size to your yarn for best results.
Stuffing is another key component in How to make a crochet bunny tutorial. Polyester fiberfill is commonly used because it is lightweight and holds its shape well. Proper stuffing ensures your bunny looks full and well-formed without being too stiff.
Safety eyes or embroidered features can be used in How to make a crochet bunny tutorial to give your bunny personality. If the toy is intended for young children, embroidered eyes are safer and more secure.
You will also need basic tools such as scissors, yarn needles, and stitch markers when following How to make a crochet bunny tutorial. These tools help you assemble and refine your project with precision.
Color selection adds creativity to How to make a crochet bunny tutorial. Traditional white or pastel colors give a classic look, while bold colors can make your bunny unique. Choosing your palette carefully enhances the overall aesthetic of your creation.
Step-by-Step Process to Make a Crochet Bunny
The first step in How to make a crochet bunny tutorial usually involves creating the head. This is often worked in continuous rounds using a magic ring. Gradual increases shape the head, while decreases help close it neatly after stuffing.
Next in How to make a crochet bunny tutorial, you will create the body. The body may be slightly larger than the head and follows a similar pattern of increases and decreases. Ensuring proper proportion between the head and body is essential for a balanced look.
Ears are a defining feature in How to make a crochet bunny tutorial. They can be long and floppy or short and upright, depending on your design. Crocheting them separately allows for flexibility in positioning and style.
Arms and legs are typically small but important parts of How to make a crochet bunny tutorial. These pieces are often made in simple rounds and lightly stuffed. Attaching them securely ensures durability and stability.
Assembly is a crucial stage in How to make a crochet bunny tutorial. Using a yarn needle, you will sew all parts together. Take your time aligning each piece carefully to achieve a symmetrical and polished result.
Finally, adding details completes How to make a crochet bunny tutorial. This includes facial features, tails, and optional accessories like bows or clothing. These finishing touches bring your bunny to life and give it a unique personality.
Tips for Improving Your Crochet Bunny Skills
Practice is the most effective way to improve in How to make a crochet bunny tutorial. The more you crochet, the more comfortable you will become with techniques and patterns. Repetition builds confidence and skill.
Pay attention to tension when working on How to make a crochet bunny tutorial. Consistent tension ensures even stitches and a professional finish. If your stitches are too tight or too loose, adjusting your grip can help.
Following patterns carefully is essential in How to make a crochet bunny tutorial. Skipping steps or improvising too early can lead to mistakes. Once you gain experience, you can start customizing your designs.
Learning from mistakes is part of mastering How to make a crochet bunny tutorial. If something doesn’t look right, don’t hesitate to undo a few stitches and fix it. This approach helps you improve faster.
Experimenting with different yarns and colors enhances your creativity in How to make a crochet bunny tutorial. Trying new combinations can lead to unique and beautiful results.
Staying patient and enjoying the process is key in How to make a crochet bunny tutorial. Crochet is not just about the final product but also about the relaxing and fulfilling journey of creating something by hand.
FAQ About How to Make a Crochet Bunny Tutorial
What is the best yarn for a crochet bunny?
The best yarn for How to make a crochet bunny tutorial is usually soft, medium-weight yarn such as acrylic or cotton. These materials are easy to work with and provide a smooth finish.
Is this tutorial suitable for beginners?
Yes, How to make a crochet bunny tutorial can be beginner-friendly if you understand basic stitches like single crochet, increases, and decreases.
How long does it take to make a crochet bunny?
The time required for How to make a crochet bunny tutorial depends on your experience level. Beginners may take a few hours to a couple of days, while experienced crocheters can complete it faster.
What size hook should I use?
In How to make a crochet bunny tutorial, hook size depends on your yarn choice. Typically, a smaller hook than recommended for the yarn is used to create tighter stitches.
Can I customize my crochet bunny?
Absolutely! One of the joys of How to make a crochet bunny tutorial is the ability to customize colors, features, and accessories to create a unique piece.
How do I make my bunny look more professional?
To improve your results in How to make a crochet bunny tutorial, focus on even stitches, proper stuffing, and careful assembly. Small details make a big difference.
Conclusion
In this complete guide on How to make a crochet bunny tutorial, you learned the essential steps, materials, and techniques needed to create a charming handmade bunny.
From understanding basic stitches to assembling and adding final details, each stage plays a crucial role in achieving a beautiful result. With practice, patience, and creativity, you can refine your skills and even develop your own unique designs.
Now that you understand How to make a crochet bunny tutorial, try creating your own version and experimenting with different styles. Your feedback is very important, so feel free to share your honest opinion and suggestions.