
If you have ever wondered how to make a crochet frog eyeglass holder-Step by Step Tutorial, you are in the right place. This creative and practical crochet project is not only fun to make but also serves as a charming accessory to keep your glasses safe and easy to find. A crochet frog eyeglass holder combines functionality with cuteness, making it a perfect handmade item to gift or to keep for yourself. Throughout this tutorial, you will learn the techniques, stitches, and steps needed to complete this adorable project from start to finish.
Learning how to make a crochet frog eyeglass holder-Step by Step Tutorial is also a great opportunity to expand your crochet skills. Whether you are a beginner or an experienced crocheter, this project introduces you to creative shaping, basic amigurumi techniques, and the use of soft yarns to achieve a playful design. A frog-shaped eyeglass holder not only protects your glasses but also doubles as a decorative piece for your desk, bedside table, or craft corner. With just a few materials and a bit of patience, you can create a handmade item that brings joy every time you see it.
In this article, you will get a detailed explanation of every step in how to make a crochet frog eyeglass holder-Step by Step Tutorial. From gathering supplies to forming the frog’s body, creating its adorable face, and assembling the structure that holds the glasses, everything is described in a clear and structured way. You will also find helpful tips to customize your frog eyeglass holder by changing colors, adding embellishments, or adjusting the size. Let’s begin this creative journey together and bring a little frog to life with your crochet hook.
Materials and Tools Needed for the Crochet Frog Eyeglass Holder
To begin how to make a crochet frog eyeglass holder-Step by Step Tutorial, you will first need to gather the right supplies. Using the correct materials ensures the final product is sturdy and attractive. Most of the required items are easy to find and inexpensive. You will need green yarn for the frog’s body, white yarn for the eyes, and black yarn or safety eyes to give the frog its playful look. A medium-weight cotton or acrylic yarn works best because it holds its shape well.
Along with the yarn, a crochet hook in the correct size for your yarn weight is essential. Usually, a 3.5 mm to 4.0 mm crochet hook works perfectly. Make sure you also have a yarn needle to weave in ends, scissors to cut your yarn, and a bit of stuffing material like polyester fiberfill. Stuffing gives the frog’s body and head their cute, rounded shape. Without stuffing, the project will not stand upright and may not support your eyeglasses properly.
Another important material for how to make a crochet frog eyeglass holder-Step by Step Tutorial is a weighted base or filler. You can use rice, beans, or small pebbles sealed inside a fabric pouch to give the frog stability. This helps the holder stay in place when you set your glasses on it. You may also want to have stitch markers handy, especially if you are a beginner, to help you keep track of rounds and ensure accuracy.
When choosing yarn colors, green is the classic option for a frog, but don’t be afraid to get creative. Bright greens, pastel shades, or even multicolored yarns can give your frog a unique personality. White yarn is perfect for the big round eyes, while black yarn or safety eyes give expression to the frog’s face. Adding a small red yarn detail can make a cute smile. The beauty of crochet projects like this is how much you can personalize them.
The tools and materials may seem simple, but each plays an important role in creating a professional-looking result. Many people who try how to make a crochet frog eyeglass holder-Step by Step Tutorial for the first time are surprised at how little is needed to make such a delightful project. With everything ready, you can move to the fun part: crocheting the different sections of your frog.
Before starting, take time to prepare your workspace. Having your tools organized and yarn untangled will make the process smoother. Place all your supplies within reach and ensure you have good lighting, especially when working with dark yarns. This preparation step may seem small, but it makes a big difference in your crocheting experience and helps you focus fully on each stitch.
Crocheting the Frog’s Body
The body is the main structure in how to make a crochet frog eyeglass holder-Step by Step Tutorial. You will begin by making a round base that will eventually be filled with stuffing and weight. The base is usually worked in continuous rounds, starting with a magic ring. A magic ring creates a tight circle that closes securely, making it ideal for amigurumi-style projects. From there, you increase evenly to form a flat round shape.
Once the base is wide enough, you will stop increasing and begin crocheting in even rounds to build height. This turns the flat circle into a cylinder. As you continue, the body gradually becomes taller and starts to resemble the frog’s rounded form. At this stage, you should add the weighted pouch to the bottom. This will keep the holder balanced and prevent it from tipping over when holding glasses.
After placing the weighted base, continue crocheting upward until the frog’s body reaches the desired height. Stuff the body gradually with fiberfill as you work, pressing it down firmly to create a solid structure. A well-stuffed body ensures that the frog eyeglass holder remains stable. If the body feels too soft, the glasses may tilt or slide off, so don’t be afraid to use plenty of stuffing.
Shaping the top of the body involves decreasing stitches to close the cylinder slightly. Unlike a traditional amigurumi toy, you don’t want the body completely closed. Leave a small rounded flat surface at the top where the frog’s face will attach. This surface will also serve as the main support for the eyeglasses.
One of the best things about how to make a crochet frog eyeglass holder-Step by Step Tutorial is how customizable it is. If you want a larger holder, you can simply add more rounds and stuffing. If you prefer a smaller version, reduce the number of rounds. Adjusting the size allows you to create holders for kids’ glasses, sunglasses, or regular prescription frames.
Finally, secure and weave in all loose ends with a yarn needle. This step may feel tedious, but it gives your project a neat, professional finish. A clean result makes the frog eyeglass holder look polished and ensures it will last longer without unraveling. Now, the main structure of the body is complete, and you can move on to crocheting the frog’s most recognizable features: its face and eyes.
Making the Frog’s Face and Eyes
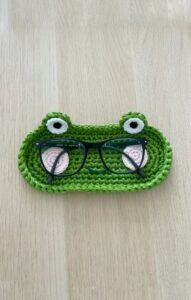
The face is what brings personality to the project and makes how to make a crochet frog eyeglass holder-Step by Step Tutorial so enjoyable. Start with the eyes, which are crocheted separately in small round pieces. Each eye is made using white yarn for the base and either black yarn or safety eyes for the pupils. If using yarn, you can embroider the pupils in place. Safety eyes, on the other hand, are easy to attach and give a shiny finish.
Once the eyes are finished, they are sewn onto the top of the frog’s head. Placement is important here, as slightly different positioning can change the frog’s entire expression. Wide-set eyes give a funny, playful look, while closer eyes make the frog look curious and sweet. Take time to experiment with positioning before sewing them on permanently.
Next, add details to the face. Using black yarn, stitch a small smile under the eyes. A curved line gives a friendly appearance, while adding a tiny tongue detail in red makes the frog even cuter. Embroidered cheeks in pink can also give a cheerful and lively touch. These small additions make the frog eyeglass holder feel more personal and handcrafted.
The nose is optional but can be made by embroidering two small stitches with black yarn between the eyes. Some people prefer leaving the nose out for a simpler look, while others like the added detail. The beauty of this project is that you can customize it to reflect your style.
After the face is complete, attach it securely to the frog’s body. Make sure the head sits firmly on the flat top of the body. This area will support the weight of the eyeglasses, so it’s important to sew it on tightly. Once the face is attached, the frog will begin to take on its full character and charm.
At this stage of how to make a crochet frog eyeglass holder-Step by Step Tutorial, you will notice that your project is both decorative and functional. The wide eyes, friendly smile, and round body make it appealing, while its sturdy structure ensures it can actually hold your glasses. The combination of cuteness and practicality is what makes this project so popular among crafters.
Assembling and Final Touches
Now that the main parts are done, the last step in how to make a crochet frog eyeglass holder-Step by Step Tutorial is assembly. Carefully check all pieces to ensure they are securely sewn together. Loose stitches may cause parts to detach over time, especially if the holder is used daily. Double-knot your sewing threads and weave them inside the body for extra strength.
To assemble the holder, make sure the body sits upright with its weighted base. Test its balance by placing your glasses gently on top. The nose bridge of the glasses should rest securely between the frog’s eyes. If the structure feels unstable, adjust the stuffing or base weight until it stands firmly. This step ensures the functionality of your crochet project.
Once assembled, you can add extra details to enhance the design. A small crochet bow, a flower on the side, or even a little lily pad base can make your frog unique. Many crafters enjoy personalizing their frog eyeglass holder to match a theme or color scheme. These finishing touches make the project feel more like a one-of-a-kind creation.
Don’t forget to double-check the durability. Since the frog will be used regularly, especially to hold glasses, it needs to be strong enough to withstand daily handling. Reinforcing stitches, using quality yarn, and securing all parts tightly are essential steps to achieve a long-lasting result.
After all details are complete, your frog eyeglass holder is ready for use. Place it on your desk, nightstand, or any spot where you often take off your glasses. Not only will it keep your eyewear safe, but it will also brighten up the room with its cheerful appearance.
The satisfaction of completing how to make a crochet frog eyeglass holder-Step by Step Tutorial goes beyond having a useful item. It is the joy of creating something with your own hands, combining creativity with functionality. Every time you see your frog holding your glasses, you’ll be reminded of the time, effort, and love you put into making it.
FAQ about Crochet Frog Eyeglass Holder
1. How long does it take to complete a crochet frog eyeglass holder?
On average, this project can be completed in 4 to 6 hours, depending on your crochet speed and experience. Beginners may take a little longer, while experienced crafters can finish faster.
2. Can beginners try this project?
Yes! This tutorial is beginner-friendly. It uses basic stitches like single crochet, increases, and decreases. With patience and practice, anyone can successfully complete it.
3. What type of yarn is best for this project?
Medium-weight cotton or acrylic yarn is recommended. Cotton gives a firm structure, while acrylic is softer and more affordable. Both work well for this holder.
4. How do I clean the crochet frog eyeglass holder?
You can spot-clean it with a damp cloth and mild soap. Avoid soaking it, especially if you used rice or beans as the weighted base. If machine washing is necessary, use a gentle cycle and air dry.
5. Can I make the frog eyeglass holder in different sizes?
Absolutely. By adjusting the number of rounds and stitches, you can make a smaller or larger version to suit different types of glasses, from children’s eyewear to oversized sunglasses.
6. Is it safe to use safety eyes for this project?
Yes, safety eyes are secure once attached properly. However, if making the frog for children, embroidered eyes may be safer to avoid any risk of detachment.
Conclusion
In this article, you learned how to make a crochet frog eyeglass holder-Step by Step Tutorial in a clear and detailed way. From gathering materials and crocheting the body to creating the face, assembling, and adding final touches, every step was explained to help you complete this adorable and practical project. The frog eyeglass holder is more than just a craft—it is a functional accessory and a delightful decoration.
Now that you know how to create one, I encourage you to try it yourself. Enjoy the process of crocheting, experiment with colors and details, and make your frog unique. Once finished, your eyeglass holder will not only protect your glasses but also bring a smile to your face.
I would love to hear your sincere opinion about this tutorial and any suggestions you may have. Your feedback helps improve future guides and inspires more creative projects.