
If you’re looking for a creative and relaxing project that combines functionality with beauty, learning how to make a crochet placemat – step by step tutorial is a perfect choice. Crochet placemats are a timeless home décor item that can elevate your dining experience while showcasing your handmade talent. Whether you’re a beginner or someone who has been crocheting for years, this tutorial will guide you through each stage of making a stunning placemat that suits your personal style and home décor.
The great thing about making your own crochet placemat is that it allows you to customize the design, size, and color to match your dining table or seasonal theme. From vibrant summer tones to cozy winter shades, crocheted placemats can be adapted for any occasion. Not only are they beautiful, but they’re also practical, protecting your table from scratches and heat. Crocheting your own placemats gives you the satisfaction of crafting something functional that adds warmth and charm to your home.
This how to make a crochet placemat – step by step tutorial will show you how to choose the right materials, create the base stitches, and shape your placemat to perfection. You’ll also learn useful tips to ensure your placemat is sturdy, flat, and long-lasting. Whether you’re planning to make a set for everyday use or a special dinner, this guide will help you achieve professional-looking results, even if you’re a beginner. So grab your yarn and crochet hook, and let’s begin this delightful handmade journey together.
Choosing the Right Materials for Your Crochet Placemat
Before diving into the actual process of making your placemat, the first step in this how to make a crochet placemat – step by step tutorial is gathering the right materials. The tools and yarn you select will significantly affect the texture, durability, and overall appearance of your project. Choosing wisely ensures that your placemat will look stunning and serve its purpose effectively.
For crochet placemats, cotton yarn is the best option. Cotton is strong, washable, and can withstand heat, making it ideal for kitchen or dining table projects. It also offers excellent stitch definition, which gives your placemat a neat, polished look. Avoid using yarns like acrylic or wool, as they may not hold their shape well or resist heat effectively.
The size of your crochet hook should match the yarn you choose. Generally, a 4mm to 5mm hook works best with medium-weight cotton yarn. If you want a looser, more flexible placemat, you can go up a hook size. Always check your yarn label for the recommended hook size, as this ensures even tension throughout your work.
Aside from yarn and hook, you’ll need a pair of scissors for cutting yarn and a yarn needle to weave in the ends once you’re done. You might also want a stitch marker to keep track of your rounds if your design is circular. For rectangular or oval placemats, it helps to have a measuring tape to ensure consistent sizing.
You can also add creative touches by using multicolored yarn or combining two colors for a striped effect. Some crafters prefer using natural tones for a rustic or minimalist aesthetic, while others enjoy experimenting with bright, bold colors. Whatever your preference, the materials you choose will set the tone for your finished piece.
Once you’ve gathered everything you need, you’re ready to start creating your placemat. Preparation is key, and having the right materials at hand ensures your crochet placemat project goes smoothly from start to finish.
Step-by-Step Guide to Making the Crochet Placemat
Now that your materials are ready, it’s time to dive into the main part of this how to make a crochet placemat – step by step tutorial. Follow each stage carefully, and you’ll see how simple it can be to create something elegant and practical for your home.
Start by making a foundation chain. The number of chains will determine the width of your placemat. For a standard rectangular placemat, chain between 45 to 60 stitches, depending on your desired size. Keep your tension even, ensuring the chain isn’t too tight.
Next, work your first row using a simple stitch such as single crochet or half double crochet. These stitches are ideal for beginners because they create a dense, sturdy fabric that’s perfect for placemats. Continue across the chain, making one stitch in each chain. At the end, chain one and turn your work to begin the next row.
Repeat this process for several rows until your placemat reaches the desired length. Remember to maintain consistent tension throughout to keep your placemat flat and even. You can use different stitches in alternating rows for texture, such as combining single crochet with double crochet or using a moss stitch for an interesting woven effect.
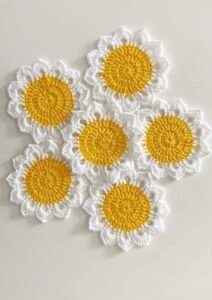
If you prefer a circular placemat, start with a magic ring and work in rounds using double crochet stitches. Increase evenly in each round to keep the placemat flat. Switching colors between rounds adds a beautiful spiral or striped effect that’s eye-catching and modern.
Once you’re happy with the size and shape, you can add a border. A simple single crochet border gives a clean edge, while a scalloped or picot border adds decorative flair. Borders not only enhance the look but also help the placemat lay flat and prevent curling at the edges.
Finish by fastening off your yarn and weaving in all the loose ends with a yarn needle. Give your placemat a gentle block by dampening it and laying it flat to dry. This helps smooth out any unevenness and gives your finished piece a professional touch.
Tips and Tricks for a Perfect Crochet Placemat
Making a crochet placemat is a rewarding experience, and a few helpful tips can make the process even smoother. This part of the how to make a crochet placemat – step by step tutorial focuses on practical advice that ensures your project looks polished and durable.
The first tip is to maintain even tension. Uneven tension can cause your placemat to warp or curl, so it’s important to crochet at a comfortable and consistent speed. Don’t pull your yarn too tightly—allow your stitches to flow naturally.
Second, measure as you go. It’s easy to lose track of dimensions while crocheting, so occasionally use a measuring tape to make sure your placemat stays uniform in size. If you’re making a set of placemats, consistency is key to a cohesive look.
Third, don’t skip the border. Even a simple border makes a big difference in how the finished placemat looks. It gives your work structure and a neat frame. A slip stitch or single crochet border is quick to do and helps your placemat lay flat.
Fourth, consider color placement carefully. Using contrasting or complementary colors can turn a simple placemat into a statement piece. If you’re uncertain, try laying your yarns side by side before starting to see how they look together.
Fifth, block your placemat when finished. Blocking helps shape your piece perfectly. To do this, lightly spray your placemat with water, lay it flat on a towel, and gently stretch it to shape. Allow it to dry completely before using.
Lastly, care for your placemat properly. Hand wash it in cool water or machine wash on a gentle cycle, then air dry flat. Proper care ensures your handmade piece remains vibrant and maintains its shape over time.
Creative Variations and Design Ideas
The beauty of this how to make a crochet placemat – step by step tutorial is that you can adapt it to suit your style. There are countless ways to personalize your placemat using colors, stitches, and shapes, making each one truly unique.
For a minimalist and modern look, stick to solid colors and clean lines. A simple rectangle or oval with a single crochet border can look elegant and timeless. Choose neutral tones like beige, gray, or cream for a sophisticated touch.
If you enjoy bold designs, try mixing colors. You can create striped patterns, color blocks, or even gradients by switching yarns every few rows. Using two or three colors can make your table setting vibrant and lively, especially for summer or festive occasions.
Texture also plays a big role in design. Experiment with different stitches such as puff stitches, bobble stitches, or the waffle stitch to add dimension to your placemat. These textured designs not only look attractive but also provide extra thickness and durability.
You can also play with shapes. While rectangular placemats are classic, circular or hexagonal versions add a fun twist to your dining table. A set of round placemats with scalloped edges can look especially charming for tea parties or outdoor lunches.
Finally, think beyond the table. Crochet placemats can double as decorative doilies, wall hangings, or even base mats for flower pots. Their versatility makes them a great handmade item for gifting or selling.
How to Make a Crochet Placemat
1. Is this project suitable for beginners?
Yes! This how to make a crochet placemat – step by step tutorial is perfect for beginners. The stitches used are simple, and you can easily follow along even if it’s your first crochet project.
2. How long does it take to make a crochet placemat?
It depends on the size and stitch used, but on average, it takes about 2 to 4 hours to complete one placemat. With practice, you’ll finish them even faster.
3. What is the best yarn for a crochet placemat?
Cotton yarn is the best choice because it’s strong, heat-resistant, and easy to wash. It also gives your placemat a crisp, durable finish.
4. How do I keep my placemat flat?
Consistent tension and blocking your finished piece will prevent curling. You can also use a border to help maintain shape.
5. Can I make placemats in different shapes?
Absolutely! Rectangular, round, and oval placemats are all great options. Simply adjust your starting chain or use circular rounds depending on the desired shape.
6. How should I wash my crochet placemats?
Hand wash with mild detergent or machine wash on a gentle cycle. Always lay flat to dry to preserve shape and color.
Conclusion
In this how to make a crochet placemat – step by step tutorial, you learned how to create a beautiful and practical handmade piece from start to finish.
We covered everything from selecting materials and mastering the basic stitches to adding borders and exploring creative designs. Crochet placemats are not only useful but also an enjoyable way to express your creativity through color and texture.
Now that you know how to make your own, why not start your first set today? Share your experience in the comments—what yarn did you choose, and what colors inspired your design? Leave your honest opinion and suggestions below to help other crochet lovers perfect their placemats too. Your creativity could inspire someone else to begin their crochet journey!