
If you’ve ever wondered how to make a cute crochet capybara – step by step tutorial, you’re in the right place! Creating your own capybara amigurumi is a fun and relaxing project that allows you to bring this adorable, calm animal to life using yarn and a crochet hook. The capybara, known for its gentle personality and friendly nature, has captured the hearts of many crafters, and now you can make your very own plush version at home.
Crochet amigurumi projects like this one are perfect for both beginners and experienced crocheters. They’re not only satisfying to create but also make wonderful handmade gifts for friends and family. Plus, this crochet capybara tutorial is a fantastic way to improve your skills while learning to shape and assemble a small 3D figure using basic crochet stitches.
In this detailed guide, you’ll find everything you need to know: from choosing the right materials and yarn to understanding the techniques and steps that make up your tiny capybara. We’ll go through each stage carefully so you can enjoy the process and create something truly special. By the end of this step-by-step tutorial, you’ll have your own soft, cuddly, and cute crochet capybara ready to display or gift.
Materials You’ll Need to Crochet a Cute Capybara
Before you begin, it’s important to gather all the materials for your cute crochet capybara project. Having everything ready will help your crafting process go smoothly and ensure your final piece looks neat and well-made.
First, choose your yarn carefully. A medium-weight cotton or acrylic yarn is ideal because it holds shape well while remaining soft to the touch. If you want a realistic look, go for shades of brown, tan, or beige — just like a real capybara! You can also experiment with pastel colors for a more whimsical touch.
Next, pick the right crochet hook size. For most yarns, a 3.0mm or 3.5mm hook works great, giving your stitches a firm texture so your capybara doesn’t lose shape. Remember, tighter stitches make the stuffing less visible.
You’ll also need polyester fiberfill for stuffing your amigurumi. This material keeps your crochet capybara plush and squeezable. Use small amounts of stuffing at a time to ensure even distribution, especially around the head and body.
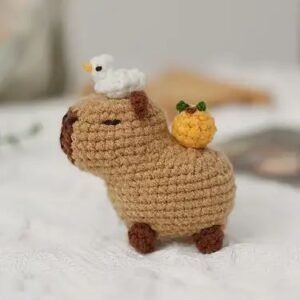
Other useful materials include safety eyes or small black beads for the eyes, a yarn needle for sewing parts together, and scissors for trimming excess yarn. You can even add cute accessories like a tiny hat or scarf once you finish the base model.
Having everything within reach will make following this step-by-step crochet tutorial a much more enjoyable experience. Once your tools are ready, it’s time to start crocheting the base of your capybara!
Step-by-Step Instructions to Crochet the Capybara Body
Now that your materials are prepared, let’s begin the actual crafting part of this how to make a cute crochet capybara – step by step tutorial. The body forms the largest part of your amigurumi and serves as the foundation for the rest of the figure.
Start by making a magic ring, which is a common way to begin amigurumi patterns. Work six single crochets into the ring and pull it tight to close the circle. This will be the beginning of your capybara’s body. Continue crocheting in rounds, gradually increasing the stitch count each round to shape the oval body.
Once you reach the desired width, stop increasing and crochet several rounds evenly. This will give your capybara a nice, rounded shape. Be sure to stuff the piece as you go — it’s easier than trying to do it all at the end. Use your fingers or a chopstick to push the fiberfill evenly inside.
To taper the body towards the back, begin decreasing stitches symmetrically. This creates the soft, sloped look characteristic of a capybara’s body. Always check your work to make sure it’s not overstuffed or uneven.
After you finish the main shape, fasten off your yarn and leave a long tail for sewing later. Your capybara body should now look like a small oval plush with rounded edges. This part is the base that will hold all the other features you’ll add later, such as legs, ears, and the face.
Crocheting the body might take some time, but it’s one of the most relaxing parts of this project. Once complete, you’ll already start seeing your cute crochet capybara coming to life!
Crocheting the Head, Legs, and Ears
Now that the body is ready, it’s time to make the other important parts of your crochet capybara. These smaller details add character and personality to your finished piece.
Let’s start with the head. Create another magic ring and make six single crochets into it. Increase evenly until the head reaches the desired size — usually slightly smaller than the body. Shape it by adding a few rounds without increases, then start decreasing as you approach the top. Before closing, insert the safety eyes and stuff it firmly.
For the legs, make four small cylinders by crocheting in continuous rounds. Keep them short and slightly chubby for that cute, stubby look. You can stuff them lightly to help them maintain shape without making them too stiff.
The ears are simple but essential. Crochet two small ovals or half-circles and leave a long tail for sewing. Capybara ears are small and sit toward the top of the head, giving them that distinctive calm and curious expression.
Once all parts are made, sew them onto the body using your yarn needle. Take your time positioning them carefully so your capybara looks balanced and symmetrical.
When assembled, your crochet capybara should start to resemble the adorable real-life animal — round, calm, and ready for hugs. The best part is that you can personalize the expression by slightly adjusting the position of the eyes and mouth.
Adding these final touches makes your step-by-step crochet capybara tutorial truly special and uniquely yours.
Adding Details and Personalizing Your Crochet Capybara
The final step in this how to make a cute crochet capybara – step by step tutorial is all about details! This is where your creativity truly shines, and you can make your crochet capybara reflect your style.
Start by embroidering the nose and mouth using a small amount of black yarn or embroidery thread. Keep the stitches minimal — a tiny triangle for the nose and a short line for the mouth gives it a soft, friendly look.
You can also add blush details using pink yarn or a dab of fabric paint to give your capybara cute rosy cheeks. This small touch adds a lot of charm to your finished creation.
For extra personality, accessorize your capybara! Crochet a small hat, a scarf, or even a flower crown. Seasonal themes work great too — imagine your capybara wearing a Christmas hat or holding a tiny heart for Valentine’s Day.
If you plan to gift it, you could attach a keychain ring or place it in a small display box. Handmade gifts like this show effort, creativity, and love, making them extra meaningful.
The more you experiment with details, the more fun this process becomes. Every variation creates a new version of the cute crochet capybara, making each one special and one-of-a-kind.
Don’t forget to take photos of your final piece — it’s a wonderful keepsake of your crafting journey and a way to share your creativity with others!
How to Make a Cute Crochet Capybara
1. Is the crochet capybara beginner-friendly?
Yes! This pattern is great for beginners who already know basic stitches like single crochet, increase, and decrease. The project is simple, repetitive, and very relaxing.
2. How long does it take to make a crochet capybara?
Depending on your skill level, it can take between 3 to 6 hours. You can also divide the project into sections and finish it over several days.
3. What type of yarn works best?
A medium-weight cotton or acrylic yarn is ideal because it’s easy to work with and gives your amigurumi a soft, durable texture.
4. Can I make a larger or smaller capybara?
Absolutely! Just adjust your hook and yarn size. Thicker yarn and larger hooks create a bigger toy, while thinner yarn makes a smaller, more delicate version.
5. Do I need safety eyes, or can I embroider them?
Both options work! Safety eyes give a shiny, realistic finish, while embroidered eyes are perfect for small children or pets since they’re more secure.
6. How can I make my crochet capybara stand out?
Experiment with colors, accessories, or facial expressions. Each small change makes your creation more unique and personal.
Conclusion
Making your own cute crochet capybara is a wonderful and rewarding experience. This step-by-step tutorial showed you how to create an adorable amigurumi friend from start to finish — from preparing materials and crocheting the body to adding details and final touches.
Whether you’re a beginner or an experienced crafter, this project is perfect for relaxing, improving your crochet skills, and expressing creativity. Take your time, enjoy the process, and soon you’ll have a charming handmade capybara to brighten your day.
If you followed this guide, I’d love to hear your thoughts! Share your opinion and suggestions about this tutorial — your feedback helps improve future crochet projects and inspires others to start their own handmade journey!