
If you’ve been looking for a practical and pretty way to organize your crochet tools, this How to make an easy crocheted pouch to store crochet hooks – Step by Step Tutorial is exactly what you need. A handmade crochet pouch is not only functional but also a delightful project for beginners and experienced crafters alike. It allows you to store your hooks safely, preventing them from getting lost or damaged, while adding a touch of creativity to your crafting corner. Plus, this type of project is quick to make and perfect for using leftover yarn from previous creations.
Making your own crocheted pouch to store crochet hooks is a satisfying process. You can customize the design, size, and color combinations according to your personal taste. Whether you prefer bright tones or soft pastels, the result will always be charming and unique. Besides, this project makes an excellent handmade gift for crochet lovers. If you enjoy both functionality and beauty, this easy tutorial will help you craft a pouch that combines both.
Through this step by step tutorial, you’ll learn all the essential techniques needed to complete your pouch. From selecting the right yarn and hook size to assembling and finishing, each stage is designed to be clear and beginner-friendly. The goal is to help you not only make something useful but also improve your crochet skills in the process. Let’s dive in and discover how simple and enjoyable it can be to make your very own crochet hook storage pouch.
Choosing the Right Materials for Your Crochet Pouch
The success of your easy crocheted pouch to store crochet hooks starts with selecting the right materials. The choice of yarn and hook size determines the texture and durability of your pouch. For this project, cotton yarn is often preferred because it is sturdy, washable, and holds its shape well. Acrylic yarn can also be used if you want a softer, more flexible pouch.
A medium-weight yarn (category 4) works great for this kind of pouch. It provides the ideal thickness for structure while remaining comfortable to handle. Pair it with a crochet hook that matches the yarn’s recommended size—usually between 3.5 mm and 4.5 mm. Using the correct hook will help ensure even stitches and a neat finish.
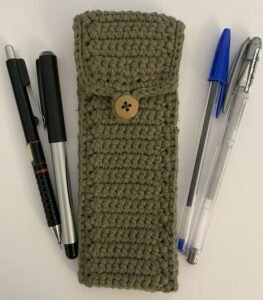
In addition to yarn and hook, you’ll need a few basic tools. A pair of scissors, a yarn needle for weaving in ends, and some stitch markers to keep track of your rounds or rows will make your work easier. If you’d like to add a closure, consider a button, zipper, or even a simple drawstring made from the same yarn.
Choosing the right color palette can make your project stand out. You might opt for neutral shades to match your workspace or bright hues to reflect your personality. This simple detail adds charm and individuality to your pouch. Don’t hesitate to experiment with different color combinations for a truly custom design.
Finally, keep in mind that the quality of your materials affects how long your crocheted pouch will last. Investing in good yarn will ensure durability and prevent stretching or pilling over time. Once you’ve gathered everything, you’re ready to start the fun part—crocheting your very own hook pouch.
Step-by-Step: Crocheting the Base of the Pouch
The base is the foundation of your crocheted pouch to store crochet hooks, so it’s important to start with accuracy. Begin with a chain that matches the width you want your pouch to have. For a standard hook holder, chaining about 30 to 35 stitches is a good starting point. This will give you enough room for multiple crochet hooks.
Once you have your base chain, work single crochets along the chain to create the first row. When you reach the end, continue working around the chain to form an oval base. This technique allows your pouch to have depth and structure. Continue crocheting in rounds, increasing stitches slightly at the ends to maintain the oval shape.
After a few rounds, your base will take form. Make sure it lies flat and doesn’t curl. If it starts to curve, you may need to add or remove a few stitches in the corners to balance the shape. The key here is consistency—maintaining the same tension throughout the base ensures your pouch will be even and stable.
Once the base is complete, stop increasing and continue crocheting straight rounds upward. This creates the body of your pouch. You can use single crochet or half double crochet stitches depending on how tight or flexible you want the fabric to be. A tighter stitch offers more structure, while a looser one gives a softer finish.
Continue crocheting until your pouch reaches your desired height. For most hook holders, about 6 to 8 inches in height works perfectly. This ensures that your crochet hooks fit securely without falling out. Remember to measure your tallest hook before deciding on the final height.
Adding the Finishing Touches
When your pouch has reached the desired size, it’s time to add the finishing touches. This step gives your easy crocheted pouch a polished and professional look. Begin by creating a neat edge. You can do this by working a round of slip stitches or single crochets across the top opening. This reinforces the structure and prevents the yarn from stretching over time.
If you’d like to add a closure, now is the time. Buttons are a simple and decorative option. To attach one, make a small loop with chain stitches on one side and sew the button securely on the opposite side. If you prefer a zipper, carefully hand-sew it along the inside edge using matching thread. A drawstring can also work beautifully; just weave it through the top row and tie a small knot or bow.
Personalization adds charm and creativity to your pouch. Consider adding a small flower appliqué, a tag, or a stripe pattern to make it unique. You can even incorporate two or three colors to create visual contrast. These small details make your project special and reflect your own style.
Don’t forget to weave in all loose yarn ends using a yarn needle. This step might seem minor, but it’s crucial for maintaining the pouch’s durability and preventing unraveling. Trim the excess yarn neatly once the ends are secure.
At this point, your crocheted pouch to store crochet hooks should look complete and ready for use. Take a moment to admire your work and enjoy the satisfaction of creating something functional and beautiful with your own hands.
Creative Variations and Useful Tips
Once you’ve mastered this step by step tutorial, you can explore creative variations. For example, you can make larger pouches to store other tools like scissors, tape measures, or even small yarn balls. The same base pattern can easily be adapted to suit different needs simply by adjusting the size.
You can also experiment with different stitch patterns. Try shell stitches, puff stitches, or even a simple mesh design to give your pouch more texture. These decorative stitches not only look lovely but also allow you to practice new crochet techniques.
Another idea is to line your pouch with fabric. This adds extra durability and gives the inside a smooth finish, especially if you plan to store metal crochet hooks. To do this, cut a piece of fabric matching your pouch’s dimensions and sew it inside carefully.
If you’re making pouches as gifts, adding personalized tags or labels can make them even more special. Handmade items carry a unique charm that mass-produced products lack, and a custom touch adds sentimental value.
Finally, always block your finished pouch lightly if needed. Blocking helps even out stitches and gives the piece a professional look. Simply dampen it slightly, shape it with your hands, and let it dry flat.
FAQ
1. What type of yarn is best for a crochet hook pouch?
Cotton yarn is ideal for a crocheted pouch because it’s durable and holds its shape well. However, acrylic yarn can be used if you prefer a softer texture.
2. How long does it take to make a crochet hook pouch?
Depending on your skill level, it usually takes between two and four hours to complete. Beginners might take a bit longer, especially if adding decorations or lining.
3. Can I wash my crocheted pouch?
Yes, you can hand wash it gently using cold water and mild detergent. Avoid wringing or stretching it; instead, press it between towels and let it air dry.
4. How can I make my pouch more structured?
Using tighter stitches or adding a fabric lining will give your pouch a firmer shape. You can also use thicker yarn or smaller hooks for a denser finish.
5. Can I adjust the size of the pouch?
Absolutely. Simply increase or decrease the number of starting chains to adjust the width and add or reduce rounds for height.
6. Is this a good project for beginners?
Yes, this How to make an easy crocheted pouch to store crochet hooks – Step by Step Tutorial is beginner-friendly. It uses basic stitches and simple shaping, making it ideal for those just learning crochet.
Conclusion
Making your own crocheted pouch to store crochet hooks is a fun and rewarding experience. This step by step tutorial guides you through every stage, from choosing the right materials to finishing with a touch of creativity. You’ve learned how to create a durable, stylish, and functional crochet hook holder that helps keep your tools organized.
Now that you know how to make an easy crocheted pouch, try experimenting with colors, patterns, and embellishments to create your own signature design. Each pouch you make reflects your style and passion for crochet.
If you enjoyed this tutorial, share your thoughts below! Leave your honest opinion and suggestions on what type of crochet projects you’d like to learn next. Your feedback helps make every future guide even better and more inspiring for crochet lovers everywhere.