
If you have ever wondered How to Make Crochet Coasters- Step by Step Tutorial, you have found the perfect guide. Making crochet coasters is a creative, fun, and practical project for both beginners and experienced crocheters. Coasters are small, quick to complete, and allow you to practice different crochet stitches while creating something useful for your home. In this tutorial, we will guide you through the entire process so you can make beautiful and functional crochet coasters with ease.
Learning How to Make Crochet Coasters- Step by Step Tutorial also gives you the freedom to customize your coasters with different colors, patterns, and designs. They can be made to match your home décor, given as thoughtful handmade gifts, or even sold at craft fairs. Because they are small, they require minimal yarn and materials, making them a budget-friendly crochet project.
In the following sections, we will cover the materials you need, how to prepare for your project, the steps to crochet different coaster patterns, and tips for finishing and decorating them. By the end of this article, you will have all the knowledge and confidence to start making your own coasters while following this How to Make Crochet Coasters- Step by Step Tutorial.
Materials and Preparation for Crochet Coasters
The first step in How to Make Crochet Coasters- Step by Step Tutorial is gathering the right materials. Because coasters are small, you will not need a lot of supplies, but having the correct tools and yarn makes the process easier and more enjoyable.
Most crochet coasters are made using cotton yarn because it is absorbent, washable, and holds its shape well. Acrylic yarn can also be used, but it is less heat resistant, so cotton is recommended if you want to use the coasters for hot drinks. Choosing the right yarn is essential when learning How to Make Crochet Coasters- Step by Step Tutorial.
You will also need a crochet hook that matches your yarn’s weight. Common sizes for coasters are between 3.5 mm and 5 mm hooks, depending on the thickness of the yarn and the desired coaster size. The hook size affects the texture and tightness of the stitches, so experimenting with different sizes can be helpful.
Other supplies include scissors, a tapestry needle for weaving in yarn ends, and a stitch marker if you are working in rounds. A flat, even workspace makes crocheting more comfortable, especially when counting stitches and keeping track of your pattern.
Before starting the project, choose your pattern and color scheme. Solid colors create a minimalist look, while multicolored yarn or stripes add a fun, vibrant touch. Planning ahead ensures your coasters look cohesive, especially if you are making a full set following this How to Make Crochet Coasters- Step by Step Tutorial.
Finally, make sure you understand basic crochet stitches such as chain stitch, single crochet, and double crochet. These are the building blocks of most coaster patterns and will be used throughout this tutorial.
Step-by-Step Instructions for Crochet Coasters
Now that you have your materials ready, let’s begin the practical part of How to Make Crochet Coasters- Step by Step Tutorial. Most crochet coasters are made in the round, starting with a small center circle and gradually increasing stitches to create a flat disc.
Start by making a slip knot on your hook, then chain four stitches and join the last chain to the first with a slip stitch to form a ring. Alternatively, you can use the magic ring method, which allows you to pull the center tight for a neater look. This is the foundation of your coaster.
Next, work single crochet stitches into the center ring. The number of stitches in the first round determines the coaster’s size, so typically, 8–12 stitches are used. Join the round with a slip stitch, completing the first stage of How to Make Crochet Coasters- Step by Step Tutorial.
For the second round, increase the size by working two single crochet stitches into each stitch from the previous round. This ensures the coaster remains flat rather than curling up into a bowl shape. Continue joining each round with a slip stitch.
In the following rounds, continue increasing evenly. For example, in the third round, work one single crochet in the first stitch, then two single crochets in the next, repeating this pattern all the way around. Each round increases the coaster’s diameter while maintaining its circular shape.
You can stop after a few rounds for small coasters or keep going for larger ones. Once the coaster reaches your desired size, finish with a slip stitch and cut the yarn, leaving a short tail to weave in. This completes the basic version of How to Make Crochet Coasters- Step by Step Tutorial.
Adding Decorative Edges and Patterns
One of the best things about How to Make Crochet Coasters- Step by Step Tutorial is the ability to customize them. Adding decorative edges or using different stitch patterns can transform a simple coaster into something unique and beautiful.
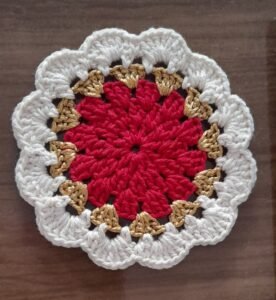
A popular option is the scalloped edge. After completing the main circle, chain three stitches, skip one stitch, and slip stitch into the next. Repeat this all the way around to create small, rounded edges that look like petals.
You can also add color changes between rounds for a striped effect. Simply switch to a different yarn color at the beginning of a new round. This technique is simple but makes the coasters look more vibrant and fun.
Another variation is using textured stitches like the puff stitch or the bobble stitch. These stitches create a raised texture, giving the coaster a unique appearance while still being functional.
For a lacy effect, incorporate chain spaces into your rounds. For example, alternate between single crochet stitches and chain stitches to create small gaps. This technique works well for decorative coasters meant for cold drinks rather than hot mugs.
You can even crochet coasters into shapes such as hearts, flowers, or hexagons instead of circles. These variations follow the same principles as How to Make Crochet Coasters- Step by Step Tutorial but with slightly different stitch placements to form the desired shapes.
Finally, consider adding a border with a contrasting color. A simple single crochet border in a bright color frames the coaster beautifully, giving it a neat and polished look.
Finishing and Caring for Your Crochet Coasters
Once you have completed the main steps in How to Make Crochet Coasters- Step by Step Tutorial, it is important to finish them properly for durability and a professional appearance. Start by weaving in all loose yarn ends using a tapestry needle. This prevents unraveling and keeps the coaster edges tidy.
Blocking is another optional but highly recommended step. To block your coasters, lightly wet them, lay them flat on a towel, and shape them into perfect circles or squares. Allow them to dry completely. This process ensures the coasters stay flat and even.
If you want extra thickness or heat resistance, consider making double-layered coasters by sewing two circles together. This works especially well for coasters meant for hot drinks like coffee or tea.
Caring for crochet coasters is simple. Because most are made from cotton yarn, they are machine washable. Use a gentle cycle and lay them flat to dry to prevent stretching. Proper care keeps them looking fresh and functional for a long time.
Handmade coasters also make wonderful gifts. You can tie a set of four or six coasters with a ribbon for a thoughtful, homemade present. Personalizing them with favorite colors or initials adds a special touch.
Lastly, remember that practice makes perfect. Your first set might not be flawless, but each new set will look better as you become more comfortable with How to Make Crochet Coasters- Step by Step Tutorial.
FAQ about How to Make Crochet Coasters- Step by Step Tutorial
1. What is the best yarn for crochet coasters?
Cotton yarn is recommended because it is absorbent, durable, and easy to wash.
2. How long does it take to make one coaster?
A simple coaster can be completed in 30–45 minutes, making it a quick project for beginners.
3. Can I make crochet coasters without a pattern?
Yes, once you understand the basic increase method, you can design your own coaster patterns easily.
4. How many coasters should I make for a set?
Most sets include four to six coasters, but you can make as many as you like.
5. Do crochet coasters really protect furniture?
Yes, when made with absorbent yarn, they help protect surfaces from moisture and heat.
6. Can I sell handmade crochet coasters?
Absolutely! Handmade coasters are popular at craft fairs and online shops.
Conclusion
In this article, we covered How to Make Crochet Coasters- Step by Step Tutorial in detail, from gathering materials to crocheting, decorating, and caring for your coasters.
We explored different patterns, edging techniques, and customization ideas to help you create unique and functional pieces.
Now it is your turn to pick up your hook, try the tutorial, and share your results. We would love to hear your honest opinions and suggestions for future projects, so feel free to leave your feedback after making your first set of crochet coasters.