
Have you ever stumbled upon a craft project so creative and profitable that it completely changed your perspective on handmade items? That’s exactly what happened to me when I made 100 of them and sold them all in one day. This is a genius idea. You will love it – Step by Step Tutorial. It all started as a small weekend experiment and quickly turned into a surprisingly successful venture. The best part? It’s so simple that anyone can do it with just a few inexpensive materials and some creativity.
When I first started crafting, I never imagined that something so fun could also be profitable. I shared my handmade creations at a local market, and to my amazement, everything was gone within hours. That experience made me realize how valuable it is to make products that are not only adorable but also practical. In this tutorial, I’ll share all the secrets behind my best-selling idea so you can recreate it and even turn it into your own small business. Whether you’re crafting for fun, gifting, or extra income, this project will win your heart.
This project is easy, fast, and incredibly rewarding. The key is that it combines functionality and charm—something that always attracts attention. By following this step-by-step tutorial, you’ll learn how to make an item that stands out for its creativity and usefulness. You’ll also understand why so many people fell in love with it and how I managed to sell so many in such a short time. So, grab your materials, get comfortable, and let’s dive into this genius idea together!
What Makes This Project So Genius
The reason I made 100 of them and sold them all in one day is because people are constantly looking for cute, useful, and affordable handmade items. This project checks all those boxes perfectly. It’s small enough to make in bulk but impressive enough to catch everyone’s attention. The design is clever, functional, and versatile, making it a great fit for any audience or occasion.
Another secret behind this success is the low production cost. You can use leftover materials you already have at home—scraps of fabric, yarn, or felt—and turn them into beautiful pieces. That means you’ll spend very little and still have something that looks high-end and professional. The combination of low cost and high perceived value is what makes this idea truly genius.
It’s also incredibly customizable. You can play with different colors, textures, and decorations to make each piece unique. Customers love having options, especially when they’re buying gifts or looking for something personal. Adding small details like buttons, ribbons, or embroidery gives each item a special charm that makes it irresistible.
Another factor that contributed to the fast sales was presentation. I made sure to package each piece neatly and display them in an inviting way. A simple tag or bow can make a big difference in how your work is perceived. When people see something that looks professionally made and well-presented, they’re more likely to buy it right away.
Finally, the genius part of this idea lies in its repeatability. Once you master the process, you can produce these items quickly without compromising quality. That’s why it was easy for me to make a large batch and sell them all in one day. When demand is high, being efficient in production makes all the difference.
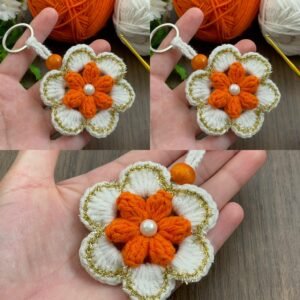
Step by Step Tutorial: How to Make It
Let’s move on to the fun part—the actual step-by-step tutorial on how to make this amazing item. First, gather all your materials. Depending on your version of the project, you might need fabric, thread, scissors, stuffing, decorative pieces, and a needle or sewing machine. Make sure everything is within reach before you start.
Step one: cut your base material into the desired shape. Keep your measurements consistent so all your pieces look uniform. If you’re using fabric, you can make templates out of cardboard to help trace faster and more accurately. Consistency in shape and size helps your products look more professional.
Step two: start assembling. Sew or glue the pieces together, depending on the material and your preferred crafting technique. This is where the fun creativity begins. You can combine different colors or textures to make each one stand out. Don’t forget to secure all edges properly to ensure durability.
Step three: add any decorations you want. This could include buttons, embroidery, ribbons, beads, or even small charms. The secret is in the details—people love items that feel personal and thoughtful. Make sure everything is securely attached, especially if you’re selling these at markets or online.
Step four: finish and check the quality. Go over each piece carefully, trim any loose threads, and make sure it looks neat. A good finish not only increases customer satisfaction but also adds to your reputation as a skilled crafter. Remember, quality always stands out.
Step five: packaging and presentation. Use clear bags, simple boxes, or eco-friendly wrapping to make your products look more appealing. Add a small thank-you tag or label with your name or brand. Presentation can often be what convinces someone to make a purchase.
Why It Sells So Fast
The reason I made 100 of them and sold them all in one day is because people love items that blend beauty and practicality. When something looks cute, feels handmade, and serves a purpose, it becomes irresistible. Whether it’s for home use, as a gift, or simply a collectible item, this project satisfies many needs at once.
Handmade products are trending more than ever. People are moving away from mass-produced goods and looking for something special, unique, and made with care. Your creations can fill that space perfectly. When customers know that each piece is handmade, they feel more connected to the product and its maker.
Affordability also plays a big role. Because the production cost is low, you can price your items reasonably while still earning a good profit. That’s how I managed to sell everything so quickly—each piece was priced just right for impulse buyers. A fair price makes customers happy and encourages them to come back for more.
Additionally, having variety helps attract a larger audience. Offering different colors or themed versions of the same product allows buyers to choose their favorite. Variety doesn’t only please the eye—it creates excitement and makes customers feel like they’re getting something exclusive.
Social media can also boost your sales tremendously. Share your creations online, post behind-the-scenes photos, and engage with your audience. People love to see the process behind handmade items—it builds trust and emotional connection. This kind of engagement can turn casual viewers into loyal customers.
Lastly, being present at local fairs, markets, or small shops exposes your work to a larger audience. Many people prefer to see and touch handmade items before buying. The moment they hold your beautiful creation in their hands, it’s almost impossible to resist.
Tips for Turning This Idea into a Small Business
Once you realize how easily I made 100 of them and sold them all in one day, it’s natural to think about turning this into a side business. The good news is—you can! Start small and scale up as you gain more confidence and experience. Selling crafts can be both fulfilling and profitable if you approach it strategically.
First, focus on branding. Create a simple logo or label that represents your work. It doesn’t have to be fancy—just consistent and recognizable. Having your own brand name helps you stand out and makes your products more memorable.
Next, manage your time effectively. Set a schedule for crafting, packaging, and marketing. Having a routine keeps you organized and productive, especially when you start receiving more orders.
Always prioritize quality over quantity. While it’s tempting to rush through large batches, maintaining high standards will ensure repeat customers and positive word of mouth. A happy customer is your best advertisement.
Consider taking custom orders once you’re comfortable with your base design. Personalization adds extra value and allows you to charge slightly more. People love owning something made just for them.
Lastly, never stop learning. Explore new techniques, color combinations, and materials. The crafting world is always evolving, and staying creative keeps your work fresh and exciting.
FAQ
1. What materials do I need for this project?
You can use simple materials such as fabric scraps, yarn, felt, thread, buttons, and glue. Choose according to your preferred crafting style.
2. How long does it take to make one?
Once you get the hang of it, you can complete one in about 10–15 minutes, making it ideal for bulk production.
3. Can I sell these online?
Absolutely! They sell very well on platforms like local marketplaces or craft fairs. Just make sure to photograph them beautifully.
4. How should I price them?
Calculate your material cost and add a fair profit margin. Keep your price affordable yet rewarding for your effort.
5. Is this suitable for beginners?
Yes! This step-by-step tutorial is beginner-friendly. Even if you’ve never crafted before, you’ll be able to follow along easily.
6. How can I make my designs unique?
Experiment with colors, shapes, and decorations. Add your personal touch to make each piece different and special.
7. How can I promote my handmade products?
Use social media, word of mouth, and local markets. Share stories behind your creations and engage with your followers.
Conclusion
As you can see, the reason I made 100 of them and sold them all in one day. This is a genius idea. You will love it – Step by Step Tutorial became such a success is because it combines simplicity, creativity, and profitability. It’s proof that you don’t need expensive tools or professional skills to create something people truly love.
By following the steps, paying attention to details, and presenting your work beautifully, you can achieve the same amazing results. Whether you want to make these for fun, gifts, or as a business, this project offers endless possibilities.
Now that you’ve learned how to make it, I’d love to hear your thoughts! Leave your honest opinion and share your suggestions about this tutorial. Your feedback helps keep the creativity flowing and inspires others to start their own handmade journey!