
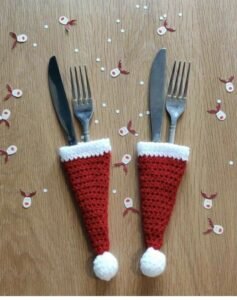
If you love adding a touch of handmade charm to your festive table, then I made these Christmas cutlery holders and loved them.-Step by Step Tutorial is exactly what you need! These adorable and functional decorations will make your holiday table look magical while keeping your silverware neatly in place. Making them yourself brings not only a sense of accomplishment but also a special personal touch that store-bought items can’t replicate. Whether you are an experienced crafter or just starting out, this project is simple, enjoyable, and festive.
The great thing about this project is that it can be easily customized to fit your holiday style. You can choose traditional Christmas colors like red, green, and gold, or opt for something modern such as white and silver tones. In this I made these Christmas cutlery holders and loved them.-Step by Step Tutorial, you will learn how to create beautiful holders using affordable materials and a few simple techniques. They are perfect for adding a cozy and elegant charm to your Christmas dinner table, and they also make thoughtful handmade gifts for friends and family.
Besides being decorative, these cutlery holders are also highly practical. They keep utensils organized while giving your dining table a well-coordinated look. Guests will love the detail and care you’ve put into your holiday preparations. By following this step-by-step tutorial, you’ll discover how easy it is to craft something beautiful and useful at the same time. So, let’s dive into the festive spirit and create these charming Christmas cutlery holders together!
Materials You Will Need
Before getting started, gather all the materials for your Christmas cutlery holders. Preparation is key to ensuring the crafting process goes smoothly and efficiently. Having everything ready will help you focus on creativity instead of searching for supplies halfway through your project.
You’ll need a few essential materials: felt fabric in Christmas colors, scissors, a hot glue gun, decorative ribbons, small embellishments like buttons or bells, and optionally, thread and needle if you prefer sewing. Felt is an excellent choice because it’s soft, durable, and easy to cut into shapes without fraying. Choose high-quality felt to ensure your holders maintain their shape and look neat.
If you want to add more character, you can use printed fabrics with festive patterns such as snowflakes, candy canes, or holly leaves. Mixing different textures—like felt with lace or burlap—creates a more rustic and cozy feel. Remember, this I made these Christmas cutlery holders and loved them.-Step by Step Tutorial is flexible, allowing you to adapt materials based on what you already have at home.
When it comes to tools, make sure your scissors are sharp enough to cut clean lines. A ruler or pattern template helps you measure and maintain uniformity between all the holders. You can also use fabric glue if sewing isn’t your favorite part. The best thing about this project is that it doesn’t require advanced crafting skills—just creativity and patience.
Adding decorations is where the fun really begins! Mini bows, sequins, or tiny pom-poms can instantly transform your holder from simple to stunning. Don’t hesitate to experiment with color combinations that match your Christmas decor. Little details like embroidered initials or small felt shapes (stars, trees, or hearts) can make your Christmas cutlery holders even more unique and personal.
Once your materials are ready, prepare your workspace. Lay out your supplies neatly, cover your table to protect it from glue, and make sure you have enough lighting. This small organization step will make your crafting experience more enjoyable and efficient.
Step-by-Step Instructions
Now that you have everything set, let’s start crafting! In this I made these Christmas cutlery holders and loved them.-Step by Step Tutorial, we’ll go step by step through the process so you can easily follow along and enjoy the experience.
First, decide on the shape of your holder. The most common design is a small envelope or stocking shape, but you can also make mittens, trees, or even reindeer faces. Draw your chosen shape on a piece of paper to create a template. Use that template to trace the outline onto your felt or fabric. This ensures that all your holders are consistent in size.
Next, carefully cut out the shapes. If you are making a stocking or pocket-style holder, remember to cut two identical pieces for each holder—one for the front and one for the back. This way, you’ll be able to glue or sew the edges together, leaving the top open to insert your cutlery.
Once the shapes are ready, it’s time to assemble. Apply a thin line of hot glue (or sew along the edges) to join the two pieces together. Make sure to leave enough space at the top so the utensils can slide in easily. Press gently to secure the edges and let it dry completely before moving on to decorating.
Now comes the most exciting part—decorating your holders! You can attach ribbons, bows, buttons, or even small felt shapes like Christmas trees or stars. Add tiny golden bells for a cheerful jingle or write guests’ names with a fabric marker to turn them into personalized placeholders. This step is where your creativity truly shines.
After decorating, test each holder by inserting your cutlery set. Check that it fits comfortably and the design remains visible. Adjust any loose decorations and make sure the glue is dry before using them. By this point, you’ll see how satisfying it feels to bring your own creation to life!
Styling and Presentation Tips
Once your Christmas cutlery holders are complete, it’s time to make them stand out on your holiday table. Presentation plays a huge role in creating a festive and inviting atmosphere. In this part of the I made these Christmas cutlery holders and loved them.-Step by Step Tutorial, we’ll talk about how to beautifully display them.
Start by choosing a table theme that complements your cutlery holders. For example, if your holders are red and white, consider using a white tablecloth with red placemats and golden napkin rings. Consistent color coordination brings harmony to your decor and makes your table look professionally styled.
If you’ve created multiple designs, alternate them across the table for a playful yet elegant look. You can place one holder on each plate or tuck them beside the napkins. Adding a small name tag or mini candy cane tied to the holder makes it even more festive.
Lighting also plays a significant role. Soft candles, fairy lights, or a centerpiece with pine branches can enhance the cozy, magical feeling of Christmas. When your guests see how much effort and love you’ve put into your setup, they’ll appreciate your attention to detail.
For a rustic or vintage look, pair your holders with wooden chargers, burlap runners, and greenery. If you prefer a modern vibe, metallic accents and minimalist decor will match beautifully. The versatility of this project means it fits any theme effortlessly.
Lastly, don’t forget to take photos of your work! Handmade decorations like these deserve to be remembered and shared. Your Christmas cutlery holders might even inspire others to try crafting their own.
Creative Variations and Gift Ideas
One of the best things about this I made these Christmas cutlery holders and loved them.-Step by Step Tutorial is how adaptable the project can be. You can tweak the design for different occasions or turn it into unique handmade gifts.
Instead of the traditional red and green, experiment with pastel tones for a softer winter look or bold metallic fabrics for a luxurious style. These holders can also double as small pouches for candy or trinkets—just add a ribbon tie at the top.
You can personalize them for each guest by adding initials, embroidered names, or small photo tags. This personal touch makes the holiday table even more memorable and meaningful. Handmade gifts like these always carry emotional value and show your thoughtfulness.
If you enjoy sewing, add a lining or a small layer of batting inside for extra structure. You can even design larger holders for utensils used during a buffet or festive dinner setup.
Another creative twist is turning these holders into ornaments. Attach a loop of ribbon at the top, and they become adorable decorations for the Christmas tree. The same idea works for gift wrapping—slide a candy cane or note into the holder and attach it to a present for a unique finishing touch.
Crafting these holders can also be a wonderful activity to share with children or friends. It’s an opportunity to spend quality time together, listen to music, and make beautiful memories while creating something meaningful.
FAQ
1. What materials are best for making Christmas cutlery holders?
Felt is the most popular choice because it’s easy to work with, doesn’t fray, and is available in many colors. However, you can also use cotton, burlap, or recycled fabric for a unique texture.
2. Can I sew instead of using glue?
Absolutely! Sewing gives a more durable finish. You can hand-stitch or use a sewing machine depending on your preference. Both methods work well for this project.
3. How long does it take to make a set of cutlery holders?
For beginners, making 4–6 holders might take around one to two hours. Once you get used to the process, it becomes much faster.
4. Are these holders washable?
If made from fabric or felt, gentle hand washing is possible. Avoid soaking or using hot water, as it may cause the felt to lose its shape.
5. Can I use this tutorial for other holidays?
Yes! You can easily adapt the design for other celebrations like Easter, Thanksgiving, or birthdays by changing the colors and decorations.
Conclusion
In this I made these Christmas cutlery holders and loved them.-Step by Step Tutorial, we’ve explored how simple and rewarding it is to craft your own festive table accessories. From gathering materials to adding your final decorative touches, every step brings creativity and joy. These holders not only elevate your Christmas table but also carry the warmth of handmade charm.
Creating them is a beautiful way to celebrate the season and share love through small, thoughtful details. Whether you make them for yourself or as gifts, they’re sure to bring smiles and admiration.
I hope you enjoyed this tutorial and feel inspired to create your own version. Please leave your honest opinion and suggestions below—I’d love to hear how your project turned out and what creative ideas you added to your Christmas table this year!