
Layered crochet witch hat pattern is a delightful project for crocheters who enjoy creating playful accessories with a touch of elegance.
One of the best things about a Layered crochet witch hat pattern is its versatility. You can crochet it using classic black yarn for a traditional witch hat or experiment with purple, orange, green, burgundy, or even glitter yarn for a magical effect.
Learning a Layered crochet witch hat pattern helps improve several important crochet techniques while producing an accessory that is both decorative and functional. Throughout this tutorial, you will practice working in continuous rounds, increasing stitches evenly, shaping the pointed crown, forming the brim, and adding layered decorative elements that give the hat its distinctive appearance. With patience and careful stitch placement, even beginners can achieve beautiful results while gaining confidence in their crochet skills.
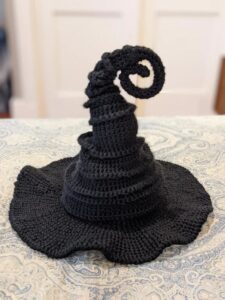
Choosing Materials for a Layered Crochet Witch Hat Pattern
The first step is selecting the right yarn. Cotton yarn creates crisp stitch definition and helps the hat maintain its structure, while acrylic yarn offers softness, flexibility, and vibrant color choices. Either option works well depending on the style you want to achieve.
Choose a crochet hook that matches your yarn weight. Most small decorative witch hats are made using hooks between 2.5 mm and 4 mm. Using a slightly smaller hook often produces tighter stitches, helping the hat stand upright without additional support.
Prepare several useful accessories before starting your project. You will need scissors, a yarn needle for weaving in the ends, stitch markers to keep track of rounds, and measuring tape if you are making a wearable version.
For extra stability, some crocheters insert a thin piece of plastic canvas or lightweight cardboard inside the brim after completing the hat. This optional step helps the brim remain flat while preserving the handmade appearance.
Decorations are what truly make a layered witch hat unique. Small crochet flowers, miniature pumpkins, leaves, stars, tiny bows, beads, ribbons, or decorative buttons can all be added after the hat is finished to create a magical design.
Before beginning, organize your supplies in a comfortable workspace with good lighting. Keeping everything within easy reach allows you to maintain an even rhythm while crocheting and helps prevent counting mistakes during the shaping rounds.
Step-by-Step Layered Crochet Witch Hat Pattern
Begin with a magic ring. Chain 1 and work 6 single crochet (sc) into the ring. Pull the ring tightly closed and place a stitch marker in the first stitch of the round. This forms the pointed tip of your witch hat.
Round 2: Work 2 single crochet into each stitch around, increasing evenly to 12 stitches. These increases begin forming the cone while maintaining a symmetrical shape.
Round 3: 1 single crochet, increase. Repeat around the circle. Continue increasing gradually in each following round by adding one additional single crochet between increases. This slow shaping creates the classic pointed crown of the witch hat.
Continue working rounds until the cone reaches your desired height. For miniature hats, approximately 18 to 22 rounds are usually sufficient. For larger wearable hats, continue until the crown comfortably fits the intended size.
Once the cone is complete, stop increasing and crochet one round of single crochet evenly around. This stabilizes the base of the crown before beginning the brim and provides a clean transition between both sections.
To create the brim, begin increasing again. Work 2 single crochet, increase around the first brim round. On each following round, continue spacing the increases evenly while expanding the circle outward. Repeat until the brim reaches the desired width, ensuring it remains flat without curling.
Creative Ways to Personalize Your Layered Crochet Witch Hat Pattern
One of the most enjoyable parts of making a Layered crochet witch hat pattern is choosing your own color palette. While classic black remains a timeless favorite, deep purple, emerald green, midnight blue, burgundy, and charcoal gray can give your project a magical and elegant appearance. You can even combine two complementary colors to create a unique layered effect.
Adding decorative bands around the base of the crown is another easy way to customize your hat. Crochet a narrow strip in a contrasting color or weave a satin ribbon through the stitches. Gold, silver, and copper accents pair beautifully with darker yarns and create a sophisticated finish.
Crochet flowers are a wonderful embellishment for this project. Small roses, daisies, or layered blossoms attached to one side of the hat create a charming handmade look. Adding tiny crochet leaves behind the flowers provides extra depth and makes the decoration appear more realistic.
For a whimsical design, decorate your witch hat with miniature pumpkins, stars, crescent moons, tiny spiders, or little bows. These small crochet appliqués are quick to make and allow you to create themed hats for seasonal decorations, costume parties, or festive displays.
Experiment with textured stitches when making the brim or decorative bands. Front post stitches, back post stitches, puff stitches, and bobble stitches all introduce extra dimension without making the pattern difficult to follow. These details give the finished hat a more luxurious handcrafted appearance.
Your finished Layered crochet witch hat pattern can be used in many creative ways. It can decorate amigurumi dolls, become a costume accessory, serve as a table centerpiece, embellish gift wrapping, decorate wreaths, or even become a charming ornament. Its versatility makes it one of the most enjoyable seasonal crochet projects for all skill levels.
Finishing, Care, and Helpful Tips for Your Layered Crochet Witch Hat Pattern
After completing your hat, carefully weave in every yarn end using a yarn needle. Taking time to secure the ends properly prevents unraveling and gives the project a clean, professional finish. Hidden yarn tails also improve the overall appearance of the hat.
If the brim curls upward slightly, lightly block the finished hat. Mist it with clean water, gently shape the brim with your hands, and allow it to dry naturally on a flat surface. Blocking helps smooth the stitches and gives the hat a polished appearance.
If you would like the crown to remain especially firm, insert a small amount of lightweight stuffing for decorative hats or use a removable cone made from flexible plastic canvas inside the hat. This simple addition helps maintain the pointed shape without adding significant weight.
Store your crochet hat in a cool, dry location away from direct sunlight. Proper storage helps preserve both the yarn color and the structure of the hat. If you are storing several hats together, avoid placing heavy objects on top of them to prevent flattening.
Hand wash the finished project only when necessary. Use cool water and a mild detergent, gently rinse, reshape the hat while damp, and allow it to air dry completely. Avoid using excessive heat, which may affect the yarn fibers depending on the material you selected.
As you gain confidence, challenge yourself by creating larger versions, adding multiple decorative layers, experimenting with different brim widths, or combining several crochet techniques in one design. Every new project will strengthen your crochet skills and inspire even more creative ideas.
Frequently Asked Questions About the Layered Crochet Witch Hat Pattern
1. Is this Layered crochet witch hat pattern suitable for beginners?
Yes. Beginners who already know basic crochet stitches such as chain, single crochet, slip stitch, and simple increases can successfully complete this project with patience and careful stitch counting.
2. Which yarn works best for this project?
Cotton yarn provides excellent stitch definition and structure, while acrylic yarn offers softness, affordability, and a wide variety of colors. Both are excellent choices depending on your desired finish.
3. How long does it take to crochet one witch hat?
A miniature decorative hat usually takes between one and three hours, depending on your experience and the amount of decorative detail you choose to add. Larger wearable versions naturally require more time.
4. Can I make the hat in different sizes?
Absolutely. Simply continue adding increase rounds to enlarge the crown and expand the brim according to the desired measurements. Adjusting the yarn weight and hook size also changes the finished dimensions.
5. How can I keep the hat standing upright?
Using a smaller crochet hook creates tighter stitches. For additional support, you can lightly stuff the crown or insert a removable support inside decorative hats while keeping the exterior soft and attractive.
6. What decorations can I add?
Popular embellishments include crochet flowers, bows, pumpkins, stars, leaves, pearls, buttons, ribbons, embroidered details, and seasonal appliqués. These decorative elements allow every Layered crochet witch hat pattern to become unique.
7. Can I sell hats made from this pattern?
Yes. Handmade crochet accessories are popular at craft fairs, seasonal markets, and online handmade shops. Offering various colors, sizes, and decorative themes can appeal to a wider range of customers.
8. Is this pattern suitable for gifts?
Definitely. A handmade crochet witch hat is a thoughtful gift for crochet enthusiasts, costume lovers, collectors of seasonal decorations, or anyone who appreciates handcrafted accessories made with care.
Conclusion
The Layered crochet witch hat pattern is a fun, creative, and rewarding crochet project that combines simple stitches with beautiful three-dimensional shaping. Throughout this tutorial, you learned how to select suitable materials, build the pointed crown step by step, create a balanced brim with evenly spaced increases, personalize your design using decorative crochet embellishments, and properly finish and care for your completed project. These techniques provide a solid foundation for creating hats in many different sizes, colors, and styles.
One of the greatest advantages of this project is its flexibility. Whether you prefer a classic design with elegant simplicity or a richly decorated hat featuring flowers, ribbons, stars, and textured stitches, every version reflects your own creativity and growing crochet experience. Each completed hat also offers another opportunity to practice stitch consistency, shaping, and finishing techniques that will benefit many future crochet projects.
I hope this Layered crochet witch hat pattern has inspired you to pick up your crochet hook and create something truly special. If you enjoyed this tutorial, please leave your honest opinion and share your suggestions or creative ideas. Your feedback is greatly appreciated and may inspire even more crochet patterns and creative projects in the future.