
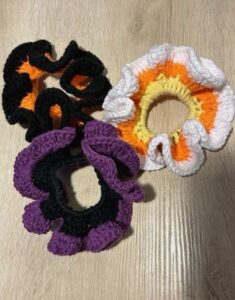
If you have ever wanted to add a delicate and charming touch to your accessories, this Learn how to make a crochet ruffled elastic band – Step by Step Tutorial is perfect for you. Crochet ruffled elastic bands are not only beautiful but also practical, as they can be used to decorate hair ties, clothing, or even small home projects. With just a few materials and some patience, you can create a unique piece that combines functionality with style. This tutorial will guide you through every step, making it easy even for beginners to follow.
Crochet projects like these are ideal for relaxing while crafting something useful. When you learn how to make a crochet ruffled elastic band – Step by Step Tutorial, you are not only learning a skill but also opening the door to countless creative possibilities. You can make them in different colors, sizes, and styles, perfect for personal use or as handmade gifts for friends and family.
Another great advantage of following this Learn how to make a crochet ruffled elastic band – Step by Step Tutorial is that it helps you practice basic crochet stitches while creating something decorative. It’s a fun way to improve your skills, explore new designs, and develop confidence in crafting projects from scratch. Whether you’re a beginner or an experienced crocheter, this tutorial offers something valuable for everyone.
Materials You Need for a Crochet Ruffled Elastic Band
To start this Learn how to make a crochet ruffled elastic band – Step by Step Tutorial, it’s important to gather all the materials beforehand. Having everything ready will save time and make the process much smoother. Luckily, this project doesn’t require expensive supplies; most of the items are affordable and easy to find.
You will need a small elastic band as the base for your project. Hair ties are a great option because they are stretchy and come in different sizes. Then, you will need crochet yarn in your preferred color. Cotton yarn works best for beginners because it is easy to handle, holds its shape well, and is comfortable to wear.
A crochet hook is essential, and the size will depend on your yarn. Usually, a 3.5mm or 4mm hook works well for this type of project. You will also need a pair of scissors for cutting yarn and a yarn needle for weaving in ends neatly once your ruffled elastic band is finished.
Before you begin crocheting, check that your elastic band is in good condition with no tears or fraying. This ensures that your finished piece will be durable and last longer. Some people even recycle old hair ties by covering them with crochet ruffles to give them a brand-new look.
Having multiple yarn colors on hand can make your project more fun and creative. You can use a single color for a classic style or mix two or three shades for a playful effect. This flexibility is one of the things that makes this Learn how to make a crochet ruffled elastic band – Step by Step Tutorial so enjoyable.
Finally, make sure you have good lighting and a comfortable workspace. Crocheting is more enjoyable when you can see your stitches clearly and work without distractions. With all your materials ready, you can now move on to the next step.
Step-by-Step Instructions for Crocheting the Ruffled Elastic Band
Now comes the exciting part of the Learn how to make a crochet ruffled elastic band – Step by Step Tutorial: actually making the ruffles! Start by attaching your yarn to the elastic band using a slip knot. Hold the elastic band in one hand and your hook in the other. Insert the hook into the elastic and pull the yarn through to secure it.
Once your yarn is attached, you will begin working single crochet stitches all around the elastic band. This forms the foundation for the ruffles. Make sure your stitches are close together so the elastic is covered completely and looks neat when stretched.
After you’ve gone all the way around with single crochet stitches, it’s time to create the ruffles. To do this, you will work multiple stitches into each single crochet stitch from the previous round. For example, work three double crochet stitches into each stitch around the band. This will cause the fabric to gather naturally, forming a pretty ruffled effect.
As you work, gently push your stitches together to make sure the ruffles are full and even. The more stitches you add into each base stitch, the more dramatic the ruffles will be. You can experiment with different stitch combinations to achieve the exact look you want.
When you reach the starting point, join your last stitch to the first one with a slip stitch. Cut the yarn, leaving a few inches of tail. Use your yarn needle to weave in the ends securely so that nothing unravels.
At this stage of the Learn how to make a crochet ruffled elastic band – Step by Step Tutorial, your project should look complete with lovely ruffles surrounding the elastic band. You can now move on to customizing and decorating it if you wish.
Customizing Your Crochet Ruffled Elastic Band
One of the best things about the Learn how to make a crochet ruffled elastic band – Step by Step Tutorial is how customizable it is. You can make small adjustments to suit your preferences and style. For instance, using thinner yarn and smaller hooks will create delicate ruffles, while thicker yarn and larger hooks will produce bold, fluffy ruffles.
Color choice also plays a big role in the final look of your elastic band. Soft pastels give a feminine and elegant touch, while bright colors create a fun, playful vibe. You can even use variegated yarn that changes colors as you crochet for a unique, multicolor effect.
Adding decorative elements can make your project stand out even more. Small crochet flowers, beads, or ribbons can be sewn onto the ruffles for a personalized look. This step is optional but allows you to express your creativity fully.
Another idea is to create matching sets. For example, you can make several ruffled elastic bands in different colors to match various outfits or occasions. These also make wonderful handmade gifts for friends and family who appreciate unique, handcrafted items.
Experimenting with stitch variations is another way to customize your project. Instead of double crochets, you could use half-double or treble crochets to change the texture and appearance of the ruffles.
Because this tutorial is so beginner-friendly, you can easily make multiple versions until you find your favorite style. The possibilities are endless with this Learn how to make a crochet ruffled elastic band – Step by Step Tutorial.
Tips for Success and Practical Uses
While following this Learn how to make a crochet ruffled elastic band – Step by Step Tutorial, there are some tips that can make your experience even better. First, keep your tension consistent throughout the project. Uneven tension can make the ruffles look messy or cause the band to lose its shape.
Second, avoid making your stitches too tight. Remember that the elastic band needs to stretch, so the crochet fabric should have some flexibility. Tight stitches can restrict the stretchiness and make the band uncomfortable to wear.
Third, don’t be afraid to practice on a spare elastic band before starting your final project. This helps you get comfortable with the technique and prevents mistakes on your main piece.
In terms of practical uses, ruffled elastic bands are very versatile. They can be used as hair accessories, wristbands, or even decorative napkin holders for special occasions. Their simple yet charming design makes them suitable for many purposes.
They are also excellent craft fair items or gifts. Because they are quick to make and require little yarn, you can produce several in a short amount of time for friends or family.
Finally, always store your crochet elastic bands properly when not in use. Keeping them in a drawer or small box helps maintain their shape and prevents them from getting tangled.
FAQ About Crochet Ruffled Elastic Bands
1. Can beginners make crochet ruffled elastic bands?
Yes, this project is perfect for beginners because it uses simple stitches and techniques.
2. What type of yarn is best for this project?
Cotton yarn works best because it is soft, durable, and easy to crochet with.
3. How long does it take to make one elastic band?
Most people can finish one in about 30–45 minutes, depending on skill level.
4. Can I wash crochet ruffled elastic bands?
Yes, you can hand wash them gently with mild detergent and let them air dry.
5. Do I need a special elastic band for this project?
No, any regular hair tie or elastic band will work as the base.
6. How can I make the ruffles fuller?
Add more stitches into each base stitch for a more dramatic ruffled effect.
Conclusion
This Learn how to make a crochet ruffled elastic band – Step by Step Tutorial has shown you how to create a beautiful and functional accessory using simple crochet techniques.
From gathering materials to customizing your design, every step is easy to follow and perfect for beginners or experienced crocheters.
Now that you know how to make these lovely ruffled elastic bands, we encourage you to try different colors, stitch variations, and decorative elements to make them uniquely yours. Please share your honest opinion and suggestions about this tutorial—we would love to hear your feedback and ideas for future projects!