
Creating handmade table accessories adds elegance and charm to any dining experience, and with this Learn how to make this beautiful cutlery holder.-Step by Step Tutorial, you will be able to craft a unique and practical piece that enhances the presentation of your meals. Whether you enjoy hosting special dinners, decorating your table for seasonal celebrations, or simply keeping things organized at home, a handmade cutlery holder offers both beauty and functionality. This tutorial guides you through every stage of the process, making it accessible even if you are new to crafting.
The appeal of the Learn how to make this beautiful cutlery holder.-Step by Step Tutorial lies in its versatility and simplicity. You can choose colors and patterns that match your home décor, add embellishments, or keep it clean and minimalistic—depending on your taste. This flexibility allows you to design a piece that reflects your personal style while maintaining practicality for everyday use. Handmade cutlery holders also make wonderful gifts for friends and family, offering something unique, thoughtful, and crafted with care.
This Learn how to make this beautiful cutlery holder.-Step by Step Tutorial shows you how to work with basic materials and straightforward techniques that anyone can follow. You will discover how to assemble, shape, and decorate your cutlery holder so that it remains durable, functional, and visually appealing. With just a few simple steps, you can elevate your table setup and bring handmade charm to any meal.
Materials and Preparation for Your Cutlery Holder
To begin the Learn how to make this beautiful cutlery holder.-Step by Step Tutorial, the first step is organizing the materials you will need. Choosing the right supplies ensures that your cutlery holder is sturdy, practical, and visually attractive. Most cutlery holders can be crafted using fabric, felt, crochet, or even repurposed materials depending on your preference. Start by selecting a material that complements your table setting and overall home décor.
When choosing fabric, make sure it is thick enough to maintain its shape while still being easy to sew or fold. Cotton, canvas, felt, or linen fabrics are excellent choices. If you prefer a softer texture, felt offers durability and is easy to cut, requiring no additional edge finishing. If your goal is a more elegant or decorative piece, patterned cotton or linen adds a beautiful touch to your handmade project.
You will also need essential tools such as scissors, a ruler, sewing needles, pins, and thread that matches or complements your chosen fabric. If you are crocheting the holder, prepare your yarn, hook, and tapestry needle. Having all materials ready before starting the process makes the project easier, smoother, and more enjoyable.
Measuring your cutlery correctly is also important for a well-fitted holder. Forks, knives, and spoons vary in length, so use the largest piece as your reference measurement. Adding a little extra space ensures that each utensil fits comfortably inside the holder without being too snug or too loose. A well-measured design enhances both practicality and appearance.
Color combinations play an important role in creating a visually appealing cutlery holder. Choose tones that match your dining style—neutral shades for a modern minimalist look, bold colors for festive occasions, or pastels for softer, more delicate table presentations. The Learn how to make this beautiful cutlery holder.-Step by Step Tutorial encourages creativity, allowing you to personalize your piece according to the ambiance you want to create.
By taking time to prepare all your materials with care, you set the foundation for a successful crafting experience. Preparation ensures smoother progress, fewer mistakes, and a final product that looks polished and professional.
Step-by-Step Instructions to Assemble Your Cutlery Holder
The assembly process in this Learn how to make this beautiful cutlery holder.-Step by Step Tutorial is simple, clear, and suitable for beginners. Start by cutting your chosen fabric or material into a rectangular shape. The size may vary depending on how many compartments you want, but a general guideline is to cut a piece that is tall enough to fold into a pocket and wide enough to hold your cutlery set.
After cutting the fabric, fold the bottom section upward to create the pocket that will hold the utensils. Pin this fold in place to secure the position. This pocket is the part that keeps your cutlery organized and prevents the utensils from sliding out. Using pins allows you to adjust and perfect the shape before sewing.
Next, sew along the sides of the holder to close the pocket. You can use a sewing machine for a clean, polished look, or sew by hand using small, tight stitches. For a crocheted version, you can join the sides using slip stitches or single crochet. The goal is to ensure the sides are strong and durable enough to hold the utensils securely.
To create separate compartments for forks, knives, and spoons, sew vertical lines from the bottom of the pocket to the top of the folded edge. These seams divide the pocket into individual slots, helping keep the cutlery organized. Measure each compartment slightly wider than your utensils so they fit comfortably without being too tight.
At this stage of the Learn how to make this beautiful cutlery holder.-Step by Step Tutorial, you can choose to add decorative stitching along the top edge of the holder. This not only improves durability but also enhances the appearance of the finished piece. Decorative stitches, contrasting thread colors, or embroidered patterns can add a personalized touch.
Before finishing, check the pockets to make sure the cutlery fits well and the seams are strong. Adjust any loose areas or uneven stitching if needed. This careful examination ensures your cutlery holder will be both functional and beautiful.
Decorating and Personalizing Your Handmade Cutlery Holder
The decorating stage of the Learn how to make this beautiful cutlery holder.-Step by Step Tutorial allows you to express your creativity and turn a simple project into a unique work of art. You can add decorative elements that complement your table setting, reflect your personality, or match the theme of a special occasion. Options include embroidery, appliqué, crochet flowers, lace borders, or fabric painting.
If you enjoy embroidery, consider adding initials, small motifs, or decorative patterns. This adds elegance and makes your cutlery holder stand out. Embroidery also offers endless design possibilities, from minimalist linework to colorful floral motifs. Matching thread shades to your fabric color enhances harmony, while contrasting colors create visual impact.
Appliqués are another attractive detail that can elevate your cutlery holder. You can sew or iron small shapes such as leaves, hearts, or seasonal elements depending on the theme. Appliqués not only decorate the holder but also reinforce the fabric, adding an extra layer of durability.
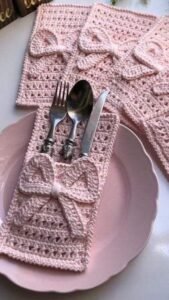
Crochet lovers can add small crocheted embellishments like flowers, leaves, or borders. These handmade elements elevate the design and create a cohesive handmade look. Adding a crocheted edge around the holder, for example, brings elegance and a touch of craftsmanship that complements the overall tutorial.
For a festive or themed table decoration, consider incorporating seasonal elements. Colors and motifs inspired by holidays or special celebrations add charm and make your cutlery holder suitable for themed dinners or events. The Learn how to make this beautiful cutlery holder.-Step by Step Tutorial encourages customization that fits your occasion and personal style.
If you prefer simplicity, minimalistic decorations also work beautifully. A clean, neatly sewn holder with subtle stitching looks modern and sophisticated. Even the simplest design can achieve elegance when crafted carefully and thoughtfully.
No matter how you choose to decorate your cutlery holder, the key is to make it meaningful and visually cohesive. Adding personal touches transforms a functional accessory into a work of art that enhances your dining experience.
How to Use, Store, and Maintain Your Cutlery Holder
After completing your project with the Learn how to make this beautiful cutlery holder.-Step by Step Tutorial, it is important to know how to use and take care of your new accessory. A well-maintained cutlery holder stays beautiful and functional for years, making your effort worthwhile. Start by placing your utensils into their compartments, ensuring each piece fits comfortably without forcing the fabric or stretching the seams.
Using the holder during meals or special events makes your table presentation more organized and visually appealing. It also helps differentiate utensils when serving multiple courses. Guests appreciate the clean and thoughtful arrangement, which demonstrates attention to detail.
When not in use, store the cutlery holder flat in a drawer or neatly rolled if you prefer a compact storage method. Rolling the holder can also be useful when transporting cutlery to picnics or outdoor gatherings. Its portability makes it a practical and versatile accessory for any occasion.
Washing the cutlery holder depends on the materials used. Fabric holders can typically be washed gently by hand with mild soap or placed in the washer on a delicate cycle. Felt should be cleaned carefully to avoid shrinking or distortion. Crocheted holders may need more delicate handling to maintain their shape.
Inspect your cutlery holder occasionally to ensure seams remain strong and the fabric has not worn out. Minor repairs, such as tightening a seam or resewing a loose appliqué, help extend its lifespan. Taking care of your handmade creations shows appreciation for your own work and ensures it stays in beautiful condition.
With proper use and care, your handmade cutlery holder becomes a lasting accessory that enriches your table presentation and adds charm to your home.
FAQ – Learn how to make this beautiful cutlery holder
1. Is this cutlery holder suitable for beginners?
Yes, the tutorial uses simple techniques that are perfect for beginners and easy to follow step by step.
2. What materials work best for making a cutlery holder?
Cotton, canvas, linen, and felt are great options because they are durable and easy to work with.
3. Can I make a crocheted version instead of a sewn one?
Absolutely. The same structure applies, and you can crochet a rectangular piece and seam the sides.
4. How can I personalize my cutlery holder?
You can add embroidery, appliqués, lace, crochet decorations, or fabric paint to make it unique.
5. How do I wash my cutlery holder?
Handwashing with mild soap is recommended, especially for delicate fabrics or crocheted versions.
6. Does the holder work with any cutlery size?
Yes, as long as you measure your largest utensil before cutting your fabric, it will fit properly.
Conclusion
This Learn how to make this beautiful cutlery holder.-Step by Step Tutorial has shown you how to choose materials, assemble the structure, personalize the design, and care for your finished accessory.
With creativity and simple techniques, you can craft a beautiful and functional cutlery holder that enhances your dining experience.
I hope this guide inspires you to continue making handmade pieces that bring charm to your home. Please leave your sincere opinion and share your suggestions so I can keep improving future tutorials.