
If you enjoy creative and eco-friendly projects, you’ll love this Learn how to make this crochet bottle decoration – Step by Step Tutorial. Decorating bottles with crochet is a charming way to transform simple glass or plastic containers into beautiful home decor pieces. Whether you want to give your table setting a rustic touch or make personalized gifts, this project is easy, enjoyable, and highly customizable.
Crochet bottle decorations can be made in many styles—from simple covers with elegant lace patterns to colorful and fun designs with flower or heart motifs. The beauty of this craft lies in its versatility. With just a few materials and basic crochet techniques, you can give new life to old bottles while adding a handmade charm to your home. Plus, this is a sustainable project that supports reusing and recycling everyday items in a creative way.
In this Learn how to make this crochet bottle decoration – Step by Step Tutorial, we’ll walk through everything you need to know to create your own bottle decor—from materials and stitches to finishing details. It’s a perfect project for beginners and experienced crocheters alike. With patience and creativity, you can turn something ordinary into a unique and beautiful decoration that reflects your personal style.
Materials Needed for Crochet Bottle Decoration
Before starting your Learn how to make this crochet bottle decoration – Step by Step Tutorial, gather all the materials you’ll need. Having everything organized will make the process smoother and more enjoyable.
You’ll need cotton yarn for this project. Cotton is ideal because it’s durable, washable, and gives your work a neat finish. You can use a single color for a minimalist look or mix several shades to create eye-catching patterns.
Next, you’ll need a crochet hook that matches your yarn’s weight. For most medium-weight yarns, a 3.5mm to 4mm hook works perfectly. Make sure your hook is comfortable to hold since you’ll be using it continuously for several rounds.
Keep scissors and a yarn needle handy for trimming and weaving in ends once your decoration is complete. If you want to add more detail, gather some ribbons, beads, or small buttons—they make wonderful accents that add personality to your bottle cover.
You’ll also need a clean and dry bottle. You can reuse glass bottles from juices, sodas, or wine. Choose one with an interesting shape that will highlight your crochet design beautifully.
Finally, it’s helpful to have a measuring tape to ensure your cover fits snugly around your bottle. Taking accurate measurements will help you adjust your pattern as needed. Once everything is ready, you can move on to the fun part—crocheting!
Step by Step Instructions to Crochet the Bottle Decoration
Now that you’ve prepared your materials, let’s begin the step-by-step process in this Learn how to make this crochet bottle decoration – Step by Step Tutorial. Follow these steps carefully to achieve the best results.
-
Start the Base: Begin with a magic ring and make six single crochets (sc) inside. Pull tight and close with a slip stitch. Continue increasing in each round (2 sc in each stitch) until the circle matches the bottom diameter of your bottle.
-
Build the Body: Once the base fits, stop increasing. Crochet around using single or double crochet stitches, depending on the texture you want. This forms the cylindrical part that will cover the bottle’s body.
-
Add a Design: To create a more decorative effect, alternate between rows of double crochet and chain stitches to form a lace-like pattern. This adds elegance and helps the bottle shine through the openwork.
-
Shape the Neck: When you reach the neck of the bottle, switch to tighter stitches like single crochet to make the cover fit snugly. Adjust the number of stitches if your bottle has a narrow neck.
-
Add a Border: Finish your design with a beautiful border. You can use shell stitches or picots to give it a delicate, decorative edge that enhances the final appearance.
-
Decorate: For the final touch, add ribbons, small crocheted flowers, or beads. Tie a bow around the neck of the bottle for extra charm. Now you have a stunning handmade decoration that can brighten up any room!
By following these steps, your Learn how to make this crochet bottle decoration – Step by Step Tutorial project will result in a stylish and creative piece of decor that’s both eco-friendly and elegant.
Creative Design Ideas for Your Crochet Bottle Decoration
One of the most exciting parts of this Learn how to make this crochet bottle decoration – Step by Step Tutorial is exploring creative design options. There’s no limit to how you can personalize your crochet bottle decoration.
First, experiment with color combinations. Try soft pastels for a romantic look, bold colors for modern decor, or earthy tones for a rustic farmhouse vibe. Combining two or three shades can create unique gradient effects.
Second, incorporate texture into your project. Use puff stitches, popcorn stitches, or shell patterns to add dimension. Texture not only makes your decoration more interesting but also gives it a handmade, cozy appeal.
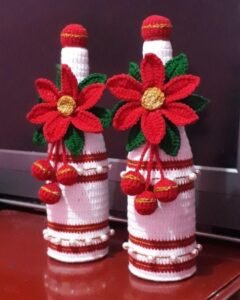
Third, you can add themes to your design. For example, use red and green for Christmas, or white and gold for weddings. Floral motifs or heart shapes work wonderfully for spring and Valentine’s Day decorations.
Fourth, consider combining materials. You can crochet half the bottle and decorate the rest with lace, jute, or ribbons. Mixing different materials gives a professional and artistic finish.
Fifth, make matching sets. Crochet multiple bottle covers with the same color palette or stitch pattern. Displaying them together on a table or shelf creates a harmonious decorative effect.
Lastly, remember that simplicity can be beautiful. Even a plain crochet pattern can look elegant when paired with a lovely bottle shape and a neat finish. Don’t be afraid to keep it minimal if that fits your home style better.
Benefits of Making Crochet Bottle Decorations
There are many benefits to following this Learn how to make this crochet bottle decoration – Step by Step Tutorial. This craft combines creativity, relaxation, and sustainability in one enjoyable activity.
First, it’s eco-friendly. By reusing bottles and leftover yarn, you reduce waste and contribute to a more sustainable lifestyle. It’s a great way to upcycle materials that might otherwise be discarded.
Second, it’s a relaxing and therapeutic hobby. Crocheting helps reduce stress and improves focus. It’s a calming activity that allows you to express creativity while producing something beautiful.
Third, it’s budget-friendly. You don’t need expensive tools or materials to start. Most of what you need is already available at home, making it an accessible craft for everyone.
Fourth, these bottle decorations make wonderful gifts. A handmade bottle covered with crochet is perfect for holidays, weddings, or birthdays. It shows thoughtfulness and effort, which makes the gift special.
Fifth, they can enhance your home decor. Whether displayed on a dining table, shelf, or mantel, crocheted bottles add a warm and personal touch to any space.
Lastly, this craft helps improve your crochet skills. As you make more bottle decorations, you’ll learn new stitches, experiment with designs, and gain confidence in your crocheting abilities.
Learn How to Make This Crochet Bottle Decoration
1. What type of yarn is best for crochet bottle decorations?
Cotton yarn works best because it’s durable, washable, and provides a clean, elegant finish.
2. Can beginners follow this Learn how to make this crochet bottle decoration – Step by Step Tutorial?
Yes! This tutorial uses basic stitches and simple techniques that even beginners can master easily.
3. How long does it take to make one crochet bottle decoration?
It usually takes 1 to 2 hours, depending on your skill level and the bottle size.
4. Can I use plastic bottles instead of glass?
Absolutely! Plastic bottles are lighter and safer, making them great for experimenting with new designs.
5. How do I clean a crochet bottle decoration?
Remove the cover, hand wash it in cold water with mild soap, and let it air dry to keep its shape and color.
6. Can I sell the bottle decorations I make using this tutorial?
Yes, you can sell them! Handmade crochet decor is popular and can make great gifts or market products.
7. How do I make sure the cover fits my bottle perfectly?
Keep measuring as you crochet. Adjust stitch counts and rounds to match the bottle’s width and height.
8. What are some decorative ideas for finishing touches?
You can add crocheted flowers, lace borders, ribbons, or beads for a unique and personalized appearance.
9. Can I use different crochet stitches for this project?
Definitely! Try shell stitches, puff stitches, or mesh patterns to create different textures and styles.
10. Is this project suitable for children or beginners learning crochet?
Yes! It’s a fun and safe project for beginners and older kids who are learning crochet basics.
Conclusion
In this Learn how to make this crochet bottle decoration – Step by Step Tutorial, you discovered how to transform simple bottles into stunning handmade decorations. You learned which materials to use, the step-by-step process, and creative ways to customize your design.
This project proves that with just a bit of yarn and imagination, you can create eco-friendly, stylish, and meaningful decor for your home. It’s perfect for any occasion, from everyday use to festive celebrations.
We hope you enjoyed this Learn how to make this crochet bottle decoration – Step by Step Tutorial and feel inspired to try it yourself. Remember to share your results, and please leave your honest opinion and suggestions below. Your feedback helps inspire future crochet projects and tutorials for our creative community!