
Creating a Make a Christmas cutlery holder.-Step by Step Tutorial is one of the most delightful ways to add a festive touch to your holiday table. This project is perfect for anyone who enjoys handmade decorations and wants to bring extra charm to their Christmas celebrations. A cutlery holder designed especially for this season can elevate even the simplest table setting, making every meal feel warm, welcoming, and special. Whether you are an experienced crafter or a complete beginner, this tutorial will guide you through each step with clarity and creativity.
When you choose to follow a Make a Christmas cutlery holder.-Step by Step Tutorial, you are not only creating a functional item but also making a decorative piece that reflects your personal style. Handmade pieces bring a unique touch to holiday décor, offering beauty, originality, and a sense of accomplishment. The process of creating your own Christmas cutlery holder is enjoyable and therapeutic, and it also allows you to customize shapes, colors, themes, and fabric patterns to match your décor perfectly. This helps your Christmas table stand out in a memorable and cozy way.
In this article, you will learn everything you need to complete this Make a Christmas cutlery holder.-Step by Step Tutorial from start to finish. The steps are clear, well-structured, and easy to follow, even if you have never sewn or crafted before. You will learn about choosing materials, cutting fabric, assembling the holder, and adding decorative touches that enhance the Christmas spirit. Read carefully, relax, and let your creativity shine as we create this charming holiday accessory together.
Materials and Preparations for Your Christmas Cutlery Holder
To begin this Make a Christmas cutlery holder.-Step by Step Tutorial, you will need to gather a few essential materials. Choosing the right materials ensures that your final product is durable, attractive, and perfectly matched to your Christmas theme. The most commonly used fabric for this project is felt, as it is sturdy, easy to cut, and does not fray. However, cotton or canvas can also work beautifully if you prefer a more textured or patterned look.
Once you have chosen your fabric, make sure you also have basic tools such as scissors, a ruler, pins, needle and thread, or a sewing machine. These tools make the crafting process easier and more precise. If you plan to decorate your cutlery holder with embellishments, gather items like ribbons, buttons, sequins, fabric glue, or small appliqués. Adding festive touches enhances the charm of your creation and makes every piece unique.
Before cutting your fabric, it is important to measure your cutlery to determine the best size for your holder. Standard cutlery usually fits well inside a pocket measuring around 20 cm in height and 10 cm in width, but you may adjust the size according to your needs. Taking accurate measurements prevents frustration and ensures a perfect fit.
When crafting your Make a Christmas cutlery holder.-Step by Step Tutorial, preparing your workspace is essential. Clear a table or flat surface, gather all your materials, and ensure you have good lighting. A clean and organized workspace makes the process more enjoyable and helps you avoid mistakes. If you’re using a sewing machine, make sure it is threaded and functioning smoothly before you start.
Another important step is choosing the color scheme of your cutlery holder. Traditional Christmas colors such as red, green, gold, and white always work well, but you may choose modern alternatives like blue and silver or rustic tones like beige and brown. The goal is to create harmony with your table setting and overall holiday décor.
Finally, take a moment to visualize your final design. Whether you prefer a minimalist look or a highly decorated piece full of festive elements, planning ahead helps the assembling process run smoothly. This preparation stage sets the foundation for a beautiful and successful Make a Christmas cutlery holder.-Step by Step Tutorial.
Cutting and Shaping the Fabric
After preparing your materials, the next step in this Make a Christmas cutlery holder.-Step by Step Tutorial is to cut and shape the fabric. Begin by marking the measurements on the fabric using a ruler and chalk or a fabric-safe pen. Precision is key during this stage because it ensures the final product looks symmetrical and professionally crafted.
Once your measurements are marked, carefully cut the fabric following the lines. If you are using felt, cutting will be easy as it holds its shape well. Cotton and other fabrics may require sharper scissors for clean edges. Make sure to cut both the front and back layers of the holder so they align perfectly when assembled.
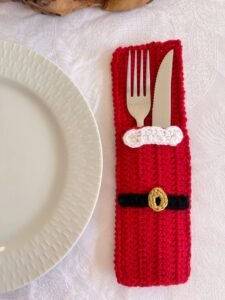
Next, decide what shape you want your cutlery holder to have. Rectangles are classic and simple to make, but festive shapes such as stockings, mittens, trees, or Santa hats add an extra touch of holiday magic. If you choose a themed shape, create a paper template first to ensure both fabric pieces match perfectly after cutting.
Place the two pieces of fabric together, making sure the edges align correctly. At this point in your Make a Christmas cutlery holder.-Step by Step Tutorial, you may also decide to cut additional pieces for pockets, trims, or decorative elements. Small shapes like stars, hearts, holly leaves, or snowflakes can be attached later to enhance the design.
Before sewing, pin the layers together to prevent shifting. This step is especially important for fabrics that stretch or slip easily. Pins help maintain alignment and reduce the chances of uneven seams. Take your time with this step to guarantee a smooth assembly later.
Double-check your cut shapes and sizes before proceeding to the sewing stage. This final review helps catch small mistakes early, ensuring that your Make a Christmas cutlery holder.-Step by Step Tutorial progresses flawlessly.
Assembling and Sewing the Cutlery Holder
Now comes the exciting part of this Make a Christmas cutlery holder.-Step by Step Tutorial—assembling and sewing your cutlery holder. Begin by sewing the sides and bottom of the holder, leaving the top open. If using a sewing machine, choose a straight stitch for clean lines. For hand-sewing, use small, tight stitches for durability.
Once the main pocket is sewn, press the seams lightly if you are working with cotton or canvas. Felt does not require pressing, but smoothing the edges with your fingers helps give it a neat appearance. Make sure your seams are secure and aligned so your cutlery fits comfortably without slipping out.
The next step is attaching any additional pockets or decorative layers. For instance, some crafters like to add a contrasting fabric piece on the front to create a two-pocket design. Others prefer a single pocket with appliqués. Whichever style you choose, sew or glue the decorations carefully to ensure they are firmly attached.
If you chose a themed shape like a Christmas stocking or mitten, stitching around curves will require extra attention. Work slowly, turning the fabric gently to avoid uneven lines. This step enhances the professional look of your Make a Christmas cutlery holder.-Step by Step Tutorial and ensures your final piece lays flat.
At this stage, you may add embellishments such as buttons, bows, lace, or ribbons. These elements enhance the festive spirit and give your cutlery holder a personalized touch. Apply embellishments after sewing the main structure to avoid damaging them with the machine needle.
Once everything is attached, inspect your cutlery holder carefully. Check for loose stitches, uneven edges, or untrimmed threads. Clean finishing details are what transform a simple craft into a beautiful Christmas decoration. With the sewing complete, your cutlery holder is almost ready to decorate your holiday table.
Decorating and Finalizing Your Christmas Cutlery Holder
To complete your Make a Christmas cutlery holder.-Step by Step Tutorial, it’s time to add the final decorative touches. Decorations play a key role in transforming a simple fabric piece into a charming Christmas table accessory. Start by choosing embellishments that complement both your fabric and overall Christmas theme. Classic choices include small felt shapes, embroidered details, glitter accents, and festive ribbons.
If you enjoy embroidery, consider stitching simple motifs like stars, snowflakes, or the word “Joy” onto the front of your cutlery holder. Hand embroidery adds elegance and warmth. You can use metallic threads for extra sparkle or stick to traditional colors for a more rustic look.
Another popular option is attaching small appliqués such as Santa faces, reindeer, holly leaves, or gingerbread men. These appliqués can be hand-sewn or glued on with fabric glue. Just make sure they are firmly attached so they withstand repeated use during the holiday season.
For a more elegant style, consider adding lace trims or satin ribbons. These materials give your cutlery holder a refined appearance, perfect for formal holiday dinners. If you choose ribbons, tie small bows and stitch them securely to the top corner of the holder.
Now take a moment to test your cutlery holder with actual utensils. Make sure the pocket holds them securely and maintains its shape. If the pocket feels too loose, you may reinforce the seams or add a small decorative stitch to tighten the opening. This ensures your Make a Christmas cutlery holder.-Step by Step Tutorial results in a functional piece as well as a decorative one.
Finally, repeat the process to create as many cutlery holders as you need for your Christmas table. Making a complete set gives your table a cohesive and festive look. Once finished, store your holders flat and dry to maintain their shape until the big celebration.
Make a Christmas Cutlery Holder
1. What is the best fabric for a Christmas cutlery holder?
Felt is the most popular because it is easy to cut and sew, but cotton and canvas also work well.
2. Can beginners follow this tutorial?
Yes, this Make a Christmas cutlery holder.-Step by Step Tutorial is simple enough for beginners and detailed enough for experienced crafters.
3. Do I need a sewing machine?
A sewing machine is helpful but not required. You can complete this project using hand-stitching.
4. Can I customize the shape of the holder?
Absolutely. You can create shapes like stockings, trees, mittens, stars, or any other Christmas design.
5. What decorations work best?
Ribbons, buttons, appliqués, embroidery, glitter details, and small fabric shapes all enhance the festive appearance.
6. How can I make the cutlery holder more durable?
Use sturdy fabrics, reinforce the seams, and ensure all decorations are securely attached.
7. How do I clean the cutlery holders?
Most felt holders can be spot-cleaned, while cotton versions can be gently hand-washed.
Conclusion
This Make a Christmas cutlery holder.-Step by Step Tutorial has guided you through every step of creating a festive, functional, and beautiful cutlery holder for your holiday table.
You learned how to choose materials, cut and shape fabric, assemble the structure, and add charming decorations that bring the Christmas spirit to life.
I hope this tutorial inspires you to create a full set for your celebrations and share the joy with family and friends. Please leave your honest opinion and feel free to share suggestions about how this article helped you!