
Starting this Make this crochet flower yourself!-Step by Step Tutorial, you will learn how to create a beautiful and versatile crochet flower from scratch. This type of project is perfect for beginners and experienced crocheters who love decorative pieces that can be used in multiple ways. From accessories to home décor, the process described in this Make this crochet flower yourself!-Step by Step Tutorial helps you master simple stitches while unlocking your creativity through color, texture, and design.
One of the reasons this tutorial is so helpful is that it focuses on clarity and simplicity. Many people want to craft something beautiful but feel intimidated by complex patterns. With this Make this crochet flower yourself!-Step by Step Tutorial, you will discover how small steps, when taken one at a time, lead to impressive results. The flower you will create can be bright, elegant, soft, or vibrant depending on the yarn you choose. You control the entire aesthetic, making it a perfect custom craft.
Another benefit of following this Make this crochet flower yourself!-Step by Step Tutorial is that it allows you to relax while creating something meaningful. Crochet is known for being both therapeutic and productive. Each petal you stitch will help you build confidence and improve your technique. Whether used for gifts, decorations, or personal projects, crochet flowers remain one of the most beloved motifs in handmade crafts, and this step-by-step guide is designed to help you create one with ease.
Materials Needed for the Project
To begin the Make this crochet flower yourself!-Step by Step Tutorial, you first need to prepare a small set of materials. The most important item is yarn. Cotton or acrylic yarns work very well, especially when creating defined petals. Cotton gives a firm, crisp result, while acrylic offers softness and flexibility depending on your preference. Pick any color that inspires you.
You will also need a crochet hook that matches your yarn weight. For most flower designs, hooks between 2.5 mm and 4.0 mm work perfectly. A smaller hook creates tighter stitches and more defined shapes, while a slightly larger hook creates a softer, fuller flower. Matching the hook to your yarn ensures the flower looks cohesive and balanced.
Scissors are necessary for trimming your ends, and a yarn needle is essential for weaving in your threads once the flower construction is complete. Keeping your finishing work clean is a big part of having a professional-looking final piece. Do not skip this step, as it affects the durability of your flower.
Stitch markers are optional but helpful, especially if you are new to following rounds. They help you identify the beginning and end of each row without confusion. Keeping track of your stitches will make the entire process easier and more enjoyable.
A comfortable chair, good lighting, and a quiet workspace will help you stay focused while working through the Make this crochet flower yourself!-Step by Step Tutorial. Small projects like this one require attention to detail. With everything prepared, you are ready to start crocheting the flower.
Creating the Center of the Flower
The flower center is the foundation of the Make this crochet flower yourself!-Step by Step Tutorial and determines the overall shape of the piece. Most crochet flowers begin with a magic ring, which gives a tight and clean center. If you are unfamiliar with the magic ring technique, practicing it a few times before starting is helpful.
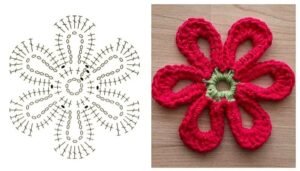
After forming the ring, you will work your first round of stitches inside it. Depending on the style of flower you want, this can be single crochet stitches for a compact look or half-double crochets for a slightly larger center. The number of stitches you add determines how wide the middle part will be. A classic center usually has six to eight stitches.
Once you finish the first round, tighten the ring and join the stitches. This creates a neat circle that forms the base for the petals. Maintaining consistent tension ensures your stitches look even and polished. The center should lie flat and symmetrical.
Some tutorials encourage adding a second round to the center for extra stability. If you choose to do so, keep the stitch count even and increase evenly around the circle. This round gives you more surface area to attach your petals, which can be useful for larger flowers.
The center is often a contrasting color from the petals, but this is entirely optional. Many crafters prefer a single-color flower for a minimalist look. Whatever color or style you choose, this foundation is key to the Make this crochet flower yourself!-Step by Step Tutorial.
Forming the Petals
With the center finished, it is time to begin forming the petals, which bring the Make this crochet flower yourself!-Step by Step Tutorial to life. Petals can be simple, layered, pointed, or rounded. The style you choose will influence the overall personality of your flower. Most beginners start with rounded petals because they are quick and easy to master.
To begin, insert your hook into a stitch on the flower center and start building each petal individually. A common method is to crochet several stitches into the same loop to create height and volume. For example, some petals include a series of double crochets that naturally curve into a petal shape.
Once you complete the height stitches for the petal, you typically slip stitch back into the center. This anchors the petal and prepares the base for the next one. Working one petal at a time gives you full control over spacing and consistency.
You will continue this pattern around the center, repeating the same sequence of stitches for each petal. Most flowers have between five and eight petals, but you can add more if you want a fuller look. The number of petals is entirely up to your personal preference.
After completing all the petals, gently shape them with your fingers. Crochet pieces often soften and settle into shape once handled. This creates a natural and beautiful appearance that makes your handmade flower look polished and realistic.
Finishing each petal neatly is an important part of the Make this crochet flower yourself!-Step by Step Tutorial. Clean finishing work ensures the flower lasts longer and maintains its shape.
Adding Layers and Details
If you want your flower to look more sophisticated, this part of the Make this crochet flower yourself!-Step by Step Tutorial allows you to add extra layers. Many popular crochet flowers have a second layer behind the first to add fullness and texture. This is optional but adds dimension to the design.
To create a second layer, simply work into the back loops or into the spaces behind the original petals. You repeat the same petal formation process, but because the second layer sits behind the first, the flower appears fuller and more structured. Using a slightly larger stitch can also help differentiate the layers.
Color changes can enhance the design even further. Some crafters choose a slightly darker or lighter shade for the second layer to add depth. Others use contrasting colors for a bold and artistic effect. The choice depends on your personal style and the purpose of the flower.
You can also add decorative details, such as a small bead or embroidered knot in the center. These accents give personality to the finished piece and allow you to customize your flower for specific projects. Whether simple or detailed, the flower will reflect your creativity.
Once all additional elements are complete, weave in your loose ends carefully. Proper finishing ensures that your flower stays secure and durable over time. This final step is essential for maintaining the beauty of your flower.
By this stage of the Make this crochet flower yourself!-Step by Step Tutorial, your flower is ready to be used for accessories, decorations, clothing appliqués, and more.
FAQ
How long does it take to make a crochet flower?
Most simple flowers take between 10 and 30 minutes, depending on your skill level and the number of petals.
Is this project suitable for beginners?
Yes, the Make this crochet flower yourself!-Step by Step Tutorial is beginner-friendly and uses basic stitches that anyone can learn.
What type of yarn is best for crochet flowers?
Cotton yarn provides the best structure, but acrylic works well if you prefer a softer look or larger petals.
Can I add more layers to the flower?
Absolutely. Adding more layers creates depth and allows you to customize the flower’s style.
How can I use crochet flowers?
They can be attached to hats, bags, clothing, hair accessories, bookmarks, or simply used as decorative accents.
Do I need special tools?
No, just yarn, a hook, scissors, and a yarn needle.
Conclusion
This Make this crochet flower yourself!-Step by Step Tutorial has guided you through every step needed to create a beautiful and customizable crochet flower.
You learned how to prepare your materials, build the center, shape the petals, and add layers for extra detail.
With this knowledge, you can create flowers for decoration, gifts, and personal projects. I hope this tutorial was helpful, and I invite you to leave your honest opinion and suggestions so future guides can become even better.