
If you are looking for a fun seasonal craft that blends creativity, charm, and functionality, then this Mini Crochet Witch Hat 🧙♀️🖤-Step by Step Tutorial is exactly what you need. Perfect for Halloween decorations, costume accessories, or simply as a whimsical handmade project, this crochet hat brings a touch of magic to your crochet collection. From beginners looking to expand their skills to experienced crafters who love festive projects, this guide will walk you through every stitch and step needed to create your very own mini witch hat.
The charm of a mini crochet witch hat lies in its versatility. It can be used as a small table decoration, a party favor, or even attached to hairbands, keychains, or doll accessories. With just a little yarn, some basic crochet tools, and patience, you will have a creative and personalized piece ready to showcase. The best part about following this step by step tutorial is that you can customize the hat in colors and embellishments, making it as spooky or as cute as you like.
In this guide, we will cover everything from choosing the right yarn and hook size to finishing touches such as adding a ribbon, beads, or even a sparkly buckle. Each step will be broken down to ensure clarity and simplicity, even for those new to crochet. By the end of this article, you will feel confident in your ability to create a stunning Mini Crochet Witch Hat 🧙♀️🖤 and possibly even share it as a handmade gift for friends and family.
Materials and Preparation for Mini Crochet Witch Hat 🧙♀️🖤
Before diving into the Mini Crochet Witch Hat 🧙♀️🖤-Step by Step Tutorial, it is important to gather the necessary supplies. Having everything ready will make the process smooth and enjoyable, allowing you to focus on the fun of crocheting without interruptions.
You will need a medium-weight yarn in black or any color of your choice. Black is traditional for a witch hat, but don’t be afraid to experiment with purple, orange, or even glittery yarn for a festive touch. Using cotton or acrylic yarn works well, as both are easy to handle and hold their shape nicely.
The crochet hook size will depend on the yarn you choose, but typically a 3.5mm or 4mm hook is ideal for creating a sturdy structure without gaps between stitches. A yarn needle is also essential for weaving in ends and sewing small parts together if needed. Scissors, stitch markers, and optional decorations like ribbons or beads can also be kept handy.
Preparing your materials beforehand ensures that once you start crocheting, the flow of your project is not disrupted. This preparation step, though simple, is key to enjoying your crafting journey. If you are making multiple hats, consider sorting your yarn into smaller balls so you can switch colors easily when adding decorations.
Finally, set aside a comfortable workspace with good lighting. Crochet projects, especially small ones like this, require focus and precision, so creating a cozy crafting environment helps. Now that your tools are ready, you can begin learning how to crochet the mini witch hat with confidence.
Step by Step Instructions for Crocheting the Hat
The foundation of the Mini Crochet Witch Hat 🧙♀️🖤-Step by Step Tutorial starts with creating the cone shape. Begin with a magic ring, which is the best way to start projects that need a tight, closed center. From there, you will build the cone by working single crochet stitches in continuous rounds, gradually increasing to form the pointed top.
Start with six single crochets in the magic ring, pulling it tight. In the second round, increase by making two stitches in one, and continue this process in following rounds until the cone begins to widen. Keep crocheting in the round without joining, using a stitch marker to track the beginning of each round. This helps maintain even growth of the cone.
Once the cone reaches the desired height, it is time to move on to the brim. The brim of the witch hat gives it character and stability. To make it, switch from continuous rounds to joined rounds. Start by increasing more frequently around the base of the cone. This will cause the edges to flare out naturally, forming the brim.
If you want a wider brim, simply continue increasing stitches every round until it reaches your preferred size. For a decorative touch, you may switch to a contrasting color of yarn on the brim’s edge. A scalloped or picot stitch can also be used to add a whimsical border.
As you near the end of your project, be sure to crochet evenly to keep the brim flat and avoid curling. Once the brim is complete, fasten off your yarn securely and weave in the ends with your yarn needle. Congratulations—you now have the base structure of your mini crochet witch hat complete.
Creative Ideas to Decorate Your Mini Witch Hat
The beauty of this Mini Crochet Witch Hat 🧙♀️🖤-Step by Step Tutorial is that it gives you room to personalize and add your own creative touches. Decorations are where your witch hat transforms from simple to stunning.
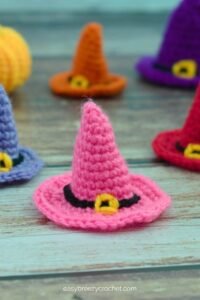
One of the most popular ways to decorate is to add a yarn belt around the base of the cone. This can be crocheted as a simple chain or made with ribbon or lace. You can even add a small buckle made from felt, fabric, or metallic beads to give the hat extra character.
For those who love sparkle, consider sewing on sequins, beads, or even adding metallic thread into your crochet stitches for a magical glimmer. Glitter glue can also be applied carefully to add shimmer without altering the fabric of the hat.
If the hat is for a doll or costume accessory, you can attach elastic bands or clips to secure it in place. For table décor, you could stuff the cone lightly with cotton or polyfill to help it stand upright and give it a solid structure.
Another idea is to create themed sets. For example, a purple hat with golden stars, an orange one with black trim, or a multi-colored one for a festive Halloween display. Small crochet flowers, stars, or pumpkin appliqués can be sewn onto the brim for seasonal charm.
No matter which decorations you choose, the goal is to make each mini witch hat unique and meaningful. Personalization is what makes handmade crafts stand out, and it allows you to showcase your creativity in every stitch.
Tips, Tricks, and Troubleshooting
While the Mini Crochet Witch Hat 🧙♀️🖤-Step by Step Tutorial is straightforward, beginners may encounter a few challenges. Understanding common mistakes and their solutions will help you enjoy the process more.
One common issue is the cone becoming uneven or leaning to one side. This usually happens if increases are placed inconsistently. Be sure to follow the increase pattern evenly around the circle and use a stitch marker to avoid confusion.
Another challenge is the brim curling upward instead of lying flat. To fix this, add extra increases in the rounds until the brim flattens out. Blocking your hat by gently shaping it with a bit of steam can also help maintain its structure.
For those struggling with tight stitches, try loosening your tension or using a slightly larger hook. This makes the project easier to work on and prevents hand fatigue. On the other hand, if your stitches are too loose, the hat may not hold its shape—switch to a smaller hook in that case.
If you want to make multiple hats quickly, consider working in batches. Crochet all the cones first, then add the brims later. This saves time and keeps your focus on one stage at a time.
Finally, don’t forget that crochet is meant to be enjoyable. Mistakes can always be unraveled and redone. With patience and practice, your mini witch hats will turn out beautifully.
FAQ about Mini Crochet Witch Hat 🧙♀️🖤-Step by Step Tutorial
Q1: Can beginners follow this Mini Crochet Witch Hat 🧙♀️🖤-Step by Step Tutorial?
Yes, this tutorial is beginner-friendly. It uses simple stitches like single crochet, increases, and basic shaping, making it accessible for those just starting their crochet journey.
Q2: How long does it take to make a mini crochet witch hat?
On average, it can take between one to two hours depending on your crochet speed and level of detail in decoration. With practice, you can finish them even faster.
Q3: What type of yarn is best for this project?
Medium-weight acrylic or cotton yarn works best because it provides structure and durability. Specialty yarns like glitter or textured yarns can also be used for creative effects.
Q4: Can I resize the hat to make it bigger?
Yes, you can simply continue increasing the rounds on the cone until it reaches your desired size. The same applies to the brim—keep adding rounds for a wider effect.
Q5: How can I use the mini crochet witch hat once it’s finished?
These hats can be used as decorations, costume accessories, doll hats, party favors, or even as keychain charms. They are versatile and perfect for festive occasions like Halloween.
Q6: How do I keep the brim flat?
Ensure you add enough increases evenly while crocheting. If it still curls, lightly block the hat by shaping it with steam or pressing gently under a cloth.
Conclusion
Creating a Mini Crochet Witch Hat 🧙♀️🖤-Step by Step Tutorial is not only a fun and festive craft but also a wonderful way to practice crochet techniques while making something unique. From preparing your materials to shaping the cone and brim, and finally decorating it with personal flair, each step offers an opportunity for creativity and skill-building.
Whether you plan to use your mini witch hat as décor, a gift, or part of a costume, the joy of crafting it yourself makes it truly special. Now that you’ve learned the complete process, why not give it a try and see how magical your creation turns out?
I would love to hear your thoughts! Share your honest opinion about this tutorial and let me know your suggestions for future crochet guides. Your feedback helps keep these tutorials inspiring and useful for all crafters.