
The New Crochet Bag Model-Step by Step Tutorial is the perfect guide for anyone who loves combining creativity with functionality. Crochet bags have gained popularity because they are stylish, customizable, and sustainable. This tutorial will walk you through how to make a unique bag, starting from the basics and moving toward more advanced details. Whether you are a beginner or have been crocheting for years, this guide will give you the knowledge and confidence to create a beautiful, practical accessory.
What makes this project so exciting is the versatility of the bag. By following the New Crochet Bag Model-Step by Step Tutorial, you can adjust the size, colors, and patterns to suit your own taste. A crochet bag can be elegant for a night out, casual for everyday wear, or even playful for summer outings. Handmade bags are also excellent gifts because they carry the warmth and personality of the maker.
Additionally, crocheting is more than just a craft—it’s a relaxing and rewarding activity. With the New Crochet Bag Model-Step by Step Tutorial, you are not only learning to make a bag, but you are also engaging in a creative process that can reduce stress and improve focus. Each stitch connects you to a long tradition of handmade artistry. In the following sections, we will go through all the steps clearly so that you can start and finish your project with ease.
Materials Needed for the New Crochet Bag Model
To begin the New Crochet Bag Model-Step by Step Tutorial, you first need to gather the right materials. Having everything at hand before starting ensures a smooth and enjoyable process. The most important element is yarn. Choose a yarn that is strong and durable, preferably cotton or a cotton-blend, as it will provide structure and resilience to the bag. Lighter yarns will create a soft and delicate look, while thicker yarns will produce a bold and sturdy finish.
Next, you will need a crochet hook that matches the yarn size. Hooks come in different sizes, and using the recommended hook for your yarn ensures that your stitches will look even. For beginners, it is often best to use a slightly larger hook because it makes stitches easier to see and handle. Remember, the New Crochet Bag Model-Step by Step Tutorial is meant to be adaptable, so you can experiment until you find the combination that suits you best.
You will also need scissors, stitch markers, and a yarn needle. Stitch markers help keep track of rows and stitches, especially when working in the round. The yarn needle is essential for weaving in loose ends and giving your bag a neat finish. These small tools may seem simple, but they make a big difference in the final outcome of your bag.
Another important consideration is the bag’s lining. While crochet bags can look beautiful on their own, adding a fabric lining will provide extra strength and prevent items from poking through the stitches. Choose a fabric that complements your yarn colors and is easy to sew. A lining can be attached by hand-stitching or with a sewing machine, depending on your skills and preference.
Handles are also a crucial part of your crochet bag. You can crochet the handles, purchase pre-made leather straps, or even recycle old belts. Each option gives the bag a different style, and the New Crochet Bag Model-Step by Step Tutorial allows you to select the one that fits your personal taste. Handles should be comfortable and strong enough to hold the weight of items inside the bag.
Finally, think about decorative elements. Buttons, tassels, beads, or wooden rings can elevate the look of your bag. Adding these finishing touches transforms a simple crochet piece into a fashionable accessory. With all materials ready, you are prepared to begin your project with confidence.
Step by Step Instructions for the New Crochet Bag Model
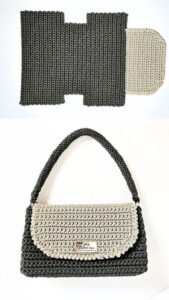
The New Crochet Bag Model-Step by Step Tutorial begins with the base of the bag. Start by creating a foundation chain, usually around 25–35 stitches, depending on the desired size. Work single crochet stitches across the chain, and continue to build rows until you form a rectangle. This rectangle will become the base of your bag, so make it wide and long enough to match your design.
Once the base is complete, you will begin working the body of the bag. Crochet around the edges of the rectangle in continuous rounds, gradually building up the sides. A popular choice is to use half-double or double crochet stitches for the body, as they create a flexible yet sturdy structure. By following this method, your bag will start to take shape quickly.
To add texture, you can experiment with stitch patterns. The New Crochet Bag Model-Step by Step Tutorial encourages creativity, so you may use shell stitches, bobble stitches, or even granny square motifs. Patterns not only add beauty but also strengthen the structure of the bag. If you prefer a minimalist look, sticking with simple stitches will give you a clean and modern result.
As you continue crocheting upward, measure the height of the bag to suit your needs. Some may prefer a deep tote-style bag, while others may like a smaller handbag. Customization is one of the best parts of this process. Always keep in mind that balance between width and height is key for a stylish final product.
Once you reach the desired height, you can start shaping the top edge. A neat finish can be achieved by working slip stitches or a decorative border such as picots. This gives the bag a professional look and ensures that the opening remains strong and tidy. The New Crochet Bag Model-Step by Step Tutorial provides flexibility here—you can make the edge as simple or as ornate as you like.
Finally, attach the handles and any decorations you have chosen. Secure them well, as they will carry the weight of the bag’s contents. If you added a fabric lining, stitch it neatly to the inside of the bag before finishing. At this stage, your crochet bag is complete and ready to use.
Styling and Using Your Crochet Bag
The best part about completing the New Crochet Bag Model-Step by Step Tutorial is styling your bag to match your wardrobe. A crochet bag is not only functional but also fashionable. You can pair it with casual outfits like jeans and T-shirts, or with summer dresses for a chic look. Because it is handmade, it stands out as a unique accessory that cannot be found in stores.
These bags are perfect for everyday use. Whether you are going to the market, the beach, or a casual outing, your crochet bag will serve as a reliable companion. Cotton yarn bags, in particular, are durable and easy to wash, making them practical for daily wear. Following the New Crochet Bag Model-Step by Step Tutorial ensures that your bag is both stylish and sturdy.
Crochet bags are also eco-friendly alternatives to plastic or synthetic bags. By making your own, you contribute to reducing waste and promoting sustainable fashion. Handmade bags encourage slower consumption habits, which is better for the environment. This makes your project not only creative but also meaningful.
Gifting crochet bags is another wonderful idea. Since they are customizable, you can design a bag specifically for a friend or family member. Handmade gifts always carry a personal touch that shows care and thoughtfulness. The New Crochet Bag Model-Step by Step Tutorial allows you to make presents that are both useful and heartfelt.
Additionally, these bags can be sold as part of a small handmade business. With the growing demand for unique, artisanal fashion, crochet bags are highly valued in craft markets and online shops. Sharing your creations can inspire others and even become a rewarding side income.
No matter how you choose to use your crochet bag, it will always carry the pride of being handmade. Each stitch tells a story of creativity, patience, and craftsmanship.
Tips and Tricks for Success
The New Crochet Bag Model-Step by Step Tutorial is easy to follow, but a few extra tips can help ensure your success. First, always maintain even tension in your stitches. Uneven tension can cause the bag to lose its shape or look inconsistent. Practicing on small swatches before starting the bag can help build confidence.
Blocking your bag after completion is another useful technique. Blocking involves wetting or steaming the crochet piece and shaping it to the desired form. Once it dries, the bag holds its structure better. This step is especially helpful if you are using textured stitches or if your bag looks slightly uneven.
If you are adding a lining, choose a strong thread and sew carefully. Lining not only adds durability but also keeps smaller items like keys or pens from slipping through the stitches. Matching the fabric color with the yarn enhances the bag’s overall appearance.
Experiment with color combinations. While solid colors look elegant, stripes or multicolored yarns can create a playful effect. The New Crochet Bag Model-Step by Step Tutorial encourages creativity, so don’t hesitate to try bold or unexpected choices. Color blocking is also a stylish option for a modern look.
Another trick is to reinforce the handles. Since they bear the most weight, double crocheting them or lining them with fabric will prevent stretching. Handles are the part of the bag that experiences the most wear, so making them strong ensures longevity.
Finally, enjoy the process. Crocheting is not only about the final product but also about the joy of creating. Take breaks, experiment, and be patient with yourself as you learn. Every mistake is part of the journey and helps you grow as a maker.
FAQ About the New Crochet Bag Model
1. How long does it take to complete the New Crochet Bag Model-Step by Step Tutorial?
The time varies depending on your skill level and the complexity of your chosen design. On average, beginners may take a few days, while experienced crocheters might finish in one or two sessions.
2. What type of yarn is best for this project?
Cotton or cotton-blend yarn is recommended because it is strong, durable, and washable. It provides structure to the bag, making it practical for daily use.
3. Do I need to add a lining to my crochet bag?
Adding a lining is optional but highly recommended. It improves durability, prevents stretching, and keeps small items secure.
4. Can I make the bag without handles?
Yes, you can create clutch-style crochet bags without handles. However, for larger bags, handles make carrying easier and more comfortable.
5. Is this project suitable for beginners?
Absolutely. The New Crochet Bag Model-Step by Step Tutorial is beginner-friendly. Simple stitches and clear instructions make it accessible, while more advanced techniques can be added by experienced crocheters.
6. How do I care for my crochet bag?
Most crochet bags made with cotton yarn can be hand-washed gently with mild soap. Lay flat to dry to maintain shape. Avoid machine drying, as it may distort the bag.
Conclusion
The New Crochet Bag Model-Step by Step Tutorial offers a complete guide to creating a stylish and practical accessory. From choosing materials to adding final touches, each step allows you to express creativity while building a functional item.
With patience and practice, anyone can master this project and enjoy the satisfaction of carrying a handmade bag.
I hope this article has inspired you to pick up your yarn and hook and start your own project. If you try the tutorial, please leave your honest opinion and share your suggestions. Your feedback helps improve and encourages others to begin their crochet journey as well.