
Creating a Pumpkin shaped crochet candy bag- Step by Step Tutorial is the perfect project for anyone looking to add a festive and handmade touch to Halloween or autumn celebrations. This charming crochet accessory is both decorative and practical, offering a fun way to store candy or small gifts while embracing the seasonal theme. Whether you are a beginner or an experienced crocheter, this guide will show you how to make your very own pumpkin-shaped bag with clear instructions and useful tips.
When making a Pumpkin shaped crochet candy bag- Step by Step Tutorial, you can choose colors and yarn textures that reflect your personal style. Traditional orange pumpkins look great, but you can also experiment with white, green, or even multicolored yarn for a playful twist. The end result will be a unique, handmade piece that can be used year after year for Halloween parties, fall decorations, or as a creative gift bag for friends and family.
This Pumpkin shaped crochet candy bag- Step by Step Tutorial is designed to be easy to follow while ensuring your finished product is sturdy and functional. From selecting materials to adding final details like handles and drawstrings, you will learn everything you need to create a beautiful bag that looks like a tiny pumpkin but works like a practical candy holder.
Materials and Preparation for the Pumpkin Shaped Crochet Candy Bag
Before you begin this Pumpkin shaped crochet candy bag- Step by Step Tutorial, gathering the right materials is essential. The type of yarn you choose affects the final look and durability of the bag. Cotton yarn is a popular option because it offers structure and strength, making the bag capable of holding candies without losing its shape. Acrylic yarn can also work well for beginners because it is affordable and easy to handle.
You will need a suitable crochet hook size based on your yarn thickness. Check the yarn label for recommendations, but remember that using a slightly smaller hook can create tighter stitches, which helps prevent candies from slipping through gaps. A stitch marker will be helpful for keeping track of your rounds, especially since this bag will be worked in a circular shape to achieve the pumpkin form.
In addition to yarn and hooks, you will need a tapestry needle for weaving in ends and possibly some decorative items like green yarn for the pumpkin stem or leaves. These small details bring the pumpkin to life, adding character and charm to your finished candy bag.
Having a pair of sharp scissors on hand is also important for cleanly cutting yarn. If you want to make the bag reusable and sturdy, consider lining it with a light fabric before attaching the drawstring. This step is optional but can enhance the overall look and durability.
Once you have all materials ready, create a comfortable and well-lit workspace. Crocheting a Pumpkin shaped crochet candy bag- Step by Step Tutorial is much more enjoyable when you can clearly see your stitches and have everything within easy reach.
Before starting, it is a good idea to practice the basic stitches if you are new to crochet. The project mainly uses simple stitches, so even beginners can follow along without feeling overwhelmed.
Step by Step Instructions for Crocheting the Pumpkin Bag
Now we will move into the main steps of the Pumpkin shaped crochet candy bag- Step by Step Tutorial. The bag is typically worked in the round, starting from the base and moving upward toward the top opening.
Begin by making a magic ring, which allows you to pull the center tight so there is no hole at the bottom of the bag. Work single crochet stitches into the ring to form the first round. Use a stitch marker to keep track of where each round begins.
In the next few rounds, you will gradually increase stitches to create a flat circle. This becomes the base of your pumpkin bag. The size of this circle determines the width of your finished bag, so you can adjust the number of increase rounds depending on how large you want it to be.
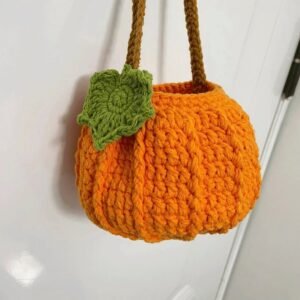
Once the base is complete, continue working in rounds without increasing to build up the sides of the bag. This creates the cylindrical shape needed before adding the characteristic pumpkin ridges. You can achieve the ridged effect by alternating front post and back post stitches, which give the fabric a textured, segmented look resembling a real pumpkin.
When the sides reach your desired height, it is time to shape the top edge. Switching to green yarn at this point allows you to crochet a stem or leaf design around the opening, adding a realistic touch.
Finally, create a small channel at the top for the drawstring closure. This step is important because it allows the bag to be pulled closed, securing the candies inside while keeping the design functional and decorative.
Adding the Drawstring and Final Details
After completing the main body of the Pumpkin shaped crochet candy bag- Step by Step Tutorial, focus on the drawstring and any decorative elements. The drawstring can be crocheted as a simple chain or made using a braided cord. Either way, it should be long enough to close the bag securely while leaving enough length for easy opening.
Thread the drawstring through the channel at the top of the bag using a tapestry needle or by weaving it in with your crochet hook. Once threaded, pull both ends to test the closure, making sure the bag gathers neatly at the top without gaps.
For the stem, use green yarn to crochet a small tube or a few leaves. Attach these securely to the top center of the bag. This detail instantly transforms the plain orange bag into a recognizable pumpkin shape, giving it seasonal charm.
If you want to personalize your Pumpkin shaped crochet candy bag- Step by Step Tutorial, consider adding small embellishments like beads, tiny flowers, or even a crocheted face for a jack-o’-lantern effect. These extras make each bag unique and can be customized for different occasions.
You can also adjust the size of the handles depending on whether you want the bag to be carried by hand or worn on the wrist. A simple crocheted strap works perfectly for a small candy bag, while longer straps turn it into a mini shoulder bag for kids.
Before finishing, weave in all yarn ends neatly to prevent unraveling. Giving the bag a gentle steam block can help smooth stitches and enhance the final appearance, especially if you used cotton yarn.
Tips for Using and Caring for Your Pumpkin Crochet Bag
Once your Pumpkin shaped crochet candy bag- Step by Step Tutorial is complete, you will want to keep it looking good for many Halloween seasons to come. Proper care ensures the bag stays clean and retains its shape over time.
If the bag becomes dirty from candy or outdoor use, gently hand wash it in cool water with mild soap. Avoid harsh detergents or bleach, as these can weaken the fibers and fade the colors.
Reshape the bag while damp and let it air dry completely. Do not use a dryer because heat can shrink or distort the yarn. Stuffing the bag lightly with paper during drying helps maintain its shape.
Store the bag in a cool, dry place when not in use. If you made multiple bags for gifts or decorations, keeping them folded neatly will save space while preventing wrinkles or creases.
The sturdy nature of crochet means your pumpkin bag can also double as a decorative item. Fill it with pinecones, artificial leaves, or small gifts for a charming autumn centerpiece.
With proper care, these handmade bags can be reused year after year, making them both practical and environmentally friendly compared to disposable gift bags.
FAQ About Pumpkin Shaped Crochet Candy Bag- Step by Step Tutorial
1. Is this project suitable for beginners?
Yes, the tutorial uses simple stitches and clear instructions, making it perfect for beginners.
2. How long does it take to make one bag?
Depending on your skill level, it can take anywhere from two to four hours to complete.
3. Can I use leftover yarn for this project?
Absolutely! This is a great way to use small amounts of yarn left from other projects.
4. What size should the finished bag be?
The size depends on how many rounds you make for the base and sides. You can customize it to fit your needs.
5. Is lining necessary for the bag?
Lining is optional but can add durability and prevent small candies from slipping through stitches.
6. Can I make the bag in colors other than orange?
Yes, you can experiment with any colors to match your personal style or event theme.
Conclusion
This Pumpkin shaped crochet candy bag- Step by Step Tutorial has shown you how to create a festive, functional accessory for Halloween or fall celebrations.
From choosing materials and crocheting the base to adding a drawstring and decorative details, every step helps you build a charming handmade bag. We hope this guide inspires you to try the project and share your results.
Please leave your honest opinions and suggestions so we can continue providing helpful tutorials for all crochet enthusiasts.