
Learning how to make a quick and easy crochet butterfly – step by step tutorial is a wonderful way to explore the art of crochet while creating something beautiful, small, and versatile. Crochet butterflies are among the most beloved beginner projects because they are charming, simple to create, and can be used in many ways. Whether you want to decorate clothing, embellish a bag, or add them to a home décor project, crocheted butterflies are perfect little accents.
This quick and easy crochet butterfly – step by step tutorial is designed for anyone, even if you have just started learning the basics of crochet. The project requires only a small amount of yarn, a crochet hook, and a bit of patience. Because butterflies symbolize transformation and beauty, they make a meaningful handmade piece to give as a gift or to keep as a personal reminder of creativity and growth.
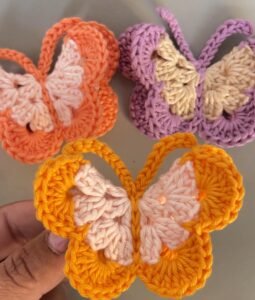
By following this step by step tutorial, you will learn how to make the base stitches, shape the wings, and add final touches to bring your butterfly to life. The best part is that you can customize your butterfly with any color combination you like, from soft pastel shades to bold and vibrant tones. The possibilities are endless, making this craft enjoyable for both beginners and experienced crocheters.
Materials Needed for the Quick and Easy Crochet Butterfly
To begin this quick and easy crochet butterfly – step by step tutorial, you will need only a few materials that are common in most crochet projects. Having the right tools and supplies ensures that your final butterfly looks neat and holds its shape well.
First, you will need some yarn. Choose a lightweight or medium-weight yarn in colors that appeal to you. Bright colors like yellow, blue, or red make the butterfly stand out, while pastel tones create a softer and more delicate appearance. Since butterflies are naturally colorful, feel free to mix different yarn shades for the wings.
Second, select the correct crochet hook for your chosen yarn. Most yarn labels recommend a suitable hook size, but generally, a 3.5 mm to 4.5 mm hook works perfectly for this project. The hook size can affect the size of your butterfly, so if you want a smaller butterfly, use a smaller hook, and for a larger one, use a slightly bigger hook.
You will also need a pair of scissors to cut the yarn neatly. A yarn needle is useful for weaving in the ends and finishing your butterfly. Optional items include small beads or sequins if you want to decorate your butterfly with extra sparkle.
Finally, it is always good to have a little patience and creativity. Even though this project is labeled quick and easy, taking your time with the stitches will help your butterfly look beautiful and symmetrical. With these materials ready, you are prepared to move forward with this fun crochet project.
Step by Step Instructions for Crocheting the Butterfly
In this quick and easy crochet butterfly – step by step tutorial, the instructions are simple to follow and can be adjusted depending on your crochet skill level. The butterfly is created in rounds, beginning with a small circle that will later be folded and shaped into wings.
Start by making a magic ring or chain four stitches and join with a slip stitch to form a small circle. This circle will serve as the base of your butterfly. Into this ring, you will work your first round of stitches. Crochet three chains to begin and then continue with double crochets, half-double crochets, and single crochets to form a round. This mix of stitches helps shape the wings naturally.
For the second round, you will build up the wings by working clusters of double crochets and chain stitches. Usually, crocheters make two larger sections for the top wings and two smaller sections for the bottom wings. The key is to balance the stitches so that the butterfly looks symmetrical on both sides.
Once the wings are finished, cut the yarn and leave a tail long enough to wrap around the center of the butterfly. This creates the body and holds the wings together. Tie the yarn securely in the middle, making sure both sides are even. You can also add a separate piece of yarn or embroidery thread to create the butterfly’s antennae.
At this stage, your butterfly is almost complete. Use your fingers to gently shape the wings, pulling them out slightly to achieve a natural appearance. If you like, you can block the butterfly with a bit of steam to help it keep its shape, especially if you plan to use it as an embellishment.
Now you have a beautiful crocheted butterfly that you can use for many purposes. The best part is that you can repeat this process with different colors and sizes to create a collection of butterflies. Each one will be unique, just like real butterflies in nature.
Creative Uses for Crochet Butterflies
After finishing this quick and easy crochet butterfly – step by step tutorial, you might wonder how to use these lovely little creations. Luckily, crochet butterflies are versatile and can be added to many projects to bring a touch of charm.
One popular use is as an applique on clothing. You can sew or glue a small butterfly onto a child’s sweater, a summer hat, or even a scarf. It adds a handmade detail that feels personal and special.
Another idea is to use them as decorations for accessories. Attach a butterfly to a handbag, a hairband, or a brooch pin. This turns your small crochet project into a fashionable accessory.
Crochet butterflies also work wonderfully in home décor. You can make several butterflies and string them together to form a garland, perfect for decorating a bedroom or party space. They can also be glued onto greeting cards or picture frames for a creative handmade gift.
Many people also use crochet butterflies in scrapbooking and journaling. Their small size makes them easy to attach to paper projects, giving them a unique textured look.
If you enjoy making handmade gifts, adding a crochet butterfly as an embellishment can make your present extra special. Imagine attaching one to a wrapped gift or a handmade blanket. It shows thoughtfulness and attention to detail.
With so many possible uses, the crochet butterfly becomes not only a quick craft but also a creative tool to express your style and imagination.
Tips for Making Perfect Crochet Butterflies
Although this project is labeled quick and easy, a few tips can help make your butterflies look even better. Paying attention to these small details can transform your crochet work into something professional-looking and beautiful.
First, always check your tension. If your stitches are too tight, the butterfly might curl up too much and lose its shape. If they are too loose, the wings may not hold properly. Try to keep your tension even throughout the project.
Second, experiment with yarn types. Cotton yarn works beautifully for crochet butterflies because it holds its shape and has a smooth finish. Acrylic yarn can also be used if you prefer a softer look.
Third, practice color combinations. Using two or more colors for the wings creates a realistic and eye-catching effect. For example, you can crochet the top wings in one color and the bottom wings in another.
Fourth, consider blocking your butterfly after finishing. Blocking helps flatten and shape the crochet piece, making it look polished. You can do this with a steam iron or by pinning the butterfly to a soft surface and spraying it lightly with water.
Fifth, don’t be afraid to personalize your butterfly. Add beads to the body, tiny sequins to the wings, or even embroidery details. These little touches make your butterfly unique.
Finally, remember that practice makes perfect. The first butterfly you make may not look exactly how you want, but with each attempt, your stitches will become more even, and your butterflies will look more professional.
FAQ about Quick and Easy Crochet Butterfly – Step by Step Tutorial
1. How long does it take to make a crochet butterfly?
It usually takes about 15 to 30 minutes to complete one butterfly, depending on your crochet speed and experience level.
2. What is the best yarn for crocheting butterflies?
Cotton yarn is recommended because it holds its shape well, but acrylic yarn also works for a softer finish.
3. Can beginners follow this step by step tutorial?
Yes, this tutorial is designed for beginners. It uses basic stitches like single crochet, double crochet, and chains, which are easy to learn.
4. Can I make the butterfly larger or smaller?
Yes, adjusting your hook size and yarn thickness will change the butterfly’s size. You can also add extra rounds for larger wings.
5. What can I use crochet butterflies for?
They can be used as appliques, accessories, home décor, scrapbooking embellishments, or gift decorations.
6. Do I need to block the butterfly after finishing?
Blocking is optional but recommended if you want your butterfly to hold its shape, especially for decorative purposes.
7. Can I sell crochet butterflies I make from this tutorial?
Yes, as long as they are handmade by you, crocheted butterflies can be sold at craft fairs, online shops, or gifted to friends and family.
Conclusion
In this quick and easy crochet butterfly – step by step tutorial, you learned how to gather materials, follow step by step instructions, and create beautiful crochet butterflies. We also explored creative ways to use them and tips to make your butterflies look even more polished. With just a little yarn and creativity, you can bring to life one of the most charming crochet projects.
Now it’s your turn to try this tutorial and enjoy the process of making your own collection of butterflies. Each one you create will be a reflection of your style and imagination.
Don’t forget to leave a sincere opinion about this article and share suggestions for future tutorials. Your feedback helps make the crafting journey even more enjoyable for everyone.