
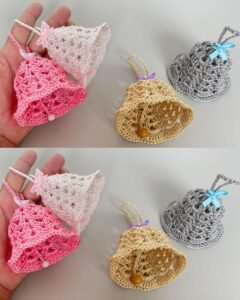
Decorating your home for the holidays becomes even more special when you make your own ornaments, and this Quick and easy crochet Christmas bell-Step by Step Tutorial is the perfect project for doing just that. Handmade Christmas decorations bring warmth, tradition, and personal charm to your festive celebrations. This simple and enjoyable pattern helps you create adorable crochet bells that can be hung on your tree, added to garlands, or even used as gift toppers. The Quick and easy crochet Christmas bell-Step by Step Tutorial provides a detailed, easy-to-follow guide suitable for both beginners and experienced crocheters who want to add a handmade touch to their Christmas décor.
What makes this Quick and easy crochet Christmas bell-Step by Step Tutorial so appealing is how little time and material it requires. You can complete one bell in less than an hour, using only a small amount of yarn. It’s a perfect project to use leftover yarn from other holiday crafts. Whether you want to create a set of matching bells or a colorful collection of ornaments, this tutorial allows for creativity in both color choice and embellishments. These crochet Christmas bells are not only beautiful but also carry sentimental value, becoming treasures you can display year after year.
Before you begin your Quick and easy crochet Christmas bell-Step by Step Tutorial, make sure to gather the materials you need. You will need a small amount of cotton or acrylic yarn, a crochet hook suitable for your yarn size, a yarn needle, scissors, and optional decorations such as ribbons or beads. Choosing festive colors like red, green, gold, and white adds a traditional holiday touch, but you can experiment with metallic threads for extra sparkle. Once everything is ready, you’ll be amazed at how fast these lovely bells take shape.
Step 1: Gathering Materials and Starting the Base
The first step in the Quick and easy crochet Christmas bell-Step by Step Tutorial is preparing your materials and creating the bell’s base. Starting right ensures your bell has a neat and well-structured foundation.
Begin by choosing your yarn. Cotton yarn is recommended for its crisp stitch definition, which helps the bell hold its shape. Acrylic yarn is also a good option for a softer, more flexible finish.
Select a crochet hook that matches the yarn weight. Usually, a 3 mm or 3.5 mm hook works perfectly for small ornaments like this. Using a smaller hook gives a tighter stitch, keeping the bell firm and stable.
Create a magic ring to start the base of your bell. This technique allows you to tighten the center and eliminates any hole, creating a clean look. If you’re new to the magic ring, take your time—it’s an essential skill for making circular crochet pieces.
Work single crochets or half double crochets into the ring, depending on the desired size of the bell’s base. Each round should increase evenly to keep the circle flat and symmetrical.
After completing a few rounds, you’ll notice the base starting to form. Make sure your stitches are even and not too tight; this ensures the bell will hang nicely once finished. This base serves as the starting point for building the bell’s curved body in the next step.
Step 2: Shaping the Bell
The second part of the Quick and easy crochet Christmas bell-Step by Step Tutorial focuses on shaping the bell’s body. This step gives the bell its classic rounded look, resembling a real Christmas ornament.
Once the base is complete, you’ll stop increasing stitches and begin working evenly in the round. This transition creates the upward curve characteristic of a bell shape.
Continue crocheting in rounds, maintaining consistent tension. The height of your bell will depend on how many rounds you complete. A taller bell requires more rounds, while a shorter one gives a cute mini-bell appearance.
To give the bell more structure, you can use slightly tighter stitches as you move upward. This will make the bell firm and help it keep its shape even without stiffening.
If you want to add decorative stripes or patterns, this is the perfect stage to change yarn colors. Alternating red and white yarn, for example, creates a candy-cane effect, while metallic gold thread adds a luxurious touch.
Finish the last few rounds by slightly decreasing your stitches. This narrows the top and gives your bell a natural taper. Once finished, fasten off and weave in the yarn ends securely with a needle.
Now, you have a lovely crochet bell body ready for the final details that will truly make it shine.
Step 3: Adding the Clapper and Hanging Loop
No Quick and easy crochet Christmas bell-Step by Step Tutorial would be complete without the clapper—the small part that dangles inside the bell—and the loop for hanging. These finishing touches bring your crochet bell to life and make it functional as a decoration.
To make the clapper, cut a short piece of yarn or thread and attach a small bead or jingle bell at one end. This gives the ornament a realistic appearance and even a gentle sound if you use a jingle bell.
Thread the yarn through the inside top of the bell and secure it firmly with a few knots. Ensure it hangs in the center so that it looks balanced when the bell is displayed.
Next, make a hanging loop. Using the same yarn or a coordinating color, create a chain of about 10 to 15 stitches, depending on how long you want the loop to be. Attach both ends to the top of the bell and fasten them securely.
For a more festive appearance, tie a small ribbon or bow where the loop meets the bell. Gold, red, or silver ribbons work beautifully and complement most Christmas color schemes.
If you’d like to personalize your crochet bell, you can add small embellishments like sequins, pearls, or embroidery. These extra touches make your bell unique and eye-catching.
After completing these details, your crochet Christmas bell is nearly ready for display—just one more optional step remains if you want an even more polished look.
Step 4: Stiffening and Final Touches
The last step in this Quick and easy crochet Christmas bell-Step by Step Tutorial is stiffening the bell to ensure it holds its shape perfectly. This step is optional but recommended if you want your bells to stay firm throughout the holiday season.
Mix a solution of equal parts water and white glue or use a commercial fabric stiffener. Dip the bell into the solution and squeeze out excess liquid gently without twisting.
Shape the bell over a small cup, balloon, or mold that matches the desired size. Allow it to dry completely, usually overnight, until it becomes firm and crisp.
Once the bell is dry, remove it from the mold and adjust the shape slightly if necessary. You’ll be surprised how professional it looks after stiffening.
Attach any final decorations, such as tiny bells or glitter paint, for extra sparkle. Just make sure not to over-decorate—the charm of the Quick and easy crochet Christmas bell-Step by Step Tutorial lies in its simplicity and elegance.
Finally, test the hanging loop and ensure everything is secure. Your crochet Christmas bell is now ready to hang on your tree, window, or wreath as a charming handmade ornament.
FAQ – Quick and easy crochet Christmas bell-Step by Step Tutorial
1. Can beginners follow this tutorial easily?
Yes, the Quick and easy crochet Christmas bell-Step by Step Tutorial is designed for beginners. It uses basic stitches and simple techniques that are easy to learn.
2. What type of yarn works best?
Cotton yarn is ideal because it provides structure and holds its shape. Acrylic yarn also works well if you prefer a softer look.
3. How long does it take to make one crochet bell?
Typically, it takes about 30 to 60 minutes to complete one bell, depending on your skill level and the size you choose.
4. Can I make larger or smaller bells?
Yes! Simply adjust the number of rounds in the base and body to make bigger or smaller bells according to your preference.
5. How can I make the bell look more festive?
You can add metallic threads, small beads, or a decorative bow to give your bell an extra holiday sparkle.
6. Do I need to stiffen the bell?
Stiffening is optional but recommended if you want the bell to hold its shape better when hanging.
7. Can I use leftover yarn for this project?
Absolutely! This project is a fantastic way to use small yarn scraps from other holiday crafts.
Conclusion
This Quick and easy crochet Christmas bell-Step by Step Tutorial is a delightful project that brings the magic of handmade crafts into your holiday season.
You’ve learned how to prepare materials, shape the bell, add finishing touches like the clapper and loop, and even stiffen it for a polished look. Each bell you make carries a bit of your creativity and festive spirit, making it a cherished part of your decorations for years to come.
Now that you’ve completed this guide, it’s time to grab your yarn and hook and start creating your own collection of Christmas bells. Experiment with colors, sizes, and embellishments to match your personal style. Don’t forget to share your thoughts and leave a sincere opinion or suggestion about this Quick and easy crochet Christmas bell-Step by Step Tutorial—your feedback helps inspire others to try this joyful and creative holiday craft.