
If you love simple crochet projects that bring beauty and functionality into your daily life, then this Quick and Easy Crochet Cup Step by Step – Step by Step Tutorial is perfect for you. This project is not only fun but also ideal for beginners who want to practice basic stitches while creating something practical. Whether you’re crafting it as a gift, for home decoration, or just for your personal use, a crochet cup design will always add a touch of handmade charm to your table setting.
In this guide, we’ll explore every detail of how to make your crochet cup in a way that’s both simple and enjoyable. You don’t need to be an expert in crochet; all it takes is a bit of yarn, a hook, and your creativity. As we go through this Step by Step Tutorial, you’ll learn how to shape your cup, choose the right materials, and decorate it to match your personal style. The beauty of crochet lies in the freedom it gives you to customize each piece—color combinations, textures, and patterns are all up to you!
Creating a crochet cup is not only a relaxing and mindful activity, but it also results in a beautiful handmade item you can be proud of. Handmade crochet projects are trending again because they combine sustainability, creativity, and timeless beauty. This Quick and Easy Crochet Cup Step by Step – Step by Step Tutorial is designed to guide you clearly through every stage, ensuring you can follow along even if this is your very first crochet project.
Materials You Will Need
Before starting your Quick and Easy Crochet Cup Step by Step – Step by Step Tutorial, it’s important to gather all the materials. Having everything ready before you begin makes the process smoother and more enjoyable. The basic supplies are simple and inexpensive, making this a budget-friendly DIY craft.
You will need a crochet hook that matches the yarn weight you’ve chosen. For this project, a 3.5mm or 4mm hook usually works well. Next, you’ll need cotton yarn, as it provides both structure and softness. Cotton is also easy to clean and perfect for home items. Choose your favorite colors to make your crochet cup stand out.
You’ll also need scissors, a yarn needle for weaving in ends, and optionally, a stitch marker if you’re new to working in rounds. Make sure you’re sitting comfortably with good lighting—crochet projects are best enjoyed in a relaxed and focused environment.
Choosing the right materials can make a big difference in the final look of your crochet cup. For example, using multicolored yarn can give your cup a playful appearance, while solid tones offer a minimalist touch. You can even combine two yarn colors to create stripes or gradients.
Once you have all your materials, it’s time to prepare your yarn and get ready to start. Wind your yarn into a neat ball to prevent tangles, and double-check that your hook size is compatible. With everything set, you’re now ready to move on to the exciting part—starting your Quick and Easy Crochet Cup Step by Step – Step by Step Tutorial!
Step by Step Instructions
Let’s start crafting your crochet cup. This section will guide you through each step, from creating the base to shaping the sides and finishing with the final touches. Take your time, and enjoy the process.
Step 1: Begin by making a magic ring and crocheting six single crochets into it. This forms the foundation of your cup’s base. Pull the ring tight to close it completely. Step 2: In the next round, increase each stitch (two single crochets in each stitch). You should have twelve stitches by the end of this round.
Step 3: Continue increasing in each round until your base reaches the desired diameter—usually around 3 to 4 inches. This will depend on how big you want your cup to be. Step 4: Once the base is done, stop increasing and start working in single crochet stitches around the edge. This is how you build the sides of the cup.
Step 5: Keep crocheting upward for several rounds until you reach your preferred height. Step 6: When you’re happy with the size, finish off your yarn, leaving a tail to weave in. Smooth out any loose ends and shape your cup gently with your hands. You’ve now completed the basic form of your Quick and Easy Crochet Cup Step by Step – Step by Step Tutorial!
Adding Details and Decoration
Now that your crochet cup has taken shape, it’s time to make it special with decorations. Adding small details transforms a simple project into something truly beautiful. This step lets you express your creativity and personalize your piece.
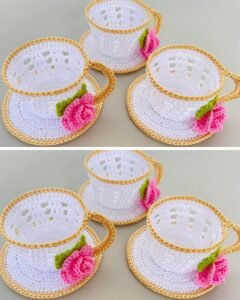
You can add a crochet handle by chaining a few stitches, then attaching each end to the cup’s side. This gives it a realistic look and also makes it more functional as a decorative piece. For a more festive touch, try embellishing your cup with small crochet flowers, hearts, or even tiny pom-poms.
If you enjoy embroidery, you can use contrasting yarn colors to stitch patterns or initials onto your cup. This is a lovely way to personalize your project if it’s meant as a gift. Handmade items with personal touches are always appreciated.
You can also use beads or buttons for extra flair. Just make sure to secure them well, especially if the cup will be handled frequently. If you plan to use it as a pen holder or decoration, consider stiffening it slightly using a fabric stiffener or diluted glue.
Decorating your crochet cup is where you can truly let your imagination run wild. You could even make a matching saucer or coaster for a cohesive set. With every small touch, your crochet project becomes more meaningful and unique.
Creative Uses for Your Crochet Cup
After completing your Quick and Easy Crochet Cup Step by Step – Step by Step Tutorial, you may wonder how to use your finished piece. The possibilities are endless! This small crochet item is versatile and can serve various decorative or functional purposes.
One fun idea is to use it as a decorative holder—for pens, crochet hooks, or even makeup brushes. It adds charm to your workspace or vanity table. Alternatively, it can be part of a kitchen or dining decoration, especially if you make it in colors that match your interior.
Crochet lovers also like turning their cups into plant pot covers for small succulents or cacti. The cozy texture of the crochet perfectly complements the green of the plants. Another great idea is to make multiple crochet cups in different colors and use them as festive table decorations during special occasions.
You can also create themed versions—for example, pastel tones for spring, bright colors for summer, and warm shades for fall and winter. Each variation adds seasonal beauty to your home.
Lastly, a crochet cup makes a thoughtful handmade gift. Whether for a birthday, housewarming, or just a sweet gesture, it shows care and creativity. The person receiving it will surely appreciate the effort and detail you put into this Step by Step Tutorial project.
FAQ
1. What yarn is best for a crochet cup?
Cotton yarn is the best choice because it holds its shape well, is easy to wash, and provides a nice firm texture.
2. Can beginners follow this Quick and Easy Crochet Cup Step by Step – Step by Step Tutorial?
Absolutely! This tutorial was designed with beginners in mind, using simple stitches and clear instructions.
3. How long does it take to make a crochet cup?
Depending on your skill level, it can take anywhere from 1 to 2 hours to complete a single cup.
4. Can I make the crochet cup larger or smaller?
Yes, you can adjust the size by increasing or decreasing the number of base rounds and height rows.
5. What can I use my crochet cup for?
It can serve as a home decoration, pen holder, small storage container, or even a plant pot cover.
6. Do I need to use a specific crochet hook size?
Use a hook that matches your yarn weight—generally, a 3.5mm or 4mm hook works well for medium-weight cotton yarn.
Conclusion
In this Quick and Easy Crochet Cup Step by Step – Step by Step Tutorial, you learned how to create a beautiful handmade crochet cup from start to finish. From gathering materials to shaping, decorating, and finding creative uses, this project offers both relaxation and satisfaction. Crochet projects like this are a wonderful way to express your creativity while crafting something useful and decorative.
Now that you know how to make your own crochet cup, why not experiment with new colors or patterns? Each piece can reflect your unique style and imagination. We hope this guide has inspired you to keep creating and discovering the joy of crochet.
If you enjoyed this Quick and Easy Crochet Cup Step by Step – Step by Step Tutorial, please leave your honest opinion and suggestions below. Your feedback helps improve future tutorials and keeps the crochet community growing with love and creativity!