
If you have ever wanted to create a quick and practical crochet hat- Step by Step Tutorial, you are in the right place. Crocheting a hat is one of the easiest and most rewarding projects you can try, especially if you are looking for something stylish and functional. A crochet hat not only keeps you warm during colder days but also adds a personal handmade touch to your wardrobe. By following this tutorial, you will learn how to make your own cozy accessory in a simple and structured way.
Making a quick and practical crochet hat- Step by Step Tutorial is an excellent project for beginners and experienced crafters alike. Unlike larger projects such as blankets or cardigans, a hat can be completed in just a few hours, which makes it both satisfying and practical. With just some basic stitches, you will see your hat take shape quickly. This project allows you to practice your skills while also ending up with a useful and beautiful piece you can wear or gift to someone special.
In this article, we will walk through everything you need to know about creating a quick and practical crochet hat- Step by Step Tutorial. From choosing the right yarn and hook to completing each round and shaping the crown, this guide will explain each step in detail. By the end of this tutorial, you will not only have a finished crochet hat but also the knowledge and confidence to make more in different styles, sizes, and colors.
Materials Needed for a Crochet Hat
Before starting your quick and practical crochet hat- Step by Step Tutorial, it is important to gather the right materials. Choosing the correct yarn and hook size will determine how soft, warm, and stretchy your hat will be. Selecting good-quality materials ensures that your final piece looks professional and lasts for years.
The most common yarn for crochet hats is medium-weight yarn, often referred to as worsted weight. This yarn is thick enough to keep the hat warm while still being easy to work with. Cotton yarn is perfect for lightweight hats, while wool or acrylic yarn is ideal for winter wear. Think about where and when you plan to wear your hat before choosing your yarn.
Next, you will need a crochet hook. For most quick and practical crochet hat- Step by Step Tutorial projects, a size H/5.0mm or I/5.5mm hook works well. However, always check the yarn label for the recommended hook size to ensure a proper finish. Using the right hook will make your stitches even and your project more enjoyable.
Other useful tools include scissors, a yarn needle for weaving in ends, and stitch markers to keep track of rounds. While some may skip markers, they are extremely helpful when working in the round, as they prevent mistakes and keep your stitches aligned. Having all these tools ready before you start will make the process smoother and faster.
Color choice also plays a big role in how your finished crochet hat will look. You can go for neutral tones to match any outfit or bold and bright shades to make your hat stand out. Solid colors are easier to work with, but variegated yarns add unique patterns without any extra effort.
Lastly, keep in mind that crocheting is supposed to be fun. Do not stress too much about having the “perfect” materials. Even if you are using leftover yarn from other projects, you can still create a charming and useful hat. The main idea of this quick and practical crochet hat- Step by Step Tutorial is to enjoy the process and learn.
Step by Step: Starting the Base of the Hat
To begin the quick and practical crochet hat- Step by Step Tutorial, you will start at the crown of the hat. Most crochet hats are worked in the round, beginning with a magic ring or a chain loop. This allows you to crochet in circles, building up the crown and then moving down toward the brim.
The magic ring method is preferred because it allows you to close the hole at the top of the hat completely. To make a magic ring, wrap the yarn around your fingers, insert your hook into the loop, and pull up a stitch. Then chain two or three stitches, depending on the pattern, to start the first round.
For the first round, you will crochet several double crochets (or half double crochets, depending on your design) into the ring. This round will form the small circle that becomes the crown of your hat. Once finished, tighten the ring and join with a slip stitch to close the round.
From here, you will begin increasing the stitches evenly in each round. This step ensures that the crown lays flat and expands to the right size for your head. For example, in round two, you may place two double crochets in each stitch. In round three, you might do one double crochet followed by an increase. This simple method creates a smooth and round crown.
It is important to measure the crown as you go. The flat circle should match the size of your head’s diameter before you stop increasing. For an adult-sized hat, the crown diameter is usually between 6 to 7 inches, depending on the yarn and hook used. Measuring ensures that your hat will fit comfortably without being too loose or too tight.
Taking your time with these early steps will make the rest of the project easier. Once the crown is the correct size, you will stop increasing and begin working evenly around to form the body of the hat. At this point, the quick and practical crochet hat- Step by Step Tutorial will start to look more like a real hat.
Shaping the Body of the Hat
After completing the crown, the next part of the quick and practical crochet hat- Step by Step Tutorial is shaping the body. This is where your hat begins to take its true form. Instead of increasing, you will simply crochet one stitch into each stitch from the previous round, which will build height.
The length of the hat’s body depends on the style you want. For a beanie that fits snugly against the head, work fewer rounds. For a slouchy hat, add several more rounds until you reach your desired length. This flexibility is one of the best things about crochet—it allows you to customize your project to your taste.
Throughout this section, remember to keep your tension consistent. Uneven stitches can create bumps or an uneven fabric, which might affect the final look of your hat. If you notice that your stitches are too tight or too loose, adjust your grip or hook size accordingly.
This part of the quick and practical crochet hat- Step by Step Tutorial also offers room for creativity. You can add stripes by switching yarn colors between rounds. You can incorporate textured stitches, such as front post double crochet, to give your hat a unique design. Simple changes can completely transform the final piece.
As you work the body of the hat, try it on from time to time. This will help you gauge whether the length is right and whether you want to make adjustments. Crocheting allows flexibility, so do not hesitate to undo a few rounds if needed.
Once the body of the hat is at your preferred length, you can move on to shaping the brim. The brim is not only functional, helping the hat fit snugly, but it also adds a clean and finished look to the project.
Creating the Brim and Finishing Touches
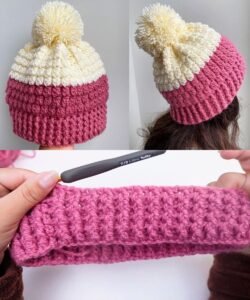
The final part of the quick and practical crochet hat- Step by Step Tutorial is creating the brim. The brim gives structure to the hat and helps it stay in place when worn. Depending on your preference, the brim can be narrow, wide, or even folded.
To start the brim, you will continue crocheting in the round but switch to single crochet or half double crochet stitches. These stitches are shorter and create a denser edge, which is ideal for a brim. Working in these tighter stitches makes the brim more stable.
Some crocheters like to work the brim in the back loop only. This technique creates a subtle ribbed effect, making the brim stretchy and visually interesting. It is a small detail that can elevate the look of your hat without requiring extra effort.
You can decide how many rounds of the brim you want. A short brim of two or three rounds works well for a simple beanie. For a chunkier hat, you might add five to six rounds. Folded brims are also popular, especially for winter hats, as they add extra warmth around the ears.
After finishing the brim, all that is left is weaving in the yarn ends with a yarn needle. This step is important because it secures your work and prevents unraveling. Take your time to weave in ends neatly so they are not visible.
At this stage, your quick and practical crochet hat- Step by Step Tutorial is complete. However, you can personalize your hat even more by adding pom-poms, buttons, or appliqués. These finishing touches make your crochet project truly one of a kind.
FAQ About Crochet Hats
1. How long does it take to make a crochet hat?
A crochet hat usually takes between 2 to 5 hours, depending on your skill level, yarn thickness, and the size of the hat. Beginners may take longer, but with practice, hats become faster to complete.
2. Can beginners follow a quick and practical crochet hat- Step by Step Tutorial?
Yes, absolutely! This project is perfect for beginners. With basic stitches like chain, single crochet, and double crochet, anyone can make a simple and stylish hat.
3. What is the best yarn for crochet hats?
The best yarn depends on the season and purpose. Acrylic and wool are great for warm winter hats, while cotton works well for lighter, breathable hats. Choose yarn that feels comfortable against your skin.
4. How do I adjust the size of a crochet hat?
To adjust the size, change the crown diameter before stopping increases. A larger diameter will make a bigger hat, while a smaller one will create a child-sized hat. Adjusting yarn and hook size also changes the overall fit.
5. Can I wash my crochet hat?
Yes, most crochet hats can be washed. However, always check the yarn label for washing instructions. Acrylic yarn is usually machine washable, while wool often requires hand washing to maintain its shape.
6. How do I add decorations like pom-poms or appliqués?
After finishing the hat, you can sew or attach pom-poms, crocheted flowers, or appliqués with a yarn needle. This adds a personal and decorative touch to your hat.
Conclusion
In this article, we explored the quick and practical crochet hat- Step by Step Tutorial, covering materials, the crown, body, brim, and finishing touches.
By following these steps, you can create a cozy, stylish, and personalized hat in just a few hours. Crocheting is not only a creative activity but also a way to make useful and beautiful accessories.
Now that you have learned how to crochet your own hat, I would love to hear your thoughts. Please share your honest opinion about this tutorial and leave any suggestions for improvement. Your feedback will help create even better guides for future crochet projects.