
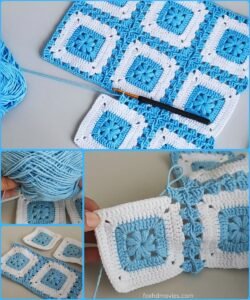
If you love crochet projects that look neat and polished, mastering the Quick & Invisible Join for Granny Squares – Step by Step Tutorial will completely transform the way your blankets, shawls, and clothing items come together. This method allows you to connect your squares seamlessly, avoiding bulky seams and giving your finished piece a professional finish. Whether you are a beginner who has just learned to crochet or a seasoned crafter looking to refine your techniques, this tutorial will make a noticeable difference in your work.
The main benefit of the quick & invisible join method is that it blends perfectly into your stitches, making the connection between squares almost unnoticeable. Unlike traditional whip stitch or slip stitch joins, this method lies flat and is comfortable against the skin—ideal for garments or baby blankets. The best part? It is simple and quick once you understand the steps, making it perfect for crafters who value both beauty and efficiency.
In this article, we will guide you through the Quick & Invisible Join for Granny Squares – Step by Step Tutorial, offering clear explanations and helpful tips so you can achieve flawless results. We will also cover common mistakes to avoid, answer popular questions, and provide insights into how you can adapt this technique for different crochet patterns. Let’s get started and give your granny square projects a professional and elegant look.
Understanding the Quick & Invisible Join Technique
The Quick & Invisible Join for Granny Squares – Step by Step Tutorial relies on a joining method that merges the final stitch of one square with the first stitch of the next, creating a continuous and seamless appearance. This technique is especially appreciated for its durability and smooth finish, which makes the project look like one cohesive fabric rather than separate pieces sewn together.
The core principle behind this method is minimal disruption to the existing stitches. Instead of overlaying a thick seam, you are essentially weaving your yarn through existing loops in a way that locks them together. This means your squares keep their original shape without being pulled or distorted, which is a common issue with other joining techniques.
Another important aspect is that this join works with various yarn weights and fiber types. Whether you are working with cotton for a summer project or soft acrylic for a cozy winter blanket, the invisible join adapts beautifully. The flexibility of the technique means you can also use it for projects with mixed yarn textures, and the join will still look consistent.
This technique also provides more elasticity than a stiff seam. This is particularly useful for wearable items like vests, sweaters, or ponchos made from granny squares. The added flexibility ensures comfort while maintaining structure.
One more advantage is the neatness on both sides. Some joins look good on the front but messy on the back. With the quick & invisible join, both sides look clean, making your project reversible in many cases.
Finally, the invisible join can be used both in a single color or multiple colors. If you want to hide the seam completely, use the same yarn color as the final round of your granny squares. If you want to add a subtle decorative effect, use a contrasting color while still keeping the seam flat and tidy.
Step-by-Step Instructions for the Quick & Invisible Join
To begin the Quick & Invisible Join for Granny Squares – Step by Step Tutorial, make sure all your granny squares are completed and blocked if necessary. Blocking ensures they are all the same size, making the joining process much easier and more accurate.
Step one is to place two squares side by side with the right sides facing up. Insert your hook into the top loops of the last stitch of one square and the top loops of the first stitch of the next square. Pull your working yarn through these loops, making sure not to tighten too much.
Next, instead of working a slip stitch, you simply pull the yarn through and continue to the next stitch, always working through the top loops of both squares simultaneously. This is what creates the invisible effect—it joins the pieces without adding extra bulk on top.
Continue across the entire edge, keeping your tension even. The secret here is to avoid pulling too tight, as that can cause puckering, or leaving it too loose, which can create visible gaps. Aim for a smooth, flat join.
When you reach the end of one pair of squares, you can either fasten off and start again for the next pair or continue in one continuous join if you are connecting multiple squares in a row. Continuous joining can save time and ensure consistent tension.
Once you have joined all the rows in one direction, turn your project and repeat the process for the other direction. This method creates an elegant grid-like connection with no visible seams.
Lastly, weave in your ends carefully along the stitches of the join. This not only hides them but also reinforces the seam, ensuring durability and long-lasting beauty.
Tips for Perfecting Your Invisible Join
First, always match your yarn weight and hook size to your granny squares. Using a different weight yarn for the join can cause imbalance in the texture and tension, making the seam more noticeable.
Second, block your granny squares before joining. This step may feel optional, but it guarantees uniform edges, which is crucial for a perfectly invisible join. Even a slight size difference can disrupt the smoothness of your join.
Third, practice your tension control. Many beginners tend to pull the yarn too tightly, causing the edges to curl or the squares to distort. A relaxed but steady tension is key for success.
Fourth, use a yarn needle to assist in tightening or loosening individual stitches along the join if needed. This small adjustment after completing a section can make your seam look even cleaner.
Fifth, if you are working with multi-colored granny squares, choose the yarn color for your join carefully. Using the most dominant color in your squares usually results in the best blending effect.
Lastly, always check both sides of your work as you go. Because this technique is reversible, you want both the front and back to look equally tidy and professional.
Common Mistakes and How to Avoid Them
One of the most frequent mistakes in the Quick & Invisible Join for Granny Squares – Step by Step Tutorial is inconsistent tension. This can make your join either too tight and puckered or too loose and gappy. To avoid this, consciously check your stitches every few joins.
Another mistake is skipping stitches by accident. Because the join works through loops rather than around entire stitches, it is easy to miss one, which creates an uneven seam. Count your stitches to ensure accuracy.
Using the wrong type of hook can also cause problems. A hook with a very sharp tip might split the yarn, while one that is too blunt may struggle to pass through loops cleanly. Choose a hook that glides smoothly without snagging.
Working without proper lighting can make it difficult to see where your hook is going, especially when working with dark-colored yarns. Good lighting helps maintain precision.
Neglecting to weave in ends securely is another common oversight. Loose ends can cause the join to unravel over time, so take the time to secure them properly.
Finally, rushing through the join often leads to visible mistakes. Take your time, especially on your first few attempts, to ensure every stitch aligns perfectly.
FAQ – Quick & Invisible Join for Granny Squares
1. Can I use the invisible join on any type of granny square?
Yes, this method works on most granny square designs, including traditional and modern variations, as long as they have consistent stitch counts along the edges.
2. Will the join be strong enough for blankets?
Absolutely. When done correctly, the invisible join is strong, flexible, and durable, making it perfect for blankets, garments, and accessories.
3. Do I need to block my squares before joining?
It’s highly recommended, as blocking ensures all squares are the same size, which is essential for a smooth and invisible join.
4. What hook size should I use for the join?
Use the same hook size you used for making the granny squares to maintain consistent tension and appearance.
5. Can I use this method with a contrasting yarn color?
Yes, but it will be more visible. If you want the join to truly disappear, use a matching yarn color.
6. Is this join suitable for beginners?
Yes, with a little practice, even beginners can master this technique and achieve professional results.
Conclusion
The Quick & Invisible Join for Granny Squares – Step by Step Tutorial is a game-changing technique for crocheters who value neatness, comfort, and professional-looking results.
By following the detailed instructions, tips, and troubleshooting advice in this article, you can join your squares seamlessly and elevate your crochet projects to the next level.
Now it’s your turn—try this method and see the difference for yourself. We’d love to hear your honest opinion and any suggestions you might have for improving the process. Your feedback can help other crochet enthusiasts perfect their own invisible joins.