
Creating a Santa Claus crochet fabric clip-Step by Step Tutorial is a delightful way to blend festive charm with handmade creativity. Many crafters love working on seasonal projects, and this tutorial offers a fun and accessible way to decorate gifts, hang ornaments, embellish clothing, or add a personalized touch to your holiday décor. The project is simple enough for beginners yet enjoyable for experienced crafters who want to create a cheerful Santa-themed accessory. Right from the first stitch to the final assembly, the Santa Claus crochet fabric clip-Step by Step Tutorial brings joy and satisfaction to anyone who loves holiday crafting.
This project combines the softness of crochet with the practicality of a fabric clip, making the final piece not only beautiful but also functional. The charm of this Santa Claus crochet fabric clip-Step by Step Tutorial lies in its versatility. You can use it as a hair clip, attach it to napkin holders, personalize gift wrapping, decorate Christmas trees, or even use it as a festive clothing accessory. With simple materials such as yarn, fabric, and a clip base, you can create a professional-looking piece that feels warm, handmade, and full of Christmas spirit.
Another wonderful aspect of this Santa Claus crochet fabric clip-Step by Step Tutorial is how easy it is to customize. You can choose different yarn colors, vary the size of Santa’s hat, adjust the beard texture, or add embellishments like small buttons or glittery touches. This freedom allows you to create a unique and expressive Santa clip that reflects your personal holiday style. Whether you want something classic and traditional or cute and playful, this project offers endless possibilities for creativity while staying beginner-friendly and enjoyable.
Materials You Need to Start the Santa Claus Crochet Fabric Clip
To begin the Santa Claus crochet fabric clip-Step by Step Tutorial, start by gathering all the necessary materials. You will need yarn in classic Santa colors such as red, white, and beige, along with a suitable crochet hook that matches your yarn thickness. Yarn should be soft but sturdy, as this will ensure the clip remains comfortable to wear and resistant to fraying. Choosing good-quality yarn helps your Santa figure look clean, bright, and long-lasting.
Next, prepare the fabric base for your clip. Felt is an excellent option because it is easy to cut, holds its shape well, and supports the crocheted piece firmly. You can choose red or white felt to match the design of your Santa. This makes the back of the clip smooth and comfortable, especially if you plan to use it as a hair accessory.
You will also need a clip base, which can be a metal snap clip, alligator clip, or even a simple brooch pin. This step in the Santa Claus crochet fabric clip-Step by Step Tutorial determines how you plan to use the final product. Alligator clips are great for hair accessories, while brooch pins work beautifully on clothing or gift wrapping.
Optional decorations can enhance your finished clip. Small beads, sequins, ribbon pieces, and fabric scraps can add charm and personality. Many crafters enjoy adding a tiny pom-pom to Santa’s hat or using a bead to represent his nose. These small details bring your piece to life.
You should also prepare scissors, fabric glue or hot glue, and a needle for sewing parts together. A fine needle helps attach the crocheted elements neatly without leaving visible marks. This ensures your clip looks polished and professional.
Finally, organize all materials on a clean, flat surface before starting the Santa Claus crochet fabric clip-Step by Step Tutorial. A tidy workspace makes the crafting process more enjoyable and allows you to work efficiently without losing small pieces or tools.
Step-by-Step Instructions to Crochet Your Santa Claus
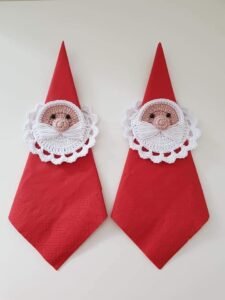
The first step in the Santa Claus crochet fabric clip-Step by Step Tutorial is to crochet Santa’s head. Start by making a small beige circle using basic stitches such as single crochet. Increase gradually to form a perfect round shape that will serve as the friendly face of your Santa Claus. This simple shape forms the foundation of the project.
Next, crochet the iconic red hat. Begin with a red yarn and form a small triangle by decreasing stitches row by row. The hat should be slightly curved to give Santa a charming, lively appearance. This part of the Santa Claus crochet fabric clip-Step by Step Tutorial is where your creativity begins to shine.
Once the hat is complete, create a fluffy white border using white yarn. This can be done by crocheting a short strip and attaching it to the base of the hat. You can also use fluffy or textured yarn to give it a realistic Santa hat effect. This step adds warmth and softness to the final design.
To craft Santa’s beard, use white yarn to crochet a wide semicircle or wavy pattern. This part is especially fun because you can choose how full or curly you want the beard to be. A textured yarn works well to give the beard a fluffy, snowy look.
Assemble the head, hat, and beard by sewing them together carefully. Secure each part so that it does not shift or come loose over time. This assembly step in the Santa Claus crochet fabric clip-Step by Step Tutorial ensures that your Santa figure looks cohesive and neatly crafted.
Finally, add facial details such as tiny eyes, a small nose, or even rosy cheeks using yarn, embroidery thread, or small beads. This final touch brings your Santa figure to life and gives him an adorable and festive expression.
How to Assemble the Fabric Clip Base
To continue the Santa Claus crochet fabric clip-Step by Step Tutorial, prepare the felt base by cutting a small shape that matches the back of your Santa figure. The felt piece should be slightly smaller than the crocheted Santa to keep it hidden while providing a stable foundation.
Next, attach your chosen clip base to the felt. Use either fabric glue or hot glue to secure the metal clip firmly. Press it down until it adheres completely. If using a brooch pin, sew it to the felt for extra durability. This step creates the functional part of your Santa clip.
After the clip base is secure, glue the crocheted Santa figure onto the felt. Apply glue only around the edges and not too close to the center, as this prevents excess glue from seeping through the yarn. The felt will support the crochet piece and prevent stretching or distortion.
Allow the glued pieces to dry fully. Drying time is crucial in the Santa Claus crochet fabric clip-Step by Step Tutorial because moving the pieces before they are set may cause misalignment. Make sure everything is firmly in place before handling the clip.
Once dry, check the stability by gently tugging the crochet piece. If any area feels loose, apply a small amount of additional glue under the edges. Secure and dry again. This ensures that your clip will withstand regular use and handling.
Finally, examine the clip closely for any visible glue marks or loose yarn ends. Trim and clean the edges for a polished look. Your Santa Claus clip is now ready to be used or gifted, beautifully completed from start to finish.
Creative Variations and Customization Ideas
One of the most enjoyable aspects of the Santa Claus crochet fabric clip-Step by Step Tutorial is experimenting with different design variations. For a classic look, stick with traditional red and white yarn, but you can also create modern versions using pastel shades or metallic yarns for a sparkling touch.
Some crafters like adding tiny embellishments such as miniature snowflakes, golden stars, or small ribbon bows to the hat. These decorative touches bring extra charm and personality to your Santa Claus clip. They also make each piece look unique and festive.
Another creative idea is to adjust the size of the clip. By increasing or decreasing stitches, you can make a large Santa for a decorative ornament or a tiny version for children’s accessories. This flexibility makes the Santa Claus crochet fabric clip-Step by Step Tutorial perfect for all crafting needs.
You can also customize Santa’s beard by changing the stitch pattern. Try a loop stitch for a fluffy beard, or a shell stitch for a wavy texture. Each version gives Santa a different look while still keeping the design adorable and recognizable.
For a cute twist, create a series of clips representing Santa’s friends—like reindeer, elves, or snowmen. This transforms your project into a whole holiday collection that can be used as decorations, gifts, or accessories. It adds variety while complementing the original Santa design.
Finally, consider personalizing your clip by adding initials or small embroidered details on Santa’s hat. This makes each piece even more meaningful, especially when giving it as a handmade Christmas gift.
Santa Claus Crochet Fabric Clip
1. Is the Santa Claus crochet fabric clip suitable for beginners?
Yes, this tutorial is beginner-friendly and uses simple crochet stitches that anyone can learn.
2. What type of yarn is best for this project?
Soft acrylic or cotton yarn works well because they are easy to handle and hold their shape nicely.
3. Can I use fabric glue instead of hot glue?
Yes, fabric glue is a good alternative as long as you allow enough drying time for secure bonding.
4. How long does it take to complete one clip?
Most people finish the clip in 30 minutes to 1 hour, depending on their crochet speed.
5. Can I wash the crochet fabric clip?
It is recommended to clean it gently with a damp cloth instead of fully washing to protect the felt and clip base.
6. Can I sell the finished clips?
Yes, this project is perfect for small handmade businesses, especially during the holiday season.
Conclusion
This Santa Claus crochet fabric clip-Step by Step Tutorial showed you how to gather materials, crochet the main components, assemble the clip, and personalize it with creative variations.
The project is fun, festive, and perfect for adding a handmade touch to your Christmas celebrations. I hope you enjoyed this tutorial and feel inspired to create your own Santa clip.
Please leave your sincere opinion and share suggestions for future tutorials—I would love to hear from you!