
If you’re looking for a creative and charming way to elevate your handmade projects, this Simple crochet flower for application – Step by Step Tutorial is the perfect place to begin. Whether you’re a beginner or an experienced crocheter, this tutorial will guide you through creating a lovely crochet flower that can be used in a wide variety of applications. From accessorizing clothing to enhancing bags, hats, baby blankets, or home decor items, a crochet flower adds a delicate, personal touch to everything it’s attached to.
What makes this project so appealing is its simplicity and versatility. You don’t need a lot of yarn or special materials. A small amount of your favorite yarn and a matching hook is all it takes to create something truly beautiful. This Simple crochet flower for application – Step by Step Tutorial breaks down each stage of the process clearly, making it accessible to those who are just learning the craft as well as those wanting a quick, satisfying project.
Throughout this article, we’ll use SEO-optimized language to ensure that those searching for an easy and engaging crochet flower tutorial can find exactly what they need. We’ll explain each term and process in a humanized tone, while also following the guidelines that keep this content Google AdSense-friendly, clear, and enjoyable. So, grab your hook, choose your yarn, and let’s bring these delightful blooms to life!
Materials and Tools You Will Need
Before we dive into the instructions, let’s prepare everything you need to get started with this Simple crochet flower for application – Step by Step Tutorial. Having the right materials and understanding how they work together will ensure a smoother process and a prettier result.
To begin, you will need a crochet hook that matches the thickness of your yarn. For this tutorial, a 3.5 mm or 4 mm hook works great with medium-weight yarn. The yarn should be soft, preferably cotton or acrylic, for a neat finish and long-lasting wear.
Scissors are essential for cutting your yarn cleanly. A yarn needle will also come in handy at the end for weaving in ends and attaching your flower to your desired item. Stitch markers are optional but can be useful for keeping track of rounds, especially if you’re still getting used to counting stitches.
Choose colors that complement your main project. You can use one solid color for a classic look or multiple shades to create more vibrant, layered flowers. This flexibility allows you to make each simple crochet flower uniquely yours.
Having a flat surface to work on will make it easier to keep your work neat and help you avoid mistakes. A notebook or digital note app can be helpful for jotting down any variations you might want to try later.
Once you have your materials set up and your space ready, you’re all set to begin following this Simple crochet flower for application – Step by Step Tutorial and create something truly delightful.
Step-by-Step Instructions to Make the Crochet Flower
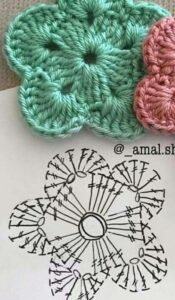
The process of creating a simple crochet flower begins with a magic ring, which is a foundational technique in many crochet projects. To make a magic ring, loop the yarn around your fingers and pull a loop through the center with your hook. This allows you to crochet into the loop and tighten it afterward, creating a clean center for your flower.
After forming the magic ring, chain two. This acts as your first stitch and sets up the round. Now work six single crochets into the magic ring. This will form the base of your flower. Pull the tail end of the yarn to close the ring tightly and join with a slip stitch into the first single crochet.
Next, we move on to forming the petals. Each petal begins with chaining two, followed by two double crochets into the same stitch, and then chaining two again. Slip stitch into the next stitch to secure the petal and begin the next one. Repeat this pattern in every stitch around.
You should now have six petals, each forming a soft loop. At this point, your simple crochet flower for application is taking shape. You can finish off here or add another round of petals to give your flower a fuller look. To add a second layer, slip stitch to the back loops of the original base stitches and repeat the petal pattern.
Once your desired number of petals is complete, cut the yarn, leaving a small tail. Pull it through the loop to fasten off. Use your yarn needle to weave in the ends securely, especially if your flower will be attached to clothing or accessories.
With the steps complete, you’ve now created your first simple crochet flower for application. The beauty of this design lies in how quick and satisfying it is to make—perfect for gifts, decoration, or even building a collection of handmade appliques.
Creative Ways to Use Your Crochet Flower
Once your simple crochet flower is complete, the real fun begins—deciding how and where to use it. This flower is incredibly adaptable, making it ideal for a wide range of craft and fashion applications.
One popular use is on baby hats or headbands. A single crochet flower sewn onto a soft cotton headband adds a sweet and handmade charm. Choose gentle pastel colors for a delicate appearance or bold tones for a playful look.
You can also sew your flowers onto bags or purses. Whether you’re decorating a simple tote or embellishing a crossbody bag, the flower adds a splash of color and personality. Try arranging three flowers of different sizes for a layered effect.
Home decor is another great use for these flowers. Add them to pillowcases, napkin rings, or even garlands. String multiple flowers together using a simple chain stitch for a seasonal decoration or party accessory.
Clothing can also benefit from this touch of crochet creativity. Add a flower to the neckline of a t-shirt or the hem of a skirt. If you’re a fan of upcycling, this is a beautiful way to refresh an old item with new life.
These flowers also make adorable brooches or pins. Simply glue or sew a safety pin to the back and wear your bloom proudly. You can also attach them to hair clips or barrettes for a fun, handmade hair accessory.
No matter how you use it, each simple crochet flower for application adds a handmade touch that turns ordinary items into something special. The possibilities are endless, limited only by your creativity and imagination.
Tips to Customize and Modify Your Crochet Flower
Even though this is a Simple crochet flower for application – Step by Step Tutorial, there are many ways to personalize your flower to suit your project’s needs. You can begin by adjusting the number of petals. Adding more petals or making double-layered ones creates a fuller and more textured look.
Another way to customize your flower is by using different yarn types. A shiny silk or glitter-threaded yarn adds a more elegant touch, perfect for festive or formal items. Chunky yarn can be used for a bolder statement flower for blankets or home decor.
Changing the petal shape also makes a big difference. Try making longer petals by adding more double crochets into each petal section. Alternatively, using half-double or treble crochets will alter the shape and size in unique ways.
Color changes offer endless creative possibilities. You could alternate colors with each petal or make the center of the flower a different shade. This works especially well when matching your flower to other colors in a project.
Adding beads or buttons to the center of your flower is a charming touch. Simply sew a small button or glue a bead in the middle for added sparkle and texture. This detail gives your simple crochet flower a polished, finished look.
Lastly, consider making sets of flowers in different sizes. Smaller versions can be used for earrings or tiny accents, while larger flowers make bold focal points. The same pattern can be easily adapted by using finer or bulkier yarn and smaller or larger hooks.
FAQ – Simple Crochet Flower for Application
Q: How long does it take to crochet a simple flower?
A: For most people, a simple crochet flower takes about 15–30 minutes to complete. Once you’re familiar with the pattern, it becomes a quick and relaxing project.
Q: Can I make this flower with any type of yarn?
A: Yes, you can use any yarn, though cotton or acrylic yarn tends to give the best shape and structure. Finer yarns will make smaller flowers, while thicker yarns will produce larger ones.
Q: What crochet level is needed for this tutorial?
A: This Simple crochet flower for application – Step by Step Tutorial is suitable for beginners. If you know how to chain, single crochet, and double crochet, you’re ready to go!
Q: How do I attach the flower to clothing or accessories?
A: You can use a yarn needle and the tail of your yarn to sew the flower securely onto fabric. For non-fabric items, glue can work, but sewing is usually more durable.
Q: Can I wash items with these flowers attached?
A: Yes, but it’s best to hand wash or use a gentle cycle, especially if the yarn is delicate. Make sure the ends are woven in well to prevent unraveling.
Q: Can I sell items made with this flower?
A: Absolutely! Handmade flowers are popular in markets and online shops. Just make sure to present your own photos and descriptions if you’re sharing the pattern.
Conclusion
Creating a Simple crochet flower for application is a joyful and accessible project for crafters of all levels. In this step-by-step tutorial, we explored everything from materials and tools to how to make the flower, how to customize it, and how to use it in creative ways.
Whether you’re adding it to a hat, bag, or pillow, this versatile little flower brings warmth and charm wherever it’s used. It’s quick to make, requires minimal materials, and is easy to learn—making it ideal for gifts, decorations, or just a relaxing evening project.
If you’ve followed along and made your own crochet flower, we’d love to hear about it! Please leave a sincere opinion or suggestion below. Your feedback helps us continue bringing you helpful, creative tutorials tailored to your interests. Happy crocheting!