
If you are looking for a creative and practical project, this Simple Sunflower Crochet Coaster- Step by Step Tutorial will guide you through the entire process in a fun and easy way. Crochet coasters are perfect for adding a touch of handmade charm to your home while protecting your furniture from watermarks and scratches. This sunflower design adds a bright and cheerful vibe that can instantly lighten up any room.
The best part about following a Simple Sunflower Crochet Coaster- Step by Step Tutorial is that you do not need to be an expert in crochet to achieve beautiful results. Whether you are a beginner or someone with years of crochet experience, this tutorial breaks everything down into clear steps. Each stage is simple to follow, ensuring that even someone new to the craft can create a functional and attractive coaster.
In this guide, we will cover everything from choosing the right materials to completing the final sunflower details. You will learn about the stitches used, tips for achieving neat edges, and ways to customize your coasters with different color combinations. By the end, you will have your own set of handmade sunflower coasters, perfect for personal use or as thoughtful gifts for friends and family.
Materials and Preparation for the Sunflower Coaster
Before starting the Simple Sunflower Crochet Coaster- Step by Step Tutorial, the first step is gathering all the necessary materials. Having everything ready makes the entire process smoother and helps you stay organized throughout the project.
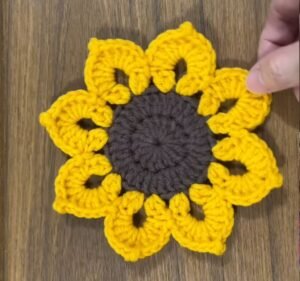
You will need cotton yarn in two or three colors. Traditionally, yellow is used for the sunflower petals, brown or black for the center, and green if you want to add a small leaf detail. Cotton yarn works best for coasters because it is absorbent and durable.
A crochet hook suitable for your yarn size is also essential. Usually, a 3.5mm or 4mm hook works well for medium-weight cotton yarn. Make sure to check the yarn label for hook recommendations so your coaster turns out the right size and texture.
You will also need scissors for trimming yarn ends and a yarn needle for weaving in loose ends at the end of the project. A stitch marker can be helpful if you are new to crochet, as it allows you to keep track of your rounds more easily.
Before beginning, choose the size of your coaster. The standard size is usually around 4 to 5 inches in diameter, but you can adjust the number of rounds to make it larger or smaller depending on your preference.
Preparing your workspace is equally important. Find a comfortable spot with good lighting, as this makes it easier to see your stitches clearly, especially when working with darker yarn colors.
Step-by-Step Instructions for the Sunflower Center
Now we can start the actual Simple Sunflower Crochet Coaster- Step by Step Tutorial by creating the center of the sunflower. This part is typically done in brown or black yarn to mimic the natural sunflower look.
Begin by making a magic ring or chain four and slip stitch to form a circle. The magic ring method is preferred because it allows you to close the center tightly without leaving a hole in the middle.
Next, crochet a series of double crochets into the center of the ring. Usually, 12 to 14 double crochets are enough to form a neat round base. This round creates the foundation for the entire coaster.
Join the last stitch to the first with a slip stitch to close the round neatly. If you want a slightly larger center, you can make a second round by increasing each stitch around.
Remember to keep your tension even throughout. Uneven stitches can make the coaster look lopsided, so try to maintain a consistent rhythm as you work.
Once the center is complete, cut the yarn and secure it tightly before moving on to the next color for the sunflower petals.
Crocheting the Sunflower Petals
The most exciting part of this Simple Sunflower Crochet Coaster- Step by Step Tutorial is creating the bright and cheerful petals. Switch to yellow yarn for this step to bring the sunflower to life.
Start by attaching the yellow yarn to any stitch on the brown center. You will be creating petal shapes by working chains and double crochets into each stitch around the circle.
A common method is to chain three, make two double crochets in the same stitch, chain three again, and slip stitch into the next stitch. This creates a pointed petal shape that repeats around the entire center.
Continue this process until you have worked petals all around. The number of petals will depend on how many stitches were in your center round, but usually, you will end up with about 12 to 14 petals.
If you want fuller petals, you can make each one with three double crochets instead of two. This gives the sunflower a more textured and realistic look.
Once all petals are complete, slip stitch into the first stitch to close the round neatly. Cut the yarn, leaving a small tail to weave in later.
Finally, use your yarn needle to hide all loose ends on the back side of the coaster so it looks neat and professional.
Adding Details and Finishing Touches
To complete the Simple Sunflower Crochet Coaster- Step by Step Tutorial, you can add optional details like a green leaf or a second round of petals for a layered effect. These small touches can make your sunflower coaster stand out even more.
To add a leaf, attach green yarn to the base of one of the petals. Chain four, then work single crochets back down the chain to create a simple leaf shape. This is completely optional but adds a nice decorative element.
Some people like to make a second round of petals behind the first. To do this, attach yellow yarn to the back loops of the center round and repeat the petal process. This gives the coaster a fuller, three-dimensional appearance.
Blocking your coaster is highly recommended. Lightly wet it and pin it flat to dry. This helps even out the stitches and gives the coaster a smooth, professional finish.
If you want a set of coasters, simply repeat the steps several times. You can experiment with different colors for fun variations, such as red petals for a poppy-inspired look.
When finished, your sunflower coaster is ready to brighten up your home, protect your tables, and impress your guests with its handmade charm.
FAQ about Simple Sunflower Crochet Coaster- Step by Step Tutorial
1. Is this project suitable for beginners?
Yes, the Simple Sunflower Crochet Coaster- Step by Step Tutorial is perfect for beginners because it uses basic stitches like chains, slip stitches, and double crochets.
2. How long does it take to make one coaster?
On average, it takes about 45 minutes to one hour to complete one coaster, depending on your crochet speed.
3. Can I use different yarn types?
Cotton yarn is best for absorbency, but you can use acrylic if you prefer decorative coasters instead of functional ones.
4. How do I clean the coasters?
Handwashing with mild soap is recommended to maintain the shape and color.
5. Can I sell the finished coasters?
Yes, handmade sunflower coasters make wonderful items for craft fairs or online shops, as long as the design is your own creation.
6. How can I make the coaster larger?
You can increase the size by adding more rounds to the center before making the petals.
Conclusion
This Simple Sunflower Crochet Coaster- Step by Step Tutorial has shown you how to create a bright, cheerful, and practical accessory for your home.
From gathering materials to making the center, petals, and final touches, every step was explained clearly to ensure success even for beginners.
Now it’s your turn to give it a try! We would love to hear your honest opinion and any suggestions you may have for future tutorials. Share your experience and let us know how your sunflower coasters turned out.